Hackaday Logo Projector From A Single LED

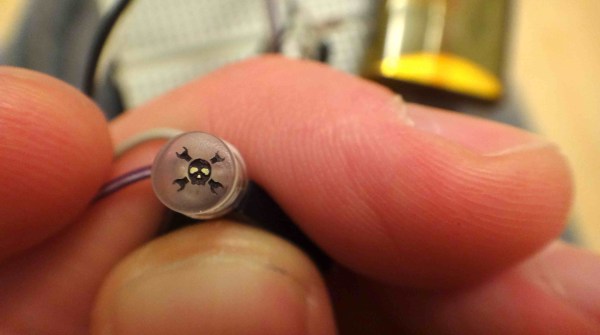
Here’s another Trinket Contest entry that was interesting enough for its own feature. [Adam] made his own Hackaday version of the Bat signal. It’s not nearly as big, but the concept is the same. Using this single modified LED he’s able to project a 12″ image that seems quite well-defined (more pictures below).

The LED is one he pulled from an old flashlight. After sanding the dome flat he made a jig which positioned it inside of his laser cutter. From there he etched the 0.1″ logo and filled the negative space with some ink. The remaining surface was polished to help the light shine through, then positioned in front of a jeweler’s loupe to magnify the image.

There’s just a couple of hours left before the Trinket Contest draws to a close. Get your entry in for a chance to win!

Continue reading “Hackaday Logo Projector From A Single LED”

Microslice: The Tiny Arduino Laser Cutter

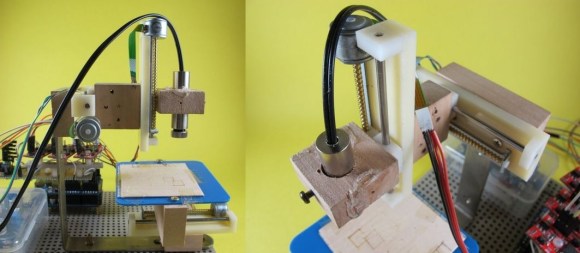
[SilverJimmy] already had a full-sized 50 watt laser cutter, but he decided to try his hand at putting together something smaller and microcontroller-driven. The result is this adorable little engraver: the MicroSlice.

To keep the design simple, [SilverJimmy] opted for a fixed cutting table, which meant moving the cutting head and the X-Axis as a unit along the Y-Axis. The solution was to take inspiration from gantry cranes. He snagged a couple of stepper motors with threaded shafts, designed the parts in Inkscape, then fired up his full-size cutter to carve out the pieces. An Arduino Uno and the relays for the laser and fans sit on the MicroSlice’s bottom platform, and two EasyDriver motor controllers sit above them on the next layer.

Swing by the Instructables for more details including the source code, and to see a video of the engraver below. [SilverJimmy] sourced his laser from eBay, but check out the engraver from earlier this year that used a DVD diode.

Continue reading “Microslice: The Tiny Arduino Laser Cutter”

Woodcut Stamps And Conductive Ink

circuit

Even though it’s been a while since the Rome Maker Faire, we’re still getting some tips from the trenches of Europe’s largest gathering of makers. One of these is a 30-minute experiment from [Luong]. He wondered if it would be possible to create SMD circuit boards by using a 3D printer to fabricate a stamp for conductive ink.

[Luong] told this idea  to a few folks around the faire, and the idea eventually wound up in the laps of the guys from TechLab. the Chieri, Italy hackerspace. They suggested cutting a wooden stamp using a laser cutter and within 30 minutes of the idea’s inception a completed stamp for an Atari Punk Console PCB was in [Luong]’s hands.

As an experiment, the idea was a tremendous success. As a tool, the stamp didn’t perform as well as hoped; the traces didn’t transfer properly, and there’s no way this wooden laser cut stamp could ever create usable PCBs.

That being said, we’re thinking [Luong] is on the right track here with printed PCBs. One of the holy grails of home fabrication is the creation of printed circuit boards, and even a partial success is too big to ignore.

This idea for CNC-created PCB stamps might work with a different material – linoleum or other rubber stamp material, or even a CNC milled aluminum plate. If you have any ideas on how to use this technique for PCB creation, leave a note in the comments, or better yet, try it out for yourself.

Custom Wireless Headphone Charging Station

wirelessHeadphoneChargingStation

We’ve come to expect quite a lot of convenience from our technology, to the point where repeatedly plugging in a device for recharging can seem tedious. Hackaday regular [Valentin Ameres] decided to ditch the plugs and built his own wireless headphone charger. We’ve seen [Valentin’s] work before, and one thing’s for certain: this guy loves his laser cutter. And he should, considering it’s churned out key components for a gorgeous Arc Reactor replica and his Airsoft Turret. [Valentin] fired it up yet again to carve the charging stand out of acrylic, then used a small torch and the edge of a table to bend the stand into shape.

He sourced the needed coils online and soldered the receiving coil to a spare miniUSB plug. These components are glued onto a laser-cut acrylic attachment, which fits against the side of the headphone and is held in place by plugging directly into the earpiece’s miniUSB jack. The headphones rest on the laser-cut charging stand, which has an extrusion of acrylic on one side that holds the emitter coil in position against the receiver coil. [Valentin] also added a simple momentary switch at the top of the stand to activate both the emitter coil and a status LED when pressed by the headphones.

Stick around for a video of the build below, and check out some other headphone hacks, like adding a Bluetooth upgrade or making a custom pair out of construction earmuffs.

Continue reading “Custom Wireless Headphone Charging Station”

OpenFuge: An Open-source Centrifuge

openFuge

Biohackers, fire up your laser cutters. [CopabX] has developed OpenFuge: a (relatively) low-cost, open-source centrifuge from powerful hobby electronic components. If you thought the VCR centrifuge wasn’t impressive, trolls be damned— OpenFuge can crank out 9000 RPM and claims it’s capable of an impressive 6000 G’s. [CopabX] also worked in adjustable speed and power, setting time durations, and an LCD to display live RPM and countdown stats.

And it’s portable. Four 18650 lithium cells plug into the back, making this centrifuge a truly unique little build. The muscle comes from a DC outrunner brushless motor similar to the ones that can blast you around on a skateboard but with one key difference; an emphasis on RPMs over torque. We’re not sure exactly which motor is pictured, but one suggestion on the bill of materials boasts a 6000 KV rating, and despite inevitable losses, that’s blazing fast at nearly 15V.

You’ll want to see the demonstration video after the break, but also make time to swing by Thingiverse for schematics and recommended parts.

Continue reading “OpenFuge: An Open-source Centrifuge”

Fail Of The Week: Laser Cutter That Makes Jagged Edges

This Fail of the Week is really only a failure because of the standards to which [eLabz] holds himself. The rig pictured above is a laser cutter built out of DVD drive parts. It goes above and beyond most of the optical drive CNC projects we see around here — it actually makes cuts! But [eLabz] looks on it as a failure because the steps of the driver motors are visible as jagged edges in those cuts. We see this more as a pausing point in the development process before the next refinement is made.

Continue reading “Fail Of The Week: Laser Cutter That Makes Jagged Edges”

Laser Cutter Helps Make Dual Sided PCBs

laser-cutter-dual-sided-pcb

[Rich Olson] wrote in to share his technique for making dual-sided printed circuit boards using a laser cutter. Unfortunately this still depends on etching copper clad boards with chemicals. But his process makes it really easy to produce well-defined and precisely aligned etch resist on both sides of the board all at once.

This can be really tough to do with the toner transfer method. The most common way would be to use a light box to align the two printouts of resist, taping them together before putting the copper clad in between and sending the whole thing though a laminator. [Rich] uses a scrap of acrylic to ensure alignment. He tapes it to the bed of his Epilog laser cutter and cuts the board outline out (that’s the void you see in the image). He removes the scrap and uses it as a stencil for cutting out the copper clad. After prepping the board he coats both sides and sends it through the laser cutter to burn away the paint where he wants to remove copper. Don’t miss his video embedded after the break.

The acrylic outline trick is similar to the laser cutter fence we heard about several weeks back.

Continue reading “Laser Cutter Helps Make Dual Sided PCBs”