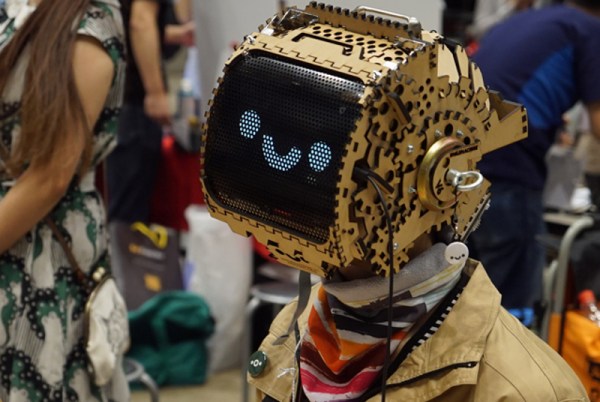
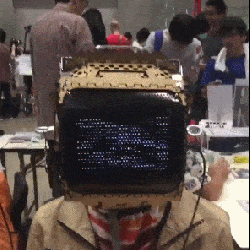
Part performance art and part social experiment, [mocymo]’s Smilemachine V6 helmet is as delightful as it is expressive. The helmet is made primarily from laser-cut MDF assembled around parts from a safety helmet. The display is an Android tablet with fine operation controlled by a Bluetooth mini keyboard, and the helmet cleverly makes use of the tablet’s ability to adjust the display to compensate for head tilt angle. It recently made an appearance at Maker Faire Tokyo, where the creator says the reception (especially by children) exceeded expectations.
There are several interesting things done with this device. One is the handheld controller, which is essentially a mini Bluetooth keyboard. To help allow fine control without needing to look down at the controller, the keyboard sits in a frame with some nuts and bolts used as highly tactile button extensions. By allowing the user to change the physical button layout (and setting up keyboard shortcuts on the device to match) the arrangement can be made more intuitive for the user. Some photos of this assembly are in the gallery after the break.
Geared mirrors to allow seeing out the front of the helmet.
Another interesting bit is that despite a tablet being right in front of your eyes, it is possible to see out the front of the helmet while wearing it. The solution is completely low-tech: two mirrors form a periscope whose angle can be adjusted by turning a knob on the side of the helmet.
Version 1 of the helmet was started back in 2012; this is version 6 and [mocymo] is already filling out a to-do list for refinements. The nose area is uncomfortable, the angle of periscope is slightly off and the gearing needs to be reworked, among other things. We can’t wait to see Version 7. Video and gallery are embedded below.
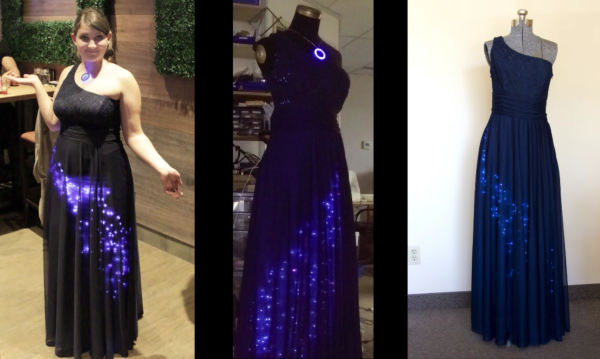
[Dave Hrynkiw] wrote up some practical and useful detail around embedding electronics into clothing. It centers around his daughter’s “Starry Night” high school graduation dress, which is the culmination of a lot of experimentation in finding the best way to do things. His daughter accented the dress with LEDs to produce a twinkling starfield effect, and a laser-cut RGB pendant to match.
While [Dave] is the president of Solarbotics and pitches some products in the process of writing it all up, the post is full of genuinely useful tips that were all learned though practical use and experimentation. Imagine how awesome it must be growing up a child of a “local technology-hacking company” founder — akin to growing up as Willy Wonka’s progeny.
What advice does [Dave] have for making electronics an awesome part of garments? For example, the fact that regular hookup wire isn’t very well suited to embedding into clothing due to the need for high flexibility. There is also the concept of sequestering electronics into a separate Technology Layer — a must for anything that will be used more than once. The idea is to “build your technology so it can be isolated from the fashion aspect as much as possible. It makes building and maintenance of both the fashion and technology aspects much simpler.”
Slapping some LEDs and a battery pack into clothing might do the trick if all you care about is some bling, but if you want something that actually highlights and complements clothing while also being able to stand up to repeated use, this is a great read. A simple lighting effect that complements a design isn’t difficult, and there’s no need to reinvent the wheel or make the same mistakes others have encountered. Video is embedded below.
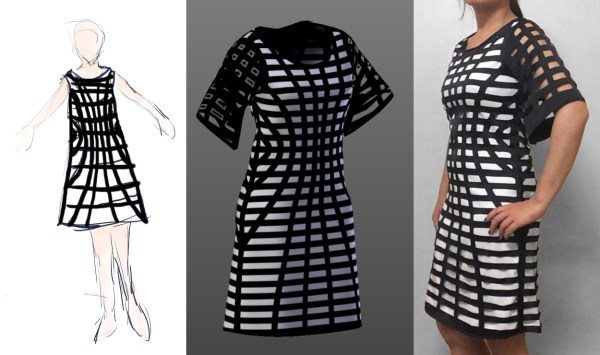
After sketching the design on paper, the design process moves into the digital domain, where an accurate 3D model of the wearer is required. [Nancy] created hers with Make Human, a free software that creates to-size avatars of humans from tape-measured parameters. Using the professional garment modeling software MarvelousDesigner (which offers a 30 day trial version), she then created the actual layout. The software allows her to design the cutting patterns, and then also drapes the fabric around the human model in a 3D garment simulation to check the fit. The result are the cutting patterns and a 3D model of the garment.
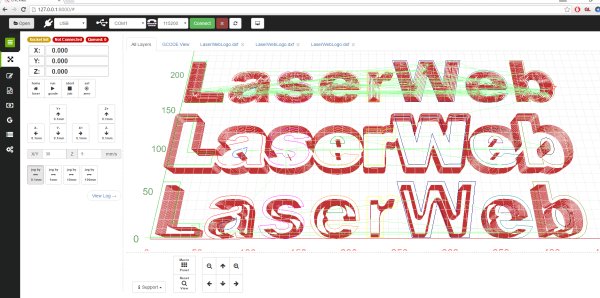
The LaserWeb project recently released version 3, with many new features and improvements ready to give your laser cutter or engraver a serious boost in capabilities! On top of that, new 3-axis CNC support means that the door is open to having LaserWeb do for other CNC tools what it has already done for laser cutting and engraving.
LaserWeb3 supports different controllers and the machines they might be connected to – whether they are home-made systems, CNC frames equipped with laser diode emitters (such as retrofitted 3D printers), or one of those affordable blue-box 40W Chinese lasers with the proprietary controller replaced by something like a SmoothieBoard.
We’ve covered the LaserWeb project in the past but since then a whole lot of new development has been contributed, resulting in better performance with new features (like CNC mode) and a new UI. The newest version includes not only an improved ability to import multiple files and formats into single multi-layered jobs, but also Smoothieware Ethernet support and a job cost estimator. Performance in LaserWeb3 is currently best with Smoothieware, but you can still save and export GCODE to use it with Grbl, Marlin, EMC2, or Mach3.
The project is open to contributions from CNC / Javascript / UX developers to bring it to the next level. If you’re interested in helping bring the project even further, and helping it do for 3-axis CNC what it did for Laser Cutting, project coordinator [Peter van der Walt] would like you to head to the github repository!
We recently shared a lot of great information on safe homebrew laser cutter design. Are you making your own laser cutting machine, or retrofitting an existing one? Let us know about it in the comments!
With more and more previously industrial processes coming online in the home shop, people are finding that getting the information that was previously provided by the manufacturer of a hundred thousand dollar machine for their three hundred dollar Shenzen special is not easy.
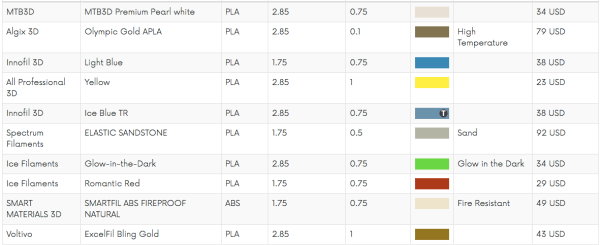
Some early work from UFID shows how even different Slic3rs can change the expected material properties of a filament.
A common example is this, a hacker purchased themselves a brand new 3D printer off amazon for a price too good to be true. After a week of tinkering with it, a small fire, and a few replacement parts later, they get it to work. After they’ve burned through, perhaps literally, the few hundred grams of filament that came with the printer at the setting recommended by the manufacturer, they do a small blanket order of the different filaments out there. Now comes the trouble, each printer is a little different and each filament has different properties. Most people find that the second spool of filament they feed into their printer doesn’t work at all. What’s the quickest way to get the right temperature, cooling, and feed settings for your printer configuration?
This isn’t a problem for the expensive machines. Epilog, a manufacturer of laser cutters, provides a grid of settings for each material you’re likely to cut, tuned to the different properties of each model of laser cutter they sell. Same goes for the expensive industrial 3D printers, each (very expensive) spool of material has the setting sitting in a chip in the casing. When the spool is slotted in the machine, it reads the settings and adjusts accordingly. All the work of tuning was done in a lab somewhere and the print is, theoretically, guaranteed.
Your Oshpark order would get delayed, your Lulzbot support case would be dropped, Teensies would ship late, and the Amp Hour would just be the EEVBlog Podcast if this bar burnt down, but it was a great event!
While we were at the Bay Area Makerfaire 2016, we had a chance to talk to [Gauthier de Valensart] and buy him a beer at the Hackaday Meet-up. [Gauthier] is from Belgium where he is the founder of a start-up with one of those fancy new TLDs: filaments.directory. The goal of filaments.directory is to create a database of 3D printer materials and link that up with a user’s 3D printer settings. The eventual goal being, much like the industrial printers, a user would be able to simply scan a barcode, or wave the spool over an RFID reader to input the needed settings into his slicing software or printer.
This sounded familiar to me, not the least because I had started work on it as an extension for repables.com when that was a larger focus in my life. In fact, I remember, while I was kicking the idea around to people at MRRF, that they kept telling me someone else was working on a similar project. I wanted to introduce [Gauthier] to the person who was working on the project back then. Since I was at a bar full of people in the industry, I sort of helplessly rotated in my spot trying to find someone who might remember. I spied [whosawhatsis], a common attendee of MRRF, and asked him. Okay, that was easy, [whosawhatsis] informed us that is was his project… introduction complete. Goes to show you what a good networking event buying a bunch of nerds beer can be.
They got a pretty okay logo while they were at it.
The project was called, “Universal Filament Identification System,” and it proposed to, “… eliminate the guess-work,” by, “…developing a method for tagging, tracking, and identifying filament for 3d printing in machine-readable formats…” The project appears to be mostly dead now and its domain is a placeholder. I think it suffered from the standard open source feature creep, but the idea is sound.
Which gets us to the questions. There are a lot of difficulties with creating such a system. The first being the data collection. Who should be responsible for measuring the filaments, the materials for laser cutting, or any other process that needs tuned settings? The ideal track, of course, would be for the manufacturers to hold themselves accountable and report on the settings for their filaments. However, many filament manufacturers rely on the ignorance of users to sell dodgy products, it’s only in the interest of a few top-quality ones to do so. If the users do so, then how will the information provided be vetted? You definitely don’t want someone’s ignorance about a faulty thermistor to encourage you to run PLA at 280C.
More and more difficulties arise. How should the information be transferred, etc. What properties should even be recorded? UFID was going as far as to use a color sensor to keep track of colors between batches from 3D printer manufacturers. In the end it’s about creating standards in a standard-less industry by using crowdsourcing. Either way, take a look at what [Gauthier]’s doing (and send him some feedback), read the backlogs of UFID, think about how annoying it was to get the right settings for a laser cutter the last time you used one, and let us know your thoughts in the comments.
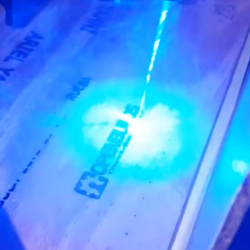
Laser cutters are CNC power tools, which means an operator uploads a job digitally and then pushes START to let the machine do all the work while they lie back in a hammock sipping a margarita, occasionally leaping out in a panic because the sound coming from the machine changed slightly.
Like other power tools, laser cutters are built around doing one thing very well, but they require an operator’s full attention and support. The operator needs to handle all the other things that go on before, during, and after the job. It’s not too hard to get adequate results, but to get truly professional and repeatable ones takes work and experience and an attention to detail.
People often focus on success stories, but learning from failures is much more educational. In the spirit of exploring that idea, here are my favorite ways to fail at laser cutting and engraving. Not all of these are my own personal experience, but they are all someone’s personal experience.
Optical microscopy is over 400 years old, and in that time, it has come a long way. There are many variations of microscopes both in the selection of lenses, lighting, and other tricks to allow an instrument to coax out more information about a sample.
One proven way to increase the resolving power of a microscope is oil immersion. The sample and the lens are placed in oil that is transparent and has a high refractive index. This prevents light from refracting at the air-coverslip interface, improving the microscope’s overall performance.
The University of New South Wales has a lab that uses such a microscope. They use a special (and expensive) chamber to hold down the glass coverslip and contain the oil. The problem? At nearly $400 a pop, the chambers are a constant expense to replace, and they are not flexible enough to handle custom size requirements.
[Ben Goodnow], a first year student at the university, applied his 3D printing and laser cutting know-how to design and build a suitable chamber that costs much less and can be adapted to different projects. In addition to all the design files on GitHub, there’s also a document (PDF) that describes the design iterations and the total cost savings.
 Part performance art and part social experiment, [mocymo]’s Smilemachine V6 helmet is as delightful as it is expressive. The helmet is made primarily from laser-cut MDF assembled around parts from a safety helmet. The display is an Android tablet with fine operation controlled by a Bluetooth mini keyboard, and the helmet cleverly makes use of the tablet’s ability to adjust the display to compensate for head tilt angle. It recently made an appearance at Maker Faire Tokyo, where the creator says the reception (especially by children) exceeded expectations.
 LaserWeb3 supports different controllers and the machines they might be connected to – whether they are home-made systems, CNC frames equipped with laser diode emitters (such as retrofitted 3D printers), or one of those affordable blue-box 40W Chinese lasers with the proprietary controller replaced by something like a