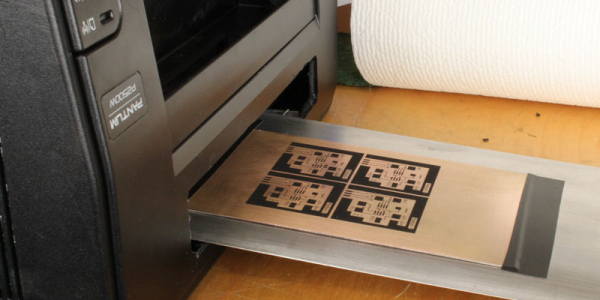
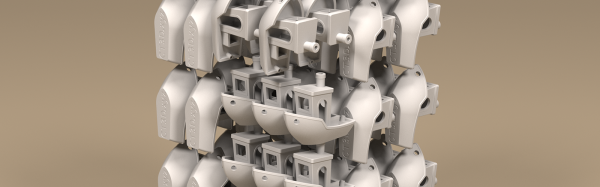
OpenExposer, The DIY SLA Printer

printer

Precisely applied ultraviolet light is an amazing thing. You can expose PCBs, print 3D objects, and even make a laser light show. Over on the Projects site, [Mario] is building a machine that does all of these things. It’s called the OpenExposer, and even if it doesn’t win the Hackaday Prize, it’s a great example of how far you can go with some salvaged electronics and a 3D printer.

The basic plan of the OpenExposer is a 3D printer with a small slit cut into the bed, and a build platform that moves in the Z axis. The bed contains a small UV laser and a polygon mirror ripped from a dead tree laser printer. By moving the bed in the Y direction, [Mario] shoot his laser anywhere on an XY plane. Put a tank filled with UV curing resin on the bed, and he has an SLA printer. Put a mounting bracket on the bed, and double-sided PCBs are a cinch.

The frame is made of 3D printed parts and standard RepRap rods, with the only hard to source component being the polygonal mirror. These can be sourced from scrounged laser printers, but there’s probably some company in China that will sell them bulk. The age of cheap SLA printers is dawning, friends. Video below, github here.

Continue reading “OpenExposer, The DIY SLA Printer”

Toner Transfer PCBs, Double Sided, With Color Silkscreen

Silk

Making a few PCBs with the toner transfer method is a well-known technique in the hacker and maker circles. Double-sided PCBs are a little rarer, but still use the same process as their single-sided cousins. [Necromancer] is taking things up a notch and doing something we’ve never seen before – double-sided PCBs made at home, with color silkscreens, all make with a laser printer.

For laying down an etch mask, [Necro] is using a Samsung ML-2167 laser printer and the usual toner transfer process; print out the board art and laminate it to some copper board.

The soldermasks use a similar process that’s head-slappingly similar and produces great results: once the board is etched, he prints out the solder mask layer of his board, laminates it, and peels off the paper. It’s so simple the only thing we’re left wondering is why no one thought of it before.

Apart from the potential alignment issues for multiple layers, the only thing missing from this fabrication technique is the ability to do plated through holes. Still, with a laser printer, a laminator, and a little bit of ferric or copper chloride you too can make some very nice boards at home.

Modifying A Printer For PCB Fabbing

ohgodmyeyes

The migraine-inducing image above is the product of [Rupert Hirst]’s attempts at home PCB fabrication. He’s using the toner transfer method – printing a circuit on a piece of transparency sheet with a laser printer, setting it on a piece of copper clad board, and sending the whole assembly through a laminator. It’s a fairly straightforward process, but if you can’t run a transparency sheet through a printer multiple times your etch resist won’t hold up too well. Of course the transparency sheet must be aligned each time it goes through the printer, so [Rupert] came up with a modification that ensures laser toner goes only where it’s supposed to.

[Rupert] picked up a Samsung ML-2165W laser printer for his PCB fab shop, but printing the same image multiple times on the same transparency sheet would result in unusable masks. This problem was fixed with a few plastic shims used to hang door frames and a card stock tray that ensures the transparency sheet goes through the printer the same way every time.

We saw [Rupert]’s homebrew PCB fabrication process a few weeks ago when he sent in his six channel floppy drive MIDI synth. In his build video, [Rupert] demonstrated what is possibly the cleanest toner transfer PCB we’ve seen to date. You can check out his etching process in the video after the break.

Continue reading “Modifying A Printer For PCB Fabbing”

Separating A Working Scanner From Its Broken Printer

The laser printer portion of this all-in-one machine gave up the ghost and [Entropia] couldn’t get it working again. But the scanner was still functioning so he decided to separate the scanner from its dead printer module.

The model in question is a Samsung SCX-4200. The design is actually perfect for separation because the scanner sits on top of the out feed tray of the printer. It can even be lifted to allow more room for printed pages to pile up. All he has to do is separate the hinged connector and reroute the flat cables. But the real question in [Entropia’s] mind was whether or not the control board would work without the laser printer components connected to it.

He carefully disassembled the unit, spilling toner here and there which is left over from a catastrophic knock-off toner cartridge incident. A quick test showed him that although the drivers complain that the paper tray is open, the scanner does still work. He glued the controller board seen on the left to the bottom of the scanner enclosure, and added some felt feet. Now his scanner is closer to the size you’d expect. And on the plus side he gained a geared stepper motor, laser scanning unit, exhaust fan, and a couple of solenoids to use in future projects.

Resetting The Page Count On A Laser Printer

[Brian] really liked his Samsung color laser printer right up until it was time to replace the toner cartridges. A full set of toner cartridges sell for about the same price as the printer itself, so [Brian] figured he could simply refill the toner in the cartridges he already has. The printer sends out the ‘low toner’ warning  based on page count and won’t print if the page count is too high, negating the economy of a toner refill kit. Luckily, [Brian] figured out a dead simple way to reset the page count so he can use those third-party refill kits.

All the configuration settings and page counts for the printer are stored on an I2C EEPROM. After dumping the data held on this EEPROM with an Arduino and sniffing everything going into the EEPROM with a Bus Pirate, [Brian] was nearly at his wit’s end. Thankfully, serendipity intervened. When [Brian] restarted the printer with the Bus Pirate attached, he noticed it took much longer to initialize. Printing a configuration report, he was trilled to see that all page counts have been zeroed.

The final hack that allows [Brian] to reset the page count and used refilled toner cartridges is a simple wire that ties the SDA line of the EEPROM to ground on boot. [Brian] used a momentary switch, but given this is a once-every-few-months operation, a simple wire would suffice. Check out [Brian]’s page reset demo after the break.

Continue reading “Resetting The Page Count On A Laser Printer”

Print Toner Directly To A PCB

We use the toner transfer method to fabricate printed circuit boards. The most difficult part of this is printing, ironing, and removing the paper from the toner that is used as an etchant resist material. [Mark Lerman] is developing a method to apply toner directly to the copper clad using a laser printer. Each of the photos in his gallery have comments that take us through his process. A laser printer has been modified to negatively charge the copper plate, thereby attracting the positively charged toner to it. Once the toner has been applied, the board is baked in an oven, then run through a laminator. This process can yield 2 mil traces and it looks like the potential for incredibly clean boards is just around the corner. The question is, will this be easier and take less time than using photo resist?

We’ve contacted [Mark] in hopes of getting more details. If you can’t wait for a follow-up, take a look at this thread concerning his work.

[Thanks Komradbob]