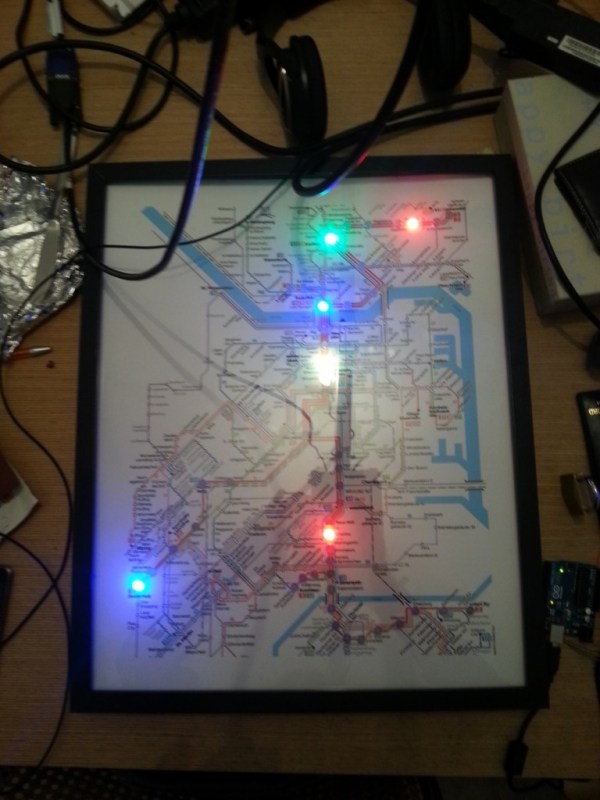
A Laser Cut Word Clock

DIY laser cut word clock.

What is a word clock? A word clock is a clock that displays the time typographically that is also an interactive piece of art. Rather than buy one for $1500, [Buckeyeguy89] decided to build one as a present for his older brother. A very nice present indeed!

There are many different things that come into play when designing a word clock. The front panel is made from a laser cut piece of birch using the service from Ponoko. Additionally, white translucent pieces of acrylic were needed to keep each word’s light from bleeding into the neighboring letters. The hardware uses two Arduinos to control the LEDs and a DS3231 RTC for keeping accurate time. The results are very impressive, but it would sure make assembly easier if a custom PCB was used in the final version. For a one-off project, this makes a great birthday present.

The craftsmanship of this word clock is great, making it well suited for any home. What projects have you built that involve more than just electronics? Sometimes, quality aesthetics make all the difference.

Party Ready Mini LED Volume Tower

Audio LED Light Tower

There are many very cool visual effects for music, but the best are the kind you build yourself. [Ben’s] mini LED volume towers adds some nice bling to your music.

[Ben] was inspired to created this project when he saw a variety of awesome stereo LED towers on YouTube (also referred to as VU meters). We have even featured a few VU meters, one very recently. [Ben] goes over every detail, including how to test your circuit (a very important part of any project). The schematic is deceptively simple. It is based on the LM3914 display driver IC, a simple chained comparator circuit is used to control the volume bar display. All you really need is a 3D printer to make the base, and you can build this awesome tower.

See the completed towers in action after the break. What next? It would be cool to see a larger tower that displays frequency magnitude!

Continue reading “Party Ready Mini LED Volume Tower”

Light Pen Draws On LED Matrix

dot-matrix01

Who needs a 1920×1080 OLED display when you can have an 8×8 matrix of LED goodness? That’s the question [Kathy] asked when she built this LED matrix light pen project. It looks simple enough – a 64-LED matrix illuminates as the pen draws shapes. But how does the circuit know which LED is under the pen? Good old fashioned matrix scanning is the answer. Only one LED is lit up at any time.

[Kathy] used a pair of 74LS138 3-to-8 line decoders to scan the matrix. The active low outputs on the ‘138 would be perfect for a common cathode matrix. Of course [Kathy] only had a common anode matrix, so 8 PNP transistors were pressed into service as inverters.

The pen itself is a phototransistor. [Kathy] originally tried a CdS photoresistor, but found it was a bit too slow for matrix scanning. An LM358 op-amp is used to get the signal up to a reasonable level for an Arduino Uno to detect.

The result is impressive for such a simple design. We’d love to see someone use this platform as the start of an epic snake game.

Press Button Get Party Mode

partymode2_2 If you’re looking to do something awesome with a graphing calculator, [Chris] is the guy to go to. He’s literally written the book on the subject. His PartyMode project, however, has absolutely nothing to do with calculators. It’s a fantastic display of lights, colors, and sounds that has been rebuilt again and again over the years, and something [Chris] has finally gotten around to documenting.

The idea for [Chris]’ PartyMode is a single button that will transform a room from a boring computer lab or dorm room into a disco with 22.4 channel sound, and computer displays used as panels of color. The first version began in the lab in his school’s EE department that included ten CRT monitors. There were a few VUFans featured on the good ‘ol Hackaday, but a few problems with regulations and politics brought this version of PartyMode to a premature end.

The second version is a miniaturized, ‘press a button, get a party’ setup with a crazy number of RGB LEDs, a few more of those computer fan VU meters, and a Bluetooth app to control everything. Unlike the first version, the PartyMode 2.0 is fully independent from a computer, instead relying on an ATMega to do the audio processing and handling the Bluetooth interface. Judging from the videos below, it’s quite the site, and if you need an instant party, you could do much worse.

Continue reading “Press Button Get Party Mode”

Here Come The RGB LED Clones

ws2812 and clones timing

It seems like every third project on Hackaday uses WS2812 RGB LEDs in some way. We all love our blinkenlights, and bright, cheap, serial controlled RGB LEDs are the bees knees.

As with all products these days, competing manufacturers have discovered the huge market for these things, and clones are now available. [Tim] recently took a look at the PD9823, as well as three versions of the WS2812. [Tim] is considered something of a WS2812 guru here at Hackaday. You might remember him from his WS2812 driver optimization article, which should be required reading for any WS2812 hacker.

As many of us know, the timing characteristics for these LEDs can be a pain to work with. The values also differ between the WS2812S and WS2812B. [Tim] discovered that the new through hole WS2812D parts are different yet again, though rather close to the B parts. The PD9823’s designers must have studied the WS2812’s closely, as their 190ns time base falls directly between WS2812S 166ns time and the 208ns time of the WS2812B. The PD9823 also requires a slightly longer reset pulse.

The takeaway is that well written drivers such as [Tim’s] should have no problem with the new parts, but compatibility is something to keep in mind as more clones hit the market.

Tic Tac Clock

tic-tac-clock

Here’s an excuse to eat a bunch of Tic Tac candies: once the container is empty it makes a nice little enclosure for your next project. This particular offering introduces a point-to-point clock project that’s a ton of fun.

[Danny Chouinard] did a lot with very little. You can get the gist of the circuit just by looking at the photos above. it uses a 3×5 Charlieplexed LED display (this is given away by the fact that there’s only a few resistors on the board. A bit difficult to see, but between the resistors and the ATtiny84 there is a clock crystal, and on the back is a little piezo buzzer. The one thing that isn’t completely obvious is the power source. Two AAAA batteries, salvaged from a 9V battery, are able to keep the unit running at an estimated 2 years of moderate use.

The video after the break is worth a look though. It shows the various characters and information that can be flashed on the LED matrix. At first it’s hard to tell that the single user input button is being pressed by [Danny’s] thumb.

If you don’t want to build a clock, there are still plenty of reasons to eat a whole container of these mints. You could replace them with a PIC programmer or a discreet camera.

Continue reading “Tic Tac Clock”

Network Controlled Decorative LED Matrix Frame

LED-Pixel-FrameThere is nothing better than a project that you can put on display for all to see. [Tristan’s] most recent project, a Decorative LED Matrix Frame, containing 12×10 big square pixels that can display any color, is really cool.

Having been built around a cheap IKEA photo frame this project is very doable, at least for those of you with a 3D printer. The 3D printer is needed to create the pixel grid, which ends up looking very clean in the final frame. From an electronics perspective, the main components are a set of Adafruit Neopixel LED strips, and an Arduino Uno with an Ethernet shield. The main controller even contains a battery backup for the real time clock (RTC) when the frame is unplugged; a nice touch. Given that the frame is connected to the local network, [Tristan] designed the frame to be controlled by a simple HTML5 interface (code available on GitHub). This allows any locally connected device to control the frame.

Be sure to check out the build details, they are very well done. If you are still not convinced how cool this project is, be sure to check out a video of it in action after the break! It makes us wish that you could play Tetris on this frame. Very nice job [Tristan]!

Continue reading “Network Controlled Decorative LED Matrix Frame”