The Cardboard Computer

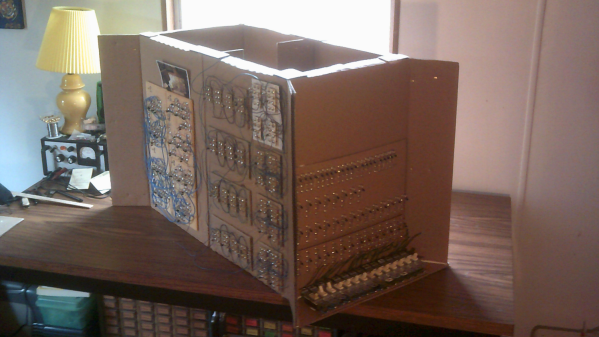
Every time we say “We’ve seen it all”, along comes a project that knocks us off. 60 year old [Mark Nesselhaus] likes to learn new things and he’s never worked with hardware at the gate level. So he’s building himself a 4-bit Computer, using only Diode-Transistor Logic. He’s assembling the whole thing on “card board” perf-board, with brass tacks for pads. Why — because he’s a thrifty guy who wants to use what he has lying around. Obviously, he’s got an endless supply of cardboard, tacks and Patience. The story sounds familiar. It started out as a simple 4-bit full adder project and then things got out of hand. You know he’s old school when he calls his multimeter an “analog VOM”!

It’s still work in progress, but he’s made a lot of it in the past year. [Mark] started off by emulating the 4-bit full adder featured on Simon Inns’ Waiting for Friday blog. This is the ALU around which the rest of his project is built. With the ALU done, he decided to keep going and next built a 4-to-16 line decoder — check out the thumbnail image to see the rats nest of jumbled wires. Next on his list were several flip flops — R-S, J-K and D types, which would be useful as program counters. This is when he bumped into problems with signal levels, timing and triggering. He decided to allow himself the luxury of adding one IC to his build — a 555 based clock generator. But he still needed some pulse shaping circuitry to make it work consistently.

from right, Input, +5V, nc, gnd
LED Driver : from left, Gnd, NC, +5V, Input

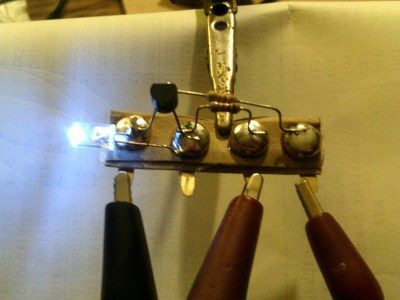
[Mark] also built a finite-state-machine sequencer based on the work done by Rory Mangles TinyTim project. He finished building some multiplexers and demultiplexers, and it appears he may be using a whole bank of 14 wall switches for address, input and control functions. For the output display, he assembled a panel using LED’s recovered from a $1 Christmas light string. Something seems amiss with his LED driver, though — 2mA with LED on and >2.5mA with LED off. The LED appears to be connected across the collector and emitter of the PNP transistor. Chime in with your comments.

This build seems to be shaping along the lines of the Megaprocessor that we’ve swooned over a couple of times in the past. Keep at it, [Mark]!

Continue reading “The Cardboard Computer”

Smoothly Modernized Nixie Display

The renaissance of Nixie tube popularity amid the nostalgia surrounding older tech has made them almost prohibitively expensive for individual projects. Seeing an opportunity to modernize the beloved devices, [Connor Nishijima] has unleashed this new, LED edge-lit display that he has dubbed Lixie.

We featured his prototype a few years ago. That design used dots to make up each character but this upgrade smooths that out with sleek lines and a look one would almost expect from a professional device — or at the very least something you’d see in a cyberpunk near-future. The color-changing Neopixel LEDs — moderated by a cleverly designed filter — allow for customization to your heart’s content, and the laser-cut acrylic panes allow for larger displays to be produced with relative ease.

The image above (and the video below) show two revisions of the most recent Lixie prototypes. There is a huge improvement on the right, as the digits are now outlines instead of single strokes and engraved instead of cut completely through the acrylic. The difference if phenomenal, and in our opinion move the “back to the drawing board” effect to “ready for primetime”. [Connor] and his team are working on just that, with a Tindie preorder in place for the first production-ready digits to roll off their line.

Continue reading “Smoothly Modernized Nixie Display”

High-Power LED + 3D Printer = Mega Flashlight

If you remember old computer magazines (or browse them today), you’ll see that back in the late 1970s and early 1980s, you weren’t always sure what you were going to do with a computer. Games were a staple, but they weren’t very exciting. Visionaries talked about storing recipes, writing Christmas letters (to send via snail mail), and keeping home inventories. You probably don’t do any of those things with your computer today, unless you count e-mailing instead of sending Christmas cards. We think sometimes 3D printers fall into that category today. Sure, you want one. But what are you really going to do with it? Print keychains?

That’s why we always like seeing practical designs for 3D printed items. Like this 100W flashlight. The electronics part of the build is simple enough: a 100W LED module, an off-the-shelf driver board, plus an old PC cooler and some batteries. But the 3D printed parts makes it all come together and it looks great!

Continue reading “High-Power LED + 3D Printer = Mega Flashlight”

X Marks The Clock

There’s no shortage of Arduino-based clocks around. [Mr_fid’s] clock, though, gets a second look because it is very unique looking. Then it gets a third look because it would be very difficult to read for the uninitiated.

The clock uses three Xs made of LEDs. There is one X for the hours (this is a 24-hour clock), another for the minutes, and one for the seconds. The left side of each X represents the tens’ digit of the number, while the right-side is the units.

But wait… even with two segments on each side of the X, that only allows for numbers from 0 to 3 in binary, right? [Mr_fid] uses another dimension–color–to get around that limitation. Although he calls this a binary clock, it is more accurately a binary-coded-decimal (BCD) clock. Red LEDs represent the numbers one to three. Green LEDs are four to six. Two blue segments represent seven to nine. It sounds complicated, but if you watch the video, below, it will make sense.

Continue reading “X Marks The Clock”

Engineer’s Primer On DIY Christmas Light Shows

Each year brings new Christmas light shows, with synchronised music and wild blinking decorations to light your eyeballs ablaze. Now, many of us have dabbled in the dark arts of blinken, tinkering with LEDs or flashing a neon bulb or two. There’s plenty of tutorials on how to control all manner of lights, but they’re often written for novices. Learning the basics of electronics for the nth time when you just need to know the specifics of a protocol or what IC you need can be a total drag. That’s why [Bill Porter] has written the Engineer’s Guide to DIY Computer Controlled Holiday Lights.

[Bill] covers the topic from start to finish – not just the technical side of things, but practical considerations about where to source components, and timescales for keeping your project on track. It’s no coincidence this is coming out in January – if you want to get something big up and running for Christmas, it’s time to start now! The guide gives links to forum communities that put in large group orders for parts early, and ship them slow to save money.

Other areas covered include software for creating advanced sequences for your lighting setup, which allow you to map animations over your entire layout. There’s also tips on which controller hardware to use for incandescent lights and the now-ubiquitous WS2811 strings. Even better, [Bill] shares specific tips on how to avoid common problems like voltage drop over long pixel runs and communication issues.

It’s a testament to [Bill] and his experience – the guide is an excellent way to get right up to speed with the state of the art in DIY Christmas light shows, and will save you from all manner of pitfalls. If you need to build something big this year and don’t want to reinvent the wheel, this is for you.

It’s not the first time we’ve heard from [Bill] either – check out his stunning wedding invitations or his repair of a science museum exhibit.

Candle with flicker led that you blow out

Blowing Out A Candle Flicker LED: The Death Of Flame

One day there will be no more need for flames. [slider2732] has put yet another nail in the coffin of this most ancient of all technology by making a candle that uses a flicker LED that you blow out. A little more miniaturization and we’ll have them fully integrated into the size of birthday cake candles (Hint hint, hackers!).

You may have seen these candle flicker LEDs.  They have a small chip inside them that modulates the LED’s light to flicker like a candle. We’ve even reported on what [Cpldcpu] found when he reverse engineered them first here and then here.

What [slider2732] did was to buy an electronic candle that used one of the LEDs actually shaped like a flame, and to drill a hole near the ‘flame’. He them embedded a microphone behind the hole. That goes to an LM386 amplifier circuit and from there to an Arduino Pro Mini all powered by a LiPo. As you’d expect, the Arduino code is very simple, just watch the pin from the amplifier and based on an internal variable, turn the LED on or off. We really like how none of the electronics is visible and how you actually have to lean over and blow into the top of the candle to blow it out. You can see this demonstrated in the video below.

Continue reading “Blowing Out A Candle Flicker LED: The Death Of Flame”

Wifi-Controlled Christmas Ornaments!

Trimming one’s Christmas tree can be an enjoyable tradition year after year, but every once in a while some variation on  the established order can be just as fun. Seeking some new ornaments to and desiring to flex his skills, Instrucables user [Gosse Adema] created a LED-illuminated, phone-controlled, deltrahedron Christmas tree ornaments.

Wemos DI Mini Pros are the brains of these little guys, WS2182b RGB LED strips — being the superb go-to’s that they are — light the ornament, and a 5 V power supply keep them lit. [Adema] used the Wemos specifically to create a web server unique to each ornament, and goes into incredible detail on how to program each one — now there’s an arrangement of words you wouldn’t expect to see — providing all the code he used, as well as the models to 3D print the deltahedron.

Continue reading “Wifi-Controlled Christmas Ornaments!”