Hackaday Links: November 3, 2013

hackaday-links-chain

[Michael] just missed the deadline for the Trinket Contest but we still think his tablet is pretty cool. He says it predates the iPad and uses a custom aluminum case, a SoC he ripped from a Gecko Edubook, powered by eight NiMH batteries. Check out the front, the guts, and the sides.

Speaking of portable power sources, After doing a teardown of a 12V 6800 mAh Li-Po battery [Howard] strapped some prototyping equipment to either side of it and now he’s got a prototyping power supply that’s easy to take with him.

Blinky goodness doesn’t have to look hacked together (even if it is). This Raspberry Pi logo looks like a professional sign! It was cut from foam and plastic, primed and painted, then stuffed with addressable LED strips.

While we’re on the topic of refined RPi projects, check out this Raspberry Pi MAME cabinet. It’s a bit bigger than the Galaga cabinet we saw recently but still small enough to keep around the house without getting in the way.

If you’re a fan of automotive hacks you should check out this effort to build an Electronic Diesel Control.

We’ve been saving the gnarliest link for last. [Matthew] laments that his missed Halloween to show off this project. But we don’t think an almost-entirely wooden spider-like walker needs to be paired with a holiday. It’s very cool and somewhat operational, but still needs help working out all of the kinks. Our favorite moment in the video is when [Matthew] exclaims “It wants to live!”.

Upgrading Cordless Drill Batteries To Lithium

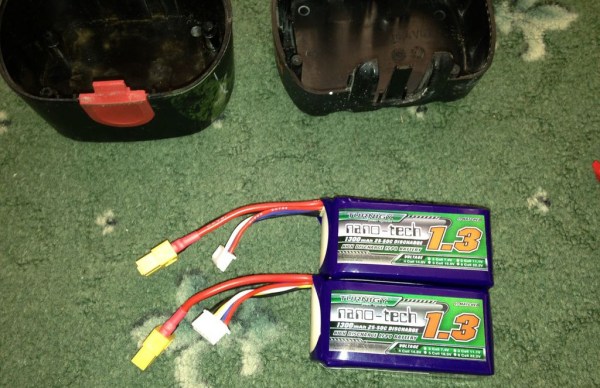
Cordless power tool battery replacements are expensive: you can easily spend $100 for a NiCd pack. [henal] decided to skip nickle-based cells and cut out the middleman by converting his old cordless battery packs to inexpensive hobby lithium cells. These batteries appear to be Turnigy 3S 1300mAh’s from Hobbyking, which for around $10 is a great bargain. As we’ve explained before, lithium batteries offer several advantages over NiMH and NiCd cells, but such a high energy density has drawbacks that should be feared and respected, despite some dismissive commenters. Please educate yourself if you’ve never worked with lithium cells.

[henal] gutted his dead battery packs and then proceeded to prepare the lithium replacements by soldering them to the cordless pack’s power connectors. To keep charging simple, he also branched off a deans connector from power and ground. After cutting some holes in the pack for access to the balancing connector and deans connector, [helan] went the extra mile by soldering on a DIN connector to the balancing wires, which he then securely glued to the side of the case.

We’ve featured lithium power tool replacements before, and these Turnigy packs pose the same problem: they don’t appear to have any low voltage cut-off protection. Check out some of the comments for a good solution.

LiPo Internal Resistance Measurement Tool

lipo-internal-resistance-meter

This is a scratch-build meter for measuring the internal resistance of Lithium Polymer cells. [Bleuer Csaba] uses the LiPo cells for RC vehicles and thet take quite a beating from the motors  they’re supplying. This means that he only gets about 100-200 cycles out of each cell. To figure out where one is in its life cycle you can measure the internal resistance where a rising resistance indicates greater age. [Bleuer] mentions that you can buy a meter to do this for you, but what fun is that?

Since he’s rolling his own tool he defined his own parameters for the readings. After experimenting with different loads driven for different test periods he was able to extrapolate an equation that estimates the resistance measurement. As you can see in the clip after the break, this happens very fast. All he has to do is connect the cell and press one button. The measurements are made and various data points are displayed on the quartet of 7-segment displays.

Continue reading “LiPo Internal Resistance Measurement Tool”

OLED Name Badge With Rechargeable LiPo Cell

oleduino-name-badge

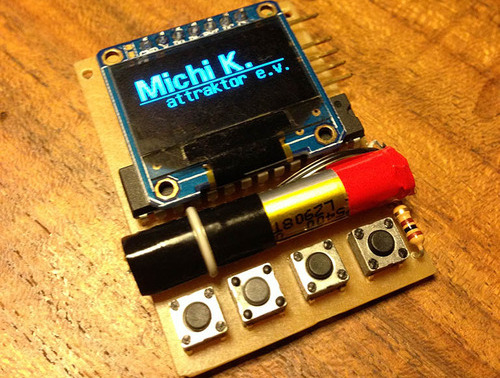
Here’s a project that let [Rick Pannen] try his hand with an OLED display and a rechargeable power source. He calls it OLEDuino which is a mashup of the display type and the Arduino compatible chip running the whole thing. He figures it will serve nicely as a geeky name badge but also ported a Breakout type game to play when he’s bored.

The project is an inexpensive way to attempt a more permanent trinket than simply using Arduino and a breadboard. [Rick] sourced the OLED display and USB LiPo charging cable on eBay. The ATmega328 hiding below the display is being driven from the 3.7V LiPo cell without any power regulation. The four buttons at the bottom provide the only user input but it should be more than enough for a few simple tricks.

Head over to his code repo for a bit more information. The schematic and board are both Eagle files. We generated an image of the schematic and embedded it after the break if you want to take a quick look at how simple the hardware really is.

Continue reading “OLED Name Badge With Rechargeable LiPo Cell”

LiPo Powered Stellaris Launchpad

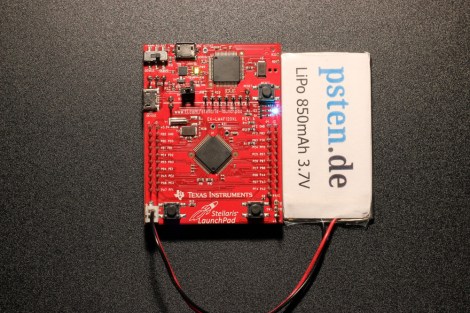
Want mobile power for your Stellaris Launchpad development board? [Philipp] was looking to add some lithium power for the Launchpad. He used an off the shelf single cell LiPo battery and connected it to the 5V rail of the Launchpad board. It didn’t work.

So [Philipp] started looking through the schematics and noticed that the regulator was working fine, but the Stellaris wasn’t starting up. He tracked down a voltage supervisor connected to the Stellaris reset pin. After some investigation, it was clear that this supervisor was holding the device in reset.

The solution is a quick and dirty hack: cut the trace that connects the reset line to the voltage line. With this modification, the device starts up from the LiPo without any issues. [Philipp] does note that you should be careful about battery under-voltage and over-voltage. This hack doesn’t handle charging the LiPo battery, but we’ve discussed that in the past.

LiPo Battery Tester For Solar Vehicle Battery Array

If you’re building solar vehicles at a competitive level you’ve got to know exactly how the storage batteries will perform. To that end [Matthew] built a Lithium Polymer battery tester for use by the McMaster University Solar Car Project. It worked well, but could only test one battery at a time. He just finished up a second version, which can test battery specifications on up to eight units at once. It saves a lot of time, but still takes fifteen hours to test just one set of the units used by the vehicle.

The most important aspect being measured is the discharge curve. Sure, there’s a datasheet that includes this information, but how can be sure that what you received will perform at spec? Each of the eight channels can be disconnected from the system using a relay. This is just one of the safety features which watch for things like over-voltage and over-current conditions. Remember, Lithium batteries can heat up fast if there’s a problem. Data is sampled on a 12-bit ADC and can be pushed to a computer via USB for graphing.

Powering A Robot With A Macbook Battery

When [Soo-Hyun]’s friend had an Apple Macbook Pro battery that began to swell, his friend did the reasonable thing and donated it to be used in a robot. Now [Soo-Hyun]’s kiwi drive robot is powered by a gigantic LiPo battery, giving it a huge range and a very fast top speed.

The defunct laptop battery that formerly powered a 15″ macbook pro is three battery packs of two cells in parallel, delivering 12.6 Volts. To get the power to the robot, [Soo-Hyun] etched a simple PCB that fit into the slot in the battery. A little bit of soldering later, and mounting the battery as a shark fin because of the 8×8 inch limitation of maze-solving robots, the power plant was complete.

Using a bulging LiPo battery probably isn’t the smartest idea (listen for the great line, “it got the camera and my face” at 4:08), but as long as [Soo-Hyun] keeps an eye on the battery as it’s charging, it should be alright.

Check out the video of the robot zipping around on 12.6 Volts after the break.

Continue reading “Powering A Robot With A Macbook Battery”