Air Wrench Becomes A Milling Machine Power Drawbar

We sometimes wonder if designers ever actually use their own products, or even put them through some sort of human-factors testing before putting them on the market. Consider the mechanism that secures toolholders to the spindle of a milling machine: the drawbar. Some mills require you to lock the spindle with a spanner wrench, loosen the drawbar with another wrench, and catch the released collet and tool with – what exactly?

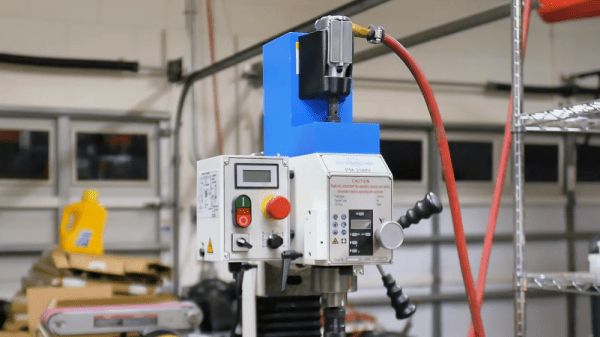
Unwilling to have the surgical modifications that would qualify him for the Galactic Presidency, [Physics Anonymous] chose instead to modify his mill with a power drawbar. The parts are cheap and easily available, with the power coming from a small butterfly-style pneumatic wrench. The drawbar on his mill has a nearly 3/8″ square drive – we’d guess it’s really 10 mm – which almost matches up with the 3/8″ drive on the air wrench, so he whipped up a female-to-female adapter from a couple of socket adapters. The wrench mounts to a cover above the drawbar in a 3D-printed holster. Pay close attention to the video below where he goes through the Fusion 360 design; we were intrigued by the way he imported three orthogonal photos on the wrench to design the holster around. That’s a tip to file away for a rainy day.

This is a great modification to a low-cost milling machine. If you’re in the process of buying machine tools, you should really check out our handy buyer’s guides for both milling machines and lathes. It’ll let you know what features to look out for, and which you’ll have to add later.

Continue reading “Air Wrench Becomes A Milling Machine Power Drawbar”

Rolling Out A Slick Rotary Phase Converter

Home machinists can often find great deals on used industrial equipment, and many a South Bend lathe or Bridgeport milling machine has followed someone home. Then comes the moment to plug it in, and the new owner discovers that the three-phase plug needed to power the new beast is nowhere to be found in the shop. Thus commences the weeping and the gnashing of teeth.

Luckily, [Handmade Extreme] is ahead of the curve in terms of shop power, and built a rotary phase converter to power his machines. Industry generally runs on three-phase AC systems, mainly because three-phase electric motors are so much more efficient and compact than the equivalent single-phase motor. But residential electrical service is either split-phase or, in the UK where [Handmade Extreme] is based, single phase. A rotary phase converter is an electromechanical device that can generate the missing phases – in essence a three-phase motor that can run on one winding and generate the missing phases across the other windings. It needs some supporting control circuitry to do so, such as timers and contactors to switch the winding connections once the motor starts, plus capacitors for motor starting and for balancing the voltage across the phases. The control gear is DIN-rail mounted and neatly wired to a smart-looking control panel. Everything is housed in a sturdy enclosure that’s big enough to serve as a mobile tool cart. It’s a really nice job – watch the whole build in the video below.

If you’re interested in power distribution, we’ve got a primer that covers the basics. And if you’re in the market for machine tools, [Quinn]’s machine tool buyer’s guide will let you decide if a three-phase machine is worth the extra effort.

Continue reading “Rolling Out A Slick Rotary Phase Converter”

CNC Mod Pack Hopes To Make Something Useful From A Cheap Machine Tool

It is probable that many of us have noticed a variety of very cheap CNC mills in the pages of Chinese tech websites and been sorely tempted. On paper or as pixels on your screen they look great, but certainly with the more inexpensive models there soon emerges a gap between the promise and the reality.

[Brandon Piner] hopes to address this problem, with his CNC Mod Pack, a series of upgrades to a cheap mill designed to make it into a much more useful tool. In particular he’s created a revised 3D-printed tool holder and a set of end stop switches. The tool holder boasts swappable mounts on a dovetail fitting with versions for both a laser diode and a rotary tool, allowing much better tool positioning. Meanwhile the end stops are a necessary addition that protects both tool and machine from mishaps.

The same arguments play out in the world of small CNC mills as do in that of inexpensive 3D printers, namely that the economy of buying the super-cheap machine that is nominally the same as the expensive one starts to take a knock when you consider the level of work and expense needed to make your purchase usable. But with projects like this one the barrier to achieving a quality result from an unpromising start is lowered, and the enticing prospect is raised of a decent CNC machine for not a lot.

Card Reader Lockout Keeps Unauthorized Tool Users At Bay

It’s a problem common to every hackerspace, university machine shop, or even the home shops of parents with serious control issues: how do you make sure that only trained personnel are running the machines? There are all kinds of ways to tackle the problem, but why not throw a little tech at it with something like this magnetic card-reader machine lockout?

[OnyxEpoch] does not reveal which of the above categories he falls into, if any, but we’ll go out on a limb and guess that it’s a hackerspace because it would work really well in such an environment. Built into a sturdy steel enclosure, the guts are pretty simple — an Arduino Uno with shields for USB, an SD card, and a data logger, along with an LCD display and various buttons and switches. The heart of the thing is a USB magnetic card reader, mounted to the front of the enclosure.

To unlock the machine, a user swipes his or her card, and if an administrator has previously added them to the list, a relay powers the tool up. There’s a key switch for local override, of course, and an administrative mode for programming at the point of use. Tool use is logged by date, time, and user, which should make it easy to identify mess-makers and other scofflaws.

We find it impressively complete, but imagine having a session timeout in the middle of a machine operation would be annoying at the least, and potentially dangerous at worst. Maybe the solution is a very visible alert as the timeout approaches — a cherry top would do the trick!

There’s more reading if you’re one seeking good ideas for hackerspace. We’ve covered the basics of hackerspace safety before, as well as insurance for hackerspaces.

Continue reading “Card Reader Lockout Keeps Unauthorized Tool Users At Bay”

Bolt-Together Belt Grinder For The No-Weld Shop

Belt grinding offers a lot of advantages for the metalworker, and since belt grinders are pretty simple machines, shop-built tools are not an uncommon project. A bolt-together belt grinder makes this tool even more accessible to the home gamer.

With no access to a welder but with a basic milling machine and an ample scrap bin at his disposal,  [IJustLikeMakingThings] had to get creative and modify some of the welding-required belt grinder designs he found online to be bolt-up builds.  The key to a cool running belt grinder is for the belt to be as long as possible, and the 2″x72″ belt seems to be the sweet spot, at least here in the States. Machined drive and idler wheels with the crown needed for proper belt tracking were sourced online, as was the D-bracket for holding the two guide wheels. But the rest of the parts were fabricated with simple tools and bolted together. [IJustLikeMakingThings] provides a lot of detail in his write-up, and it shouldn’t be too hard to build a belt grinder just like this one.

Looking for other belt grinder plans to compare notes? Here’s a grinder with an even simpler design, but with welding required.

A Fix For The Lightweight Machine Tool Shakes

No matter what material you work with, the general rule is that with machine tools, the heavier, the better. Some people can’t afford or don’t want big tools, though, even with their natural tendency to reduce vibrations. That doesn’t mean something can’t be done to help the little tools, like reducing vibration in a contractor-grade table saw.

This one might seem a little outside the usual confines of the hackosphere, but nobody can doubt [Matthias Wandel]’s hacker chops and he really shows off his problem-solving skills with this one. His well-worn contractor-style table saw has had more than a few special modifications over the years, some of which left it with a shimmy sufficient to vibrate workpieces right off the table. He fashioned a friction damper for the saw’s motor from wood, complete with ball and socket joints to allow full movement of the blade height and angle. That didn’t quite do the trick, but his incremental approach finally found the right combination of factors, and the video below shows a saw now stable enough to balance a nickel.

If the name seems familiar but you just can’t place the hacks, check out [Matthias]’s recent wooden domino extruder, his shortcuts to tapping wood, or of course his classic wood gears layout software.

Continue reading “A Fix For The Lightweight Machine Tool Shakes”

Featured Image

Go Go Camera Slider

Are your arms getting tired from pushing your camera back and forth across your camera slider? That must be the case with [Max Maker], which led him to convert his manual slider into a motorized one.

The electronics are minimal — an Arduino Micro, a few toggle switches, A4988 Stepper Driver, 12V battery pack, and the ever popular NEMA 17 stepper motor. If you’re wondering why we said ‘switches’ instead of ‘switch’, it’s because 4 of the switches are used to select a time frame. The time frame being how long it takes for the slider to move from one end to the other.

Fabrication shown off in the video below will net you a few new tricks. Our favorite is how he makes a template for the NEMA motor using masking tape. After completely covering the face of the motor with tape, he clearly marks the mounting holes and colors in the shape of the motor plate as if he were doing frottage. Then just pull the tape off as one and stick it onto the slider rack.

Not including the cost of the slider itself, the parts list came out to be around $75. Even if you don’t yet own a slider, this a great first adventure into building a CNC machine. It is one degree of freedom and the hard parts have already been taken care of by the manufacturer of the slider. Get used to using belts and programming for stepper motors and you’ll be whipping up your own 3D printer with a fancy belt scheme for the Z-axis.

Continue reading “Go Go Camera Slider”