Field Trip! Hackaday Visits Pimoroni

If you have a Raspberry Pi and have any interest in its peripherals, you may be familiar with the grinning pirate logo of the British company, Pimoroni. The Sheffield, UK based outfit first established a niche for itself as one of the go-to places for much of the essentials of Pi ownership, and has extended its portfolio beyond the Pi into parts, boards, and components across the spectrum of electronic experimentation. Their products are notable for their distinctive and colourful design language as well as their  constant exploration of new ideas, and they have rapidly become one of those companies to watch in our sphere. On our way up to Newcastle for Maker Faire UK, we passed close enough to the Pimoroni HQ to be able to ask nicely if we could drop in and have a tour.

[Paul] showing off some of the Pimoroni attention to design detail. This artwork is hidden behind a display panel on the finished product.
Paul showing off some of the Pimoroni attention to design detail. This artwork is hidden behind a display panel on the finished product.
The Pimoroni HQ can be found in a nondescript unit with a discreetly placed sign on an industrial estate after a short drive through the city from the motorway. Inside it’s the same as thousands of other units, a set of offices at the front and a cavernous warehouse behind, except this one is filled with the kinds of goodies that get our blood pumping! And we’re told this toybox warehouse is soon to be joined by another nearby unit, as the Pimoroni business is expanding.

Our guide was the company co-founder Paul Beech, whose work you will be familiar with even if this is the first time you’ve heard his name;  Paul was the designer of the Raspberry Pi logo! The company is not exclusive to that platform but it’s fair to say they have a strong connection with the Pi, starting in 2012 with as their website puts it: “One laser cutter and a kettle” on which they produced the first of their iconic PiBow laser-cut sandwich Raspberry Pi cases.

Continue reading “Field Trip! Hackaday Visits Pimoroni”

Kniwwelino Is An ESP8266 Micro:Bit

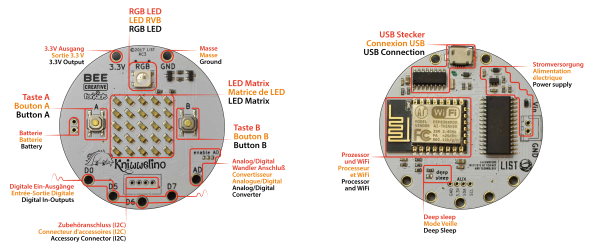
Kniwwelino is the latest in a line of micro:bit-inspired projects that we’ve seen, but this one comes with a twist: it uses an ESP8266 and WiFi at the core instead of the nR51 ARM/BTLE chip. That means that students can connect via laptop, cellphone, or anything else that can get onto a network.

That’s not the only tradeoff, though. In order to get the price down, the Kniwwelino drops the accelerometer/magnetometer of the micro:bit for a programmable RGB LED. With fewer pins to break out, the Kniwwelino is able to ditch the love-it-or-hate-it card-edge connector of the micro:bit as well. In fact, with all these changes, it’s hard to call this a micro:bit clone at all — it’s more like a super-blinky ESP8266 development kit.

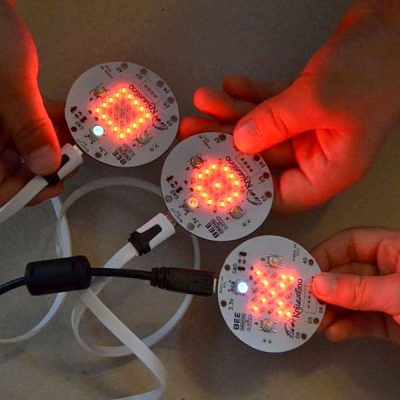
So what have they got left in common? The iconic 5×5 LED matrix in the center, and a Blockly visual programming dialect dedicated to the device. Based on the ESP8266, the Kniwwelino naturally also has an Arduino dialect that students can “graduate” to when they’re tired of moving around colored blobs, and of course you could flash the chip with anything else that runs on an ESP8266.

We don’t have one in our hands, but we like the idea. An RGB LED is a lot of fun on Day One, and the fact that the Kniwwelino fits so neatly into existing bodies of code makes the transition from novice to intermediate programmer a lot easier. These things are personal preference, but WiFi beats Bluetooth LE in our book, for sheer ubiquity and interoperability. Finally, the Kniwwelino comes in at about half the manufacturing cost of a micro:bit, which makes it viable in schools without large manufacturer subsidies. They’re estimating $5 per unit. (Retail is higher.) On the other hand, the Kniwwelino is going to use more juice than its ARM-based competitor, and doesn’t have an accelerometer.

Kniwwelino is apparently derived from a luxembourgish word “kniwweln” that apparently means to craft something. The German Calliope Mini is named after Zeus’ daughter, the programmer’s muse. We’re stoked to see so many cute dev boards getting into the hands of students, no matter what you call them.

Microgamer Is A Micro:Bit Handheld Console

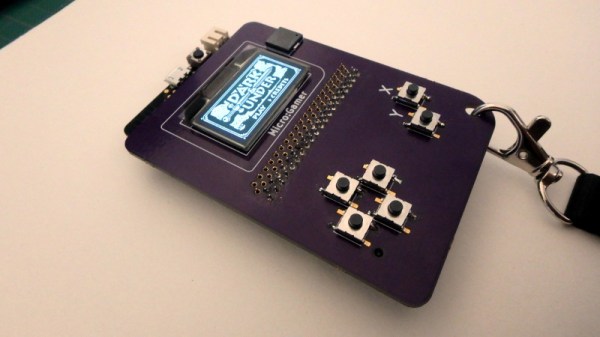
The BBC micro:bit single board ARM computer aimed at education does not feature as often as many of its competitors  in these pages. It’s not the cheapest of boards, and interfacing to it in all but the most basic of ways calls for a slightly esoteric edge connector. We’re then very pleased to see that edge connector turned from a liability into a feature by [Fabien Chouteau] with his handheld console, he uses micro:bits preprogrammed with different games in the manner of game cartridges in commercial consoles.

The micro:bit sits in its edge connector on the underside of a handheld PCB above a pair of AAA batteries, while on the other side are an OLED display and the usual set of pushbuttons. It’s a particularly simple board as the micro:bit contains all the circuitry required to support its peripherals.

He’s coded the games using the Arduino IDE with a modified version of the Arduboy2 library that allows him to easily port Arduboy games written for Arduino hardware. It’s a work in progress as there are a few more features to incorporate, but the idea of using micro:bits as cartridges is rather special. There is a video of the console in action, which we’ve placed below the break.

Continue reading “Microgamer Is A Micro:Bit Handheld Console”

Exploring The BBC Micro:Bit Software Stack

The BBC micro:bit has been with us for about eighteen months now, and while the little ARM-based board has made a name for itself in its intended market of education, we haven’t seen as much of it in our community as we might have expected.

If you or a youngster in your life have a micro:bit, you may have created code for it using one of the several web-based IDEs, a graphical programming system, TypeScript, or MicroPython. But these high level languages are only part of the board’s software stack, as [Matt Warren] shows us with his detailed examination of its various layers.

The top layer of the micro:bit sandwich is of course your code. This is turned into a hex file by the web-based IDE’s compiler, which you then place on your device. Interestingly only the Microsoft TypeScript IDE compiles the TypeScript into native code, while the others bundle your code up with an interpreter.

Below that is the micro:bit’s hardware abstraction layer, and below that in turn is ARM’s Mbed OS layer, because the micro:bit is at heart simply another Mbed board. [Matt] goes into some detail about how the device’s memory map accommodates all these components, something essential given that there is only a paltry 16 kB of RAM in hand.

You might wish to program a micro:bit somewhat closer to the metal with the Mbed toolchain, but even if that is the case it’s still of interest to read a dissection of its official stack. Meanwhile, have a look at our review of the board, from summer 2016.

The Micro:Bit Gets A Foundation

It has been announced that the BBC are to pass their micro:bit educational microcontroller board on to a non-profit-making foundation which will aim to take the project to a global audience. The little ARM-based board with its range of simple on-board peripherals and easy-to-use IDEs was given to every British 13-year-old earlier this year with the aim of introducing them to coding at an early age and recapturing some of the boost that 8-bit BASIC-programmable computers gave the youngsters of the 1980s.

Among the plans for the platform are its localization into European languages, as well as a hardware upgrade and an expansion into the USA and China. Most excitingly from our perspective, the platform will henceforth be open-source, offering the chance of micro:bits finding their way into other projects. To that end thay have placed a reference design in a GitHub repository.

We’ve covered the micro:bit story from the start here at Hackaday, from its launch to the point at which it shipped several months late after a few deadlines had slipped. We reviewed it back in June, and found it a capable enough platform for the job it was designed to do.

This is an interesting step for the little ARM board, and one that should take it from being a slightly odd niche product in one small country to the global mainstream. We can’t help however thinking that price is it’s Achilies’ heel. When it costs somewhere close to £13 in the UK, it starts to look expensive when compared to the far more capable Raspberry Pi Zero at £5 or a Chinese Arduino clone at about £2.50. Here’s hoping that economies of scale will bring it to a lower price point.

Germans React To UK’s Micro:bit

Getting kids interested in programming is all the rage right now, and the UK is certainly taking pole position with its BBC micro:bit, just recently distributed to every seventh-grader in the land. Germany, proud of its education system and technological prowess, is caught playing catch-up. Until now.

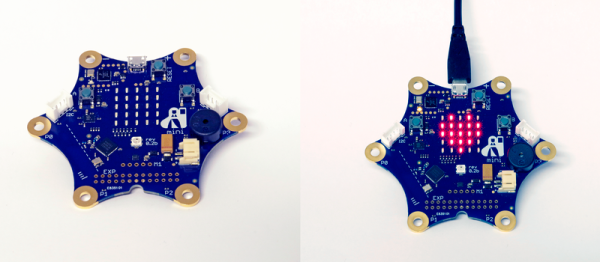
The Calliope Mini (translated here) is essentially a micro:bit clone, but one that has learned from the experience of its spiritual forefather — the connection points are spread around the outside of the board where the crocodile clips won’t accidentally touch each other.

Not content to simply copy, the Calliope also adds additional functionality. A microphone and speaker are integrated onboard, as is a Grove-style I2C connector. They’ve even added a TI DRV8837 H-bridge motor driver, so students could make a rolling robot straight out of the box.

Continue reading “Germans React To UK’s Micro:bit”

Hands-On With The BBC Micro:Bit

It’s been a long wait, but our latest single board computer for review is finally here! The BBC micro:bit, given free to every seventh-grade British child, has landed at Hackaday courtesy of a friend in the world of education. It’s been a year of false starts and delays for the project, but schools started receiving shipments just before the Easter holidays, pupils should begin lessons with them any time now, and you might even be able to buy one for yourself by the time this article goes to press.

The micro:bit top view

It’s a rather odd proposition, to give an ARM based single board computer to coder-newbie children in the hope that they might learn something about how computers work, after all if you are used to other similar boards you might expect the learning curve involved to be rather steep. But the aim has been to position it as more of a toy than the kind of development board we might be used to, so it bears some investigation to see how much of a success that has been.

Opening the package, the micro:bit kit is rather minimalist. The board itself, a short USB lead, a battery box and a pair of AAA cells, an instruction leaflet, and the board itself.  Everything is child-sized, the micro:bit is a curved-corner PCB about 50mm by 40mm. The top of the board has a 5 by 5 square LED matrix and a pair of tactile switches, while the bottom has the surface-mount processor and other components, the micro-USB and power connectors, and a reset button. Along the bottom edge of the board is a multi-way card-edge connector for the I/O lines with an ENIG finish. On the card edge connector several contacts are brought out to wide pads for crocodile clips with through-plated holes to take 4mm banana plugs, these are the ground and 3V power lines, and 3 of the I/O lines.

Continue reading “Hands-On With The BBC Micro:Bit”