PipeCam: Shallow-Water Exploration With Raspberry Pi

In what began as a personal challenge he issued to himself, [Fred] is in the process of building an underwater camera that’s capable of long-term photography in shallow waters. He’d like it to last about five hours on a charge while taking a photo every five minutes. Ideally, it will be as cheap as possible and constructed from readily available parts. Solving the cheap/available equation would theoretically make the camera easily to replicate, which is the third major requirement.

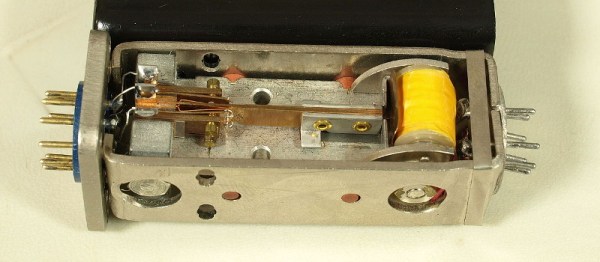
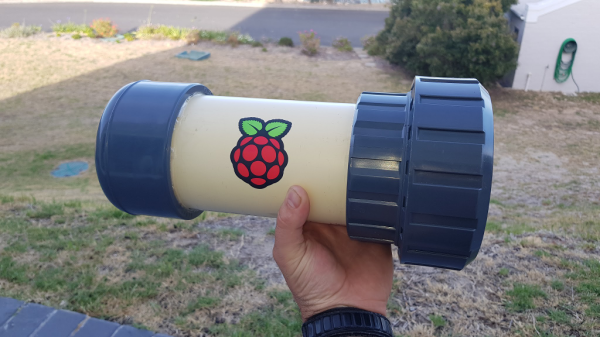
[Fred] has recently made great strides, both in the circuitry and the capsule design. The latest version uses a Raspberry Pi 3 with a V2 camera module and runs on a 12 V, 2.4 Ah rechargeable lead-acid battery. Everything is mounted on a piece of hardboard that slides into a 110mm piece of PVC. At one end, the camera looks out through a 10mm  acrylic lens fixed into a heavy-duty PVC fitting, and a DS1307 RTC provides a handy clock for shooting time lapses. With a friend’s help, he pressure-tested the housing and found that it can withstand 4 bar without leaking. He is still doing dry tests and trying hard to resist the urge to throw it in the water.

PipeCam is a work in progress, and [Fred] has many ideas for improvements. He’d like to add an Arduino to govern the battery use and provide its vital signs back to the Pi, and add an LDR to decide whether there’s enough light to warrant turning the Pi on to take pictures.

PVC is great for custom capsule building. But if you want to get started with underwater photography a little faster and want to build something instead of just buying a GoPro, try sealing your camera in something that’s already watertight.

Software Development In… Bash

Truly good ideas tend to apply in all situations. The phrase is “never run with scissors”, not “don’t run with scissors unless you are just going into the next room.” Software development methodology is a good idea and most of us have our choice of tools. But what if you are developing a significant amount of bash or similar script? Should you just wing it because bash isn’t a “real” programming language? [Oscar] says no, and if you are writing more than two or three lines of script, we agree.

We’ve made the argument before (and many of you have disagreed) that bash is a programming language. Maybe not the greatest and certainly not the sexiest, but bash is near ubiquitous on certain kinds of systems and for many tasks is pretty productive. [Oscar] shows how he uses a source code formatter, a linter, and a unit test framework to bring bash scripting in line with modern software development. We are pretty sure he uses source control, too, but that seems so elementary that it doesn’t come up outside of a link to his repository in GitHub.

Continue reading “Software Development In… Bash”

Lamp’s Ghostly Glow Benefits From Happy Mistake

[cyborgworkshop]’s youngest sister is a fan of a character in a popular video game (Thresh from League of Legends) who wields an iconic lantern with a mystical green glow. He resolved to make a replica of that lantern. Perhaps as a gift for the cherished family member? Certainly not! [cyborgworkshop]’s goal was the simple joy of having something “to lord over her.” Ah, ain’t siblings grand?

Why the glow powder turned pink in clear varnish is a bit of a mystery.

There were some interesting things learned in the process of making the ghostly green lamp. The first part of the build log is all about post-processing the lantern model, which was 3D printed at a chunky 0.48 mm layer height, but the rest is about getting the ghostly green glow to come out the way it did. [cyborgworkshop] used both glow in the dark paint and glow in the dark powder to really make the object pop, but the process involved some trial and error. Originally he mixed the glow powder into some clear varnish, and despite the mixture turning pink for some mysterious reason, a small sample spot appeared to turn out fine. However, after applying to the lantern and waiting, the varnish remained goopy and the glow powder settled out of the mixture. He ended up having to remove it as best he could and tried a heavy application of the glow paint instead. This ended up being a real blessing in disguise, because the combination resulted in a gritty stone-like texture that glowed brightly! As [cyborgworkshop] observes, sometimes mistakes end up being the highlight of a piece.

After more glow powder for highlighting, the finishing touches were a thin black wash to mute the powder’s whiteness, and a clear coat. The result looks great and a short video is embedded below. Oh, and if anyone has an idea why glow powder would turn pink when mixed into varnish, let us know in the comments!

Continue reading “Lamp’s Ghostly Glow Benefits From Happy Mistake”

Definitive Dog Feeding With Arduino

Some dogs have no sense of self-preservation. Given the opportunity, they will eat until they’re sick. It’s up to us humans to both feed them and remember doing it so they aren’t accidentally overfed. In a busy household with young children, the tricky part is the remembering.

[Bryan]’s family feeds their dog Chloe once a day, in the mornings. She was a rescue who spent a few years scrounging for meals on the street, so some part of her is always interested in finding food, even if she just ate. Each morning, the flurry of activity throughout the house is compounded by Chloe’s repeated requests for food, so [Bryan] got his kids involved and built a simple circuit that lets everyone know—at a glance—whether Chloe was fed.

Chloe’s kibble is kept in a touch-top wastebasket that flips open at the press of a button. [Bryan]’s dog-fed detector uses a reed switch and an Arduino clone to detect when the lid is opened. When the reed switch goes, low, the Arduino lights up an LED. The light stays on for two hours and then shuts off automatically to get ready for the next day. You don’t have to beg for a demo video, because it’s waiting for you after the break.

Since Chloe devours a bowl of food in about two minutes flat, maybe the next project for [Bryan]’s family could teach her to slow down a bit.

Continue reading “Definitive Dog Feeding With Arduino”

Microgamer Is A Micro:Bit Handheld Console

The BBC micro:bit single board ARM computer aimed at education does not feature as often as many of its competitors  in these pages. It’s not the cheapest of boards, and interfacing to it in all but the most basic of ways calls for a slightly esoteric edge connector. We’re then very pleased to see that edge connector turned from a liability into a feature by [Fabien Chouteau] with his handheld console, he uses micro:bits preprogrammed with different games in the manner of game cartridges in commercial consoles.

The micro:bit sits in its edge connector on the underside of a handheld PCB above a pair of AAA batteries, while on the other side are an OLED display and the usual set of pushbuttons. It’s a particularly simple board as the micro:bit contains all the circuitry required to support its peripherals.

He’s coded the games using the Arduino IDE with a modified version of the Arduboy2 library that allows him to easily port Arduboy games written for Arduino hardware. It’s a work in progress as there are a few more features to incorporate, but the idea of using micro:bits as cartridges is rather special. There is a video of the console in action, which we’ve placed below the break.

Continue reading “Microgamer Is A Micro:Bit Handheld Console”

Chopper And Chopper-Stabilised Amplifiers, What Are They All About Then?

One of my first jobs as a freshly minted graduate engineer involved the maintenance of a set of analogue chart recorders. They were museum pieces by the early 1990s: a motorized roll of graph paper across which a pen would traverse in proportion to the voltage on the input terminals. Inside was a simple servo, with a differential amplifier comparing the feedback via a potentiometer from the mechanism with the amplified input.

The recorders dated from the early 1960s, and internally their electronics were from the germanium transistor era: many Mullard OC-series devices, black-painted glass tubes with a red dot, and, unexpectedly, a large electromagnet connected to the 50 Hz AC supply with a reed switch through its middle, something completely new to an overconfident youngster who thought she knew everything.

What I’d stumbled upon was a chopper amplifier, a slightly ungainly and long superseded solution to the problem of DC amplification from the days before ubiquitous integrated circuit op-amps. We have become so used to DC amplifiers that just work, that we have forgotten that there was a time when such devices were an impossibility. The close matching of properties between devices on the same wafer allowed integrated circuit op-amps to achieve stable DC amplification in a way that the best attempts at the same circuits with discrete transistors had failed, but before they happened some desperate measures were called for. Continue reading “Chopper And Chopper-Stabilised Amplifiers, What Are They All About Then?”

Fail Of The Week: The Little Ultrasonic Knife That Couldn’t

We all know the feeling of an idea that sounded great when it was rattling around in our head, only to disappoint when we actually build the thing. It’s a natural consequence of trying new stuff, and when it happens, we salvage what we can and move on, hopefully in wisdom.

The thing that at least semi-defeated [This Old Tony] was an attempt to build an ultrasonic cutter, and it didn’t go well. Not that any blood was shed in the video below, although there seemed like there would be the way [Old Tony] was handling those X-Acto blades. His basic approach was to harvest the transducer and driver from a cheap ultrasonic cleaner and retask the lot into a tool to vibrate a knife rapidly enough to power it through tough materials with ease.

Spoiler alert: it didn’t work very well. We think the primary issue was using a transducer that was vastly underpowered compared to commercial (and expensive) ultrasonic cutters, but we suspect the horn he machined was probably not optimized either. To be fair, modeling the acoustic performance of something like that isn’t easy, so we can’t expect much. But still, it seems like the cutter could have worked better. Share your thoughts on how to make version 2.0 better in the comments.

The video is longish, but it’s as entertaining as any of [Old Tony]’s videos, and packed full of incidental gems, like the details of cavitation. We enjoyed it, even if the results were suboptimal. If you want to see a [This Old Tony] project that really delivers, check out his beautiful boring head build.

Continue reading “Fail Of The Week: The Little Ultrasonic Knife That Couldn’t”