An image of a desert with dramatically cloudy skies. In the middle of the image is a series of clay doorways with vertically-oriented wooden slats surrounding a central pole. These form the basis of a panemone windmill.

Help Wanted: Keep The World’s Oldest Windmills Turning

While the Netherlands is the country most known for its windmills, they were originally invented by the Persians. More surprisingly, some of them are still turning after 1,000 years.

The ancient world holds many wonders of technology, and some are only now coming back to the surface like the Antikythera Mechanism. Milling grain with wind power probably started around the 8th Century in Persia, but in Nashtifan, Iran they’ve been keeping the mills running generation-to-generation for over 1000 years. [Mohammed Etebari], the last windmill keeper is in need of an apprentice to keep them running though.

In a world where vertical axis wind turbines seem like a new-fangled fad, it’s interesting to see these panemone windmills are actually the original recipe. The high winds of the region mean that the timber and clay structure of the asbad structure housing the turbine is sufficient for their task without all the fabric or man-made composites of more modern designs. While drag-type turbines aren’t particularly efficient, we do wonder how some of the lessons of repairability might be used to enhance the longevity of modern wind turbines. Getting even 100 years out of a turbine would be some wicked ROI.

Wooden towers aren’t just a thing of the past either, with new wooden wind turbines soaring 100 m into the sky. Since you’ll probably be wanting to generate electricity and not mill grain if you made your own, how does that work anyway?

Continue reading “Help Wanted: Keep The World’s Oldest Windmills Turning”

Is That A Typewriter In Your Pocket Or Are You Just Pleased To See Me?

Don’t have the right milling tool? Just make one!

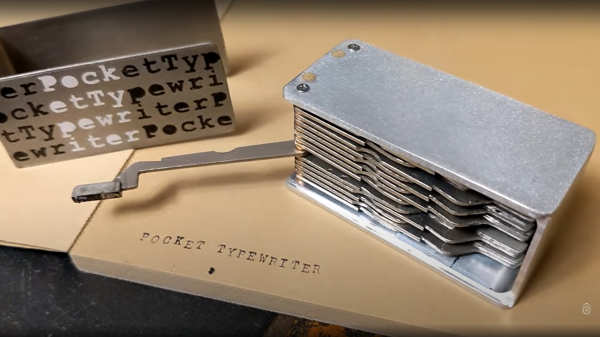
[Attoparsec] wondered what if you could carry a typewriter in your pocket, then followed through with that and built one. (Video, embedded below.) Kind of. The plan was to use an existing set of striker bars, but not wanting to destroy a perfectly good typewriter, they realised that you can easily source just the bar set on eBay.

The first problem was that the striker bars are shaped to allow the typewriter mechanism to operate, but that would not make for a compact arrangement. After a spot of straightening in a big vice, and drilling in a custom jig, they were in a suitable state to be arranged inside the case. The casing is milled from a chunk of aluminium, complete with a nice recess to hold an ink-impregnated felt pad. To prevent this pad from drying out when stowed, and to keep the whole thing clear of pocket lint, a U-shaped metal cover was bent from some sheet. This slides into a set of slots that are milled near the edges, in a very satisfying manner. This last bit was causing them a little trouble, so a custom slotting tool was created especially for the job. And a good job was indeed done. The final results look as you might expect from a manual ‘typewriter’ quirky, a bit wonky, but fabulous all the same.

If you have an old typewriter that needs some attention, here’s a quick guide for giving it a once-over. Some of you of a certain age may remember electronic typewriters with some fondness. They died a rapid death, but if you’ve still got one lurking, you could convert it into a Linux terminal for some clackity nostalgic fun.

Continue reading “Is That A Typewriter In Your Pocket Or Are You Just Pleased To See Me?”

Pulling A Chainsaw With Gravity

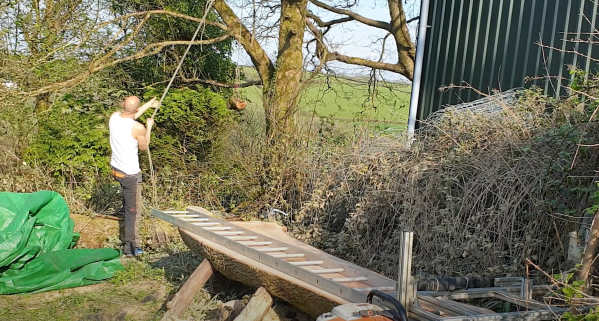
[Flowering Elbow] had a large ash log that needed to be milled. He had his chainsaw and shared an excellent technique for an easier cut. After cutting down a tree, letting it dry for a season, and then hauling it to your saw site, you’re ready to cut. However, cutting a humongous tree with a chainsaw is an enormous task. A few hacks make it better, like tilting your log slightly downhill, so the chainsaw flows downhill or using a jig to keep the cut straight. Some use a winch system to drag the jig along to assist, so it’s not just pure manpower. The problem is that a winch will exert more force if the saw hits a knot or challenging section. So you would want to slow down and let the saw work through the area.

[Flowering Elbow] uses a pulley and offcut from the log and hangs it from a tree. The log drops as the cut progresses and exerts a constant force. This means that the saw can slow down during challenging sections and take the time it needs, extending the blade’s life. There are other excellent tips in the video, and combined with his earlier chainsaw mill jig, you’ll be set to mill up logs with nothing but a chainsaw and some ingenuity.

Video after the break.

Continue reading “Pulling A Chainsaw With Gravity”

A Solar Frame From Scratch

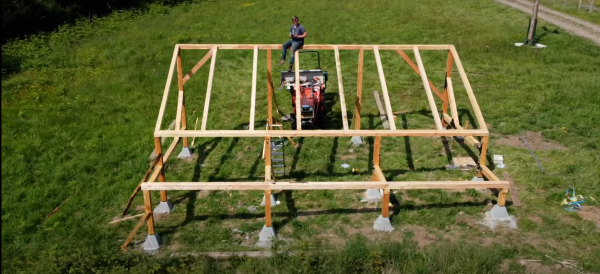
“From scratch” is a bit of a murky expression. How scratchy does it get? Are you just baking your bread yourself or are you growing your own wheat? Rolling your own solar installation probably doesn’t involve manufacturing your own photovoltaic cells. But when it comes to making the frame to hold your panels, why not machine your own brackets and harvest the wood from trees nearby?. That’s what [Kris Harbour] did with his over-engineered 8.4kW solar stand.

He already had a wind turbine and a few solar panels elsewhere on the property, but [Kris] wanted a bit more power. At the start of the video, [Kris] makes an offhand comment that he wants this to last 30-40 years at a minimum. Everything from the focus on the concrete footings to the oversized brackets and beams reflects that. The brackets were cut on his plasma CNC and the wood was cut to rough dimensions using a sawmill on his property. He admits that the sapwood will rot away a bit after 20ish years, but since the core of the posts is heartwood, structurally they’ll last a long time. After planing down to the right size, cutting hole and grooves was a bit of an involved procedure. The structure is quite tall once erected and we loved watching it come together. The most impressive thing here is that this structure was put together by just a single person. All the rafters were cut and hand-chiseled to the right sizes and hoisted into place. The panels ultimately weren’t delivered on time and he had to switch to using new panels rather than the used panels he was expecting.

Previously, [Kris] had shown off his impressive hydroelectric setup. We’re looking forward to seeing the new solar array power all the projects [Kris] is planning in the future. Video after the break.

Continue reading “A Solar Frame From Scratch”

Mini-lathe carriage wheel

Improving A Mini-Lathe With A Few Clever Hacks

Like many budget machinists, the delightfully optimistically named [We Can Do That Better] had trouble with some of the finer controls on his import mini-lathe. But rather than suffer through it, he chose to rectify the machine’s shortcomings and in the process, teach everyone a bunch of great tips.

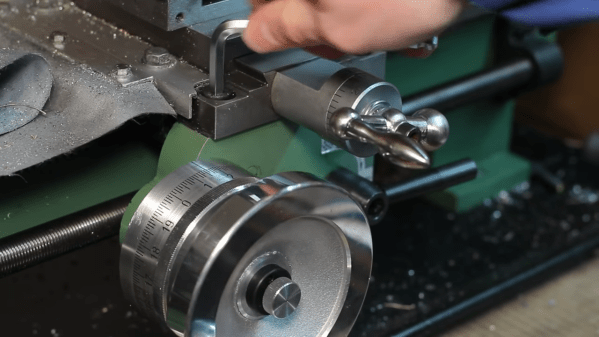
[We Can Do That Better]’s lathe retrofit focused on the carriage handwheel, which appears to lack proper bearings and wobbles around in a most imprecise manner. On top of that, the gearing of the drive made for an unsatisfying 19 mm of carriage travel per revolution of the handwheel. A single gear change made that an even 20 mm per rev, which when coupled with a calibrated and indexed handwheel ring greatly simplifies carriage travel measurements.

While the end result of the build is pretty great in its own right, for our money the best part of the video is its rich collection of machinist’s tips. The use of a wooden dowel and a printed paper template to stand in for a proper dividing head was brilliant, as was using the tailstock of the lathe to drive an engraving tool to cut the index lines. We’ve seen the use of a Dremel tool mounted to the toolpost to stand in for a milling machine before, but it’s always nice to see that trick used. And the mechanism for locking the dial to the handwheel was really clever, too.

Considering a mini-lathe? As encouraging as [We Can Do That Better]’s experience may be, it might be wise to take a deep dive into the pros and cons of such a machine.

Continue reading “Improving A Mini-Lathe With A Few Clever Hacks”

Hack A Folding Bike To Help You Catch Some Pike

For many of us, this whole pandemic thing has produced some unexpected upsides. One of [George Turvey]’s was finding a nice new scenic route to work that goes by a lake with bike trails. [George] thought it might be nice to go fishing after work, and use a folding bike to cover a lot of ground while looking for good spots on the shore. There was just one problem — riding a bike while transporting tackle is awkward.

The bike comes with a front mount that’s meant to hold the special bags they make, so that became square one for designing a rod and tackle holder. Then [George] had to weigh the pros and cons of additive vs. subtractive methods for prototyping the holder, or at least the connection between it and the mount on the bike.

Milling won out, at least for the initial proof of concept, and result is a modular mock-up that combines a milled Kydex connector and tackle box holder with a double-barrel PVC rod holder. This way, [George] had a prototype in a fraction of the time it would have taken to design and print it. Cast your line past the break to see how fast [George] can switch gears into fishing mode.

3D printing definitely has a place in the fishing world. How else are you gonna design your own lures?

Continue reading “Hack A Folding Bike To Help You Catch Some Pike”

Transform Kicad Design To Patchwork For Isolation Routing

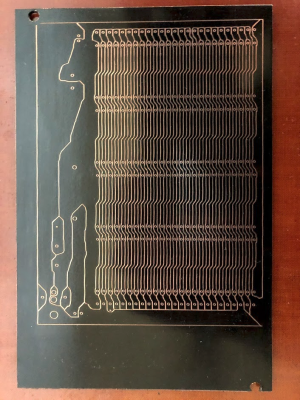
Tuning a desktop router and your board designs for isolation routing can be a bit tricky, with thin traces usually being the first victim. For simple prototype boards you usually don’t need tightly packed traces, you just want to isolate the nets. To do this with a minimum amount of routing, [Michael Schembri] created kicad-laser-min, a command-line utility that takes a Kicad PCB design and expands all the tracks and pads to their maximum possible width.

Laser scribed PCB with maximum track widths

The software takes one layer of the PCB layout, converts it to black and white, and then runs a C++ Voronoi algorithm on it to dilate each track and pad until it meets another expanding region. Each region is colourised, and OpenCV edge detection is used to produce the contours that need to be milled or etched. A contour following algorithm is then used to create the G-code. The header image shows the output of each step.

Full source code is available on GitHub. [Michael] has had good results with his own boards, which are scribed using a laser cutter before etching, but welcomes testing and feedback from other users. He has found that OpenCV doesn’t always completely close all the contours, but the gaps are usually smaller than the engraving width of his laser, so no shorts are created.

This is basically “Scribble style” prototyping with CAD and CNC tools. If you prefer scribe and etch, you might consider building a simple PCB shaker for faster etching. If you have a router but want to avoid the dust, you can use a carbide scribe to scratch out the tracks without needing to etch.