Connecting A Keyboard To A Vintage PC-XT, The Hard Way

We’re not sure if there’s any single characteristic that qualifies someone as a hacker. After all, we’re a pretty eclectic bunch, with skills that range all over the map, and what one person feels is trivial, others would look upon as black magic. But there’s one thing we’re sure of: if you find yourself reading the original POST code for the PC-XT motherboard just to get a keyboard working, you’re pretty much our kind of people.

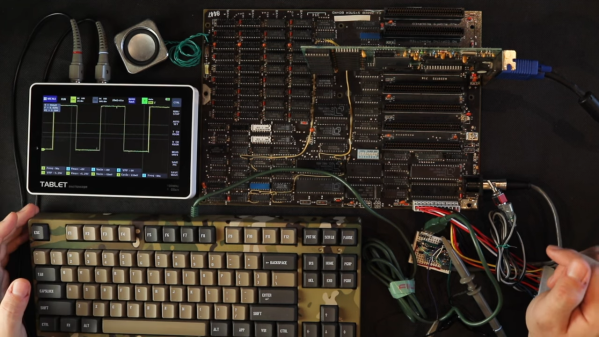
That was the position [Anders Nielsen] found himself in as work progresses on his “PC-XT from Scratch” project, which seeks to build a working mid-80s vintage IBM Model 5160 using as many period-correct parts as possible. The first installment of the series featured the delicate process of bringing the motherboard up, lest the magic smoke was released. After seeing some life out of the old board, [Anders] needed a little IO, specifically video and keyboard. The video side of the equation was relatively trivial, with an early-90s VGA card from eBay — not exactly period correct, but good enough to get something to display. Continue reading “Connecting A Keyboard To A Vintage PC-XT, The Hard Way”

Building Your Own 8088 XT Motherboard

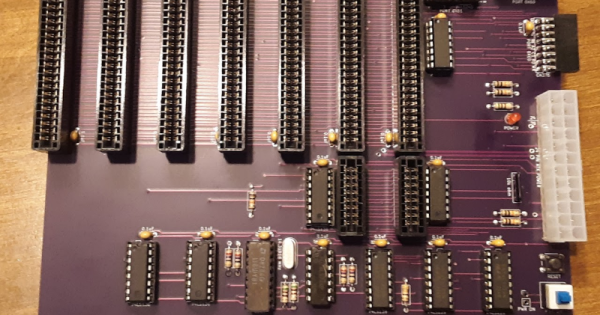
There was a time when an XT-class motherboard — like the old IBM PC with an 8088 CPU — was a high-tech accomplishment. Now, something like that is easily within reach of the average hobby lab. [Homebrew8088] did it, and it looks surprisingly simple, especially compared to what passes for a motherboard these days.

The board will take an 8088 or one of the NEC chips and by default sports 512 K of RAM, a few ISA slots, a PC speaker, a USB hard drive, and a PS/2 keyboard connector. The board will fit in an ATX case. Not bad. You can see a video of the board below.

In fact, the channel has a lot of related videos and the main site has many interesting topics, like driving an 8088 or 8086 from a Raspberry Pi. The GitHub site has design files for KiCad along with a lot of other information. Some of this will be interesting even if you are just trying to repair an old motherboard or would like to design a new ISA card.

If you want to know why the PC used an 8088 instead of an 8086, we just covered that. What are you going to do with an old XT computer? How about IRC?

Continue reading “Building Your Own 8088 XT Motherboard”

Framework Board Gets This Round Display PC Rolling

The Framework laptop is already a very exciting prospect for folks like us — a high-end computer that we can actually customize, upgrade, and repair with the manufacturer’s blessing? Sounds like music to our ears. But we’re also very excited about seeing how the community can press the modular components of the Framework into service outside of the laptop itself.

A case in point, this absolutely gorgeous retro-inspired computer built by [Penk Chen]. The Mainboard Terminal combines a Framework motherboard, five inch 1080 x 1080 round LCD display, and OLKB Preonic mechanical keyboard into a slick 3D printed enclosure that’s held together with magnets for easy access. Compared to the Raspberry Pi that we usually find tucked into custom computer builds like this, the Framework board offers incredible performance, not to mention the ability to run x86 operating systems and software.

[Penk] has Ubuntu 22.04 LTS loaded up right now, and he reports that everything works as expected, though there are a few xrandr commands you’ll need to run in order for the system to work properly with the circular display. The standard Ubuntu UI doesn’t look particularly well suited to such an unusual viewport, but we imagine that’s an issue you’ll have to learn to live with when experimenting with such an oddball screen.

It was just a few weeks ago that we brought you word that Framework was releasing the mechanical drawings for their Mainboard module, and we predicted then that it would be a huge boon to those building bespoke computers. Truth be told we expected a cyberdeck build of some sort to be the first one to hit our inbox, but you certainly won’t catch us complaining about seeing more faux-vintage personal terminals.

Modular Laptop Maker Provides Mainboard Documentation For Non-Laptop Projects

If you’ve been following the latest advancements in computing for a while, you already know that there’s a big problem with laptops: When they’re no longer useful as a daily driver, it can be a struggle to find a good use for all its parts. Everything is proprietary, and serious amounts of reverse engineering are required if you decide to forge ahead. This is where Framework, a laptop company building modular laptops comes in. They’ve made it clear that when you upgrade your Framework laptop with a new mainboard they want you to be able to continue to use the old mainboard outside of the laptop.

When it's done powering your laptop, use it for a cyberdeck?
When it’s done powering your laptop, use it for a cyberdeck?

To that end, Framework have provided 2D mechanical drawings of their mainboard and 3D printable cases that can of course be modified as needed. “But what about peripherals?” you might ask. Framework has provided pinouts for all of the connectors on the board along with information on which connectors to use to interface with them. No reverse engineering needed!

While it’s possible to buy a mainboard now and use it, their stated goal is to help people make use of used mainboards leftover from upgrades down the line. With just a stick of memory and a USB-C power adapter, the board will spring to life and even has i2c and USB immediately available.

What would you do with a powerful Intel i5-1135G7 mainboard? Framework wants to know, and to that end, they are actually giving away 100 mainboards to makers and developers. Mind you this is a program created and ran by Framework — and is not associated in any way Hackaday or our overlords at Supplyframe.

If you’ve read this far and still don’t know what the Framework laptop is, go check out this introduction by our own [Jenny List].

Old Firewall Reborn As Retro PC

We like projects where old gear is given a new life. [Splashdust] has a twenty-year old business firewall that’s build like a tank. He cracks it open and finds a complete x86 embedded motherboard inside, and sets off to restore it and turn it into a retro gaming computer (see the video from his Odd & Obsolete YouTube channel below the break).

This business firewall and router box is from a small Swedish firm Clavister, part of their S-Series from the early 2000s. The motherboard appears to be a generic one used in other equipment, and is powered by a VIA Eden ESP 4000 running at 400 MHz. The Eden line of x86 processors were low-power chips targeting embedded applications. The graphics chip is a Twister T by S3 Graphics which was purchased by VIA in 2000. After replacing the electrolytic capacitors, and making a few cables, [Splashdust] pops in a PCI sound card and boots up into Windows 98 from a CF card (we like the compact PCB vise he uses).

In two follow-up videos (here and here), he builds an enclosure (instructions on Thingiverse) and tries out several other operating systems. He was able to get the Tiny Core Linux distribution running with the NetSurf browser, but failed to get Windows 2000 or XP to work. Returning to Windows 98, he tweaks drivers and settings and eventually has a respectable retro-gaming computer for his efforts. The next time you’re cleaning out your junk bins, have a peek inside those pizza-box gadgets first — you may find a similar gem.

Continue reading “Old Firewall Reborn As Retro PC”

A CH341 programmer dongle with a stack of adapters on top (one for 1.8V and one for clip connection), and a test clip to the right of it

BIOS Flashing Journey Writeup Puts Tutorials To Shame

A couple of weeks ago, [Doug Brown] bought a Ryzen motherboard, advertised as “non-working” and discounted accordingly. He noticed that the seller didn’t test it with any CPUs old enough to be supported by the board’s stock BIOS revision, and decided to take a gamble with upgrading it.

Not having a supported CPU in hand either, he decided to go the “external programmer” route, which succeeded and gave this board a new life. This is not why we’re writing this up, however. The reason this article caught our eye is because [Doug]’s research leaves no stone unturned, and it’s all there to learn from. Whether through careful observation or thorough research, this article covers all the important points and more, serving as an example to follow for anyone looking to program their BIOS.

For instance, [Doug] correctly points out a design issue with these common programmers resulting in 5 V getting onto the 3.3 V data lines, and fixes it by rewiring the board. Going through all the letters in the ICs part number, something that many of us would dismiss, [Doug] notices that the flash chip is 1.8 V-only and procures a 1.8 V adapter to avoid the possibility of frying his motherboard. After finding out that the 1.8 V adapters don’t work for some people, he reverse-engineers the adapter’s schematics and confirms that it, indeed, ought to work with the specific parts on adapter he received.

Noting another letter in the part number implying the flash chip might be configured for quad-SPI operation, he adds series resistors to make sure there’s no chance of the programmer damaging the BIOS chip with its hardwired pinout. This is just an example of the insights in [Doug]’s article, there’s way more that we can’t mention for brevity, and we encourage you to check it out for yourself.

With this level of care put into the process, it’s no surprise that the modification was successful. The kind of inquisitiveness shared here is worth aspiring to, and writeups like this often surpass general-purpose tutorials in their insights and usefulness. What’s your “successfully making use of something sold as non-working” story?

If you’re looking for other insightful BIOS stories, we’ve covered someone reverse-engineering their BIOS to remove miniPCIe card whitelisting. We’ve typically covered BIOS modification stories in laptops, since there’s more incentives to modify these, but a lot of laptop BIOS articles will apply to desktop motherboards too, such as this supervisor password removal story or this LibreBoot installation journey by our own [Tom Nardi].

Thank you [Sidney] for sharing this with us!

A T700 laptop motherboard with its parts labelled

Replacement Motherboard Brings New Lease Of Life To Classic Thinkpads

“They don’t make them like they used to.” It might be a cliché, it might not even be entirely true, but there’s something special about owning a piece of hardware that was built to a much higher standard than most of its contemporaries, whether it’s that bulletproof Benz from 1992 or that odd fridge from 1987 that just seems to last forever. For laptop aficionados, the Thinkpad series from IBM and Lenovo is the ne plus ultra: beloved for their sturdy construction and rich feature set, they have been used anywhere from the United Nations to the International Space Station. The T60 and T61 (introduced in 2006) are especially famous, being the last generation sporting IBM logos and such classic features as 4:3 displays and infrared ports.

The thing is, even the best hardware eventually becomes obsolete when it can no longer run modern software: with a 2.0 GHz Core Duo and 3 GB of RAM you can still browse the web and do word processing today, but you can forget about 4K video or a 64-bit OS. Luckily, there’s hope for those who are just not ready to part with their trusty Thinkpads: [Xue Yao] has designed a replacement motherboard that fits the T60/T61 range, bringing them firmly into the present day. The T700 motherboard is currently in its prototype phase, with series production expected to start in early 2022, funded through a crowdfunding campaign.

Designing a motherboard for a modern CPU is no mean feat, and making it fit an existing laptop, with all the odd shapes and less-than-standard connections, is even more impressive. The T700 has an Intel Core i7 CPU with four cores running at 2.8 GHz, while two RAM slots allow for up to 64 GB of DDR4-3200 memory. There are modern USB-A and USB-C ports as well as well as a 6 Gbps SATA interface and two m.2 slots for your SSDs.

As for the display, the T700 motherboard will happily connect to the original screens built into the T60/T61, or to any of a range of aftermarket LED based replacements. A Thunderbolt connector is available, but only operates in USB-C mode due to firmware issues; according to the project page, full support for Thunderbolt 4 is expected once the open-source coreboot firmware has been ported to the T700 platform.

We love projects like this that extend the useful life of classic computers to keep them running way past their expected service life. But impressive though this is, it’s not the first time someone has made a replacement motherboard for the Thinkpad line; we covered a project from the nb51 forum back in 2018, which formed the basis for today’s project. We’ve seen lots of other useful Thinkpad hacks over the years, from replacing the display to revitalizing the batteries. Thanks to [René] for the tip.