Vintage Console Becomes The Calculator It Appears To Be

What’s sitting on [Bob Alexander]’s desk in the video below did not start out life as the desktop calculator it appears to be. Turning it into a standalone calculator with features the original designers couldn’t imagine turned out to be an interesting project, and a trip down the retrocomputing rabbit hole.

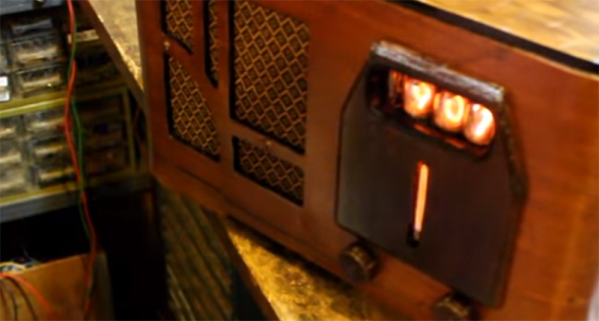
A little explanation is in order. Sure, with its Nixie display, calculator keypad, and chunky mid-century design, the Wang 360 desktop console looks like a retro calculator. But it’s actually only a dumb terminal for a much, MUCH bigger box, called the Electronic Package, that would fit under a desk. The foot-warming part that was once connected to [Bob]’s console by a thick cable that had been unceremoniously lopped off by a previous owner. [Bob] decided to remedy the situation with modern electronics. The console turned out to have enough room for a custom PCB carrying a PIC32, some level-shifting components, power supply modules that include the high-voltage supply for the Nixies, and a GPS module because Nixies and clocks just go together. The interesting bit is the programming; [Bob] chose to emulate the original Wang methods of doing math, which include multiplication by logarithmic addition. Doing so replicates the original look and feel of the calculator down to the rapid progression of numbers across the Nixies as the logarithms are calculated using the display registers.

We normally frown on vintage gear being given modern guts, but in this case [Bob] hit just the right balance of new and old, And given that the Electronic Packages these consoles were connected to go for $1500 or more on eBay, it was a better choice than letting the console go to scrap. A similarly respectful approach was taken with this TRS80 Model 100 revival.

Continue reading “Vintage Console Becomes The Calculator It Appears To Be”

Nixiewatch Looks Stylish In Aluminium

Nixie tubes are a perennial favorite, with their burnt orange glow bringing a smile to the face of even the most jaded maker. Due to their power requirements they’re usually seen in desktop clocks, but [RemcoK3] decided to whip up a Nixiewatch, with stylish results.

Packing twin Nixie tubes, the watch displays hours first, then minutes. An accelerometer is fitted, switching the tubes on when the user checks the watch. There’s also Bluetooth and WiFi connectivity, which can be used to set the time as well as check the remaining battery life. Standby time is estimated to be 350 hours, thanks to a low-power microcontroller and keeping the tubes off most of the time.

The presentation is where this watch really shines, sporting as it does an RGB LED for backlighting and an attractive aluminium case. The design is simple, helping to highlight the industrial beauty of the Nixie tubes themselves. The housing was first mocked up with 3D printed parts, before the final piece was CNC milled. [RemcoK3] is contemplating anodizing the watch, but we think that the brushed aluminium already looks perfect.

If you’ve grown tired of the Nixie aesthetic, fear not – numitron watches are also a thing!

Old Nixie Display Rides Again As 3D-Printer Filament Meter

We’re not sure about the name of this Nixie tube filament meter that [Scott M. Baker] built. He calls it a “filadometer”, perhaps a portmanteau of “filament” and “odometer”, in which case it makes sense. It may not flow trippingly from the tongue and we can’t come up with anything better, but whatever moniker you use it’s actually a pretty cool build.

The filadometer started life as something completely different and utterly typical for Nixie tube projects – a temperature and humidity gauge. [Scott] decided to recycle the eight-tube display to keep track of his Prusa, and in doing so he reveals a pretty remarkable degree of forethought in his design process. The original Nixie display has all the usual trappings – the driver chips, the shift registers, and the high voltage power supply. What stands out is the modularity of his design: the tube sockets and drivers live on a backplane PCB, with a Raspberry Pi and a separate HV supply board plugging into it. The original display had a Model B Pi, so there was plenty of room for a new Zero W. A new printed case and a little programming to capture the filament use from Octoprint is all it took to put this nifty little build back in action. The video below shows the details.

We’re always excited to see new videos from [Scott] because we learn so much from looking over his virtual shoulder. If you haven’t checked out his stuff, take a look at his homage to the 8″ floppy or his dual-port memory hack for retro gaming.

Continue reading “Old Nixie Display Rides Again As 3D-Printer Filament Meter”

The Display For When You Want Nixies Without All The Hassle

If you want to display numbers, just go for Nixies. There’s no better way to do that job, simply because they look so cool. Unfortunately, Nixies require high voltages, controlling them is a tiny bit strange, and they suck down a lot of power. These facts have given us a few Nixie alternatives, and [Dave] is here with yet another one. It’s a light pipe Nixie, made from acrylic rod.

The idea of using lights shining into a piece of acrylic to display a number is probably as old as the Nixie itself. There were a few tools in the 60s that used side-lit plastic panels to display numbers, and more recently we’ve seen a laser-cut version, the Lixie. This display is just ten sheets of acrylic etched with the numbers 0 through 9. Shine a light through the right acrylic sheet, and that number lights up.

You can do just about everything in acrylic, and it’s already used for a light pipe, so [Dave] grabbed some acrylic rod and bent it into the shape of a few numbers. With a little work, he was able to make his own FauxNixie by mounting these numbers in a carefully modified lamp socked wired up with ten individual LEDs. The results make for big, big, big Nixie-style numbers, and the perfect clock for the discerning glowey aficionado.

Continue reading “The Display For When You Want Nixies Without All The Hassle”

Arduino Shield Makes Driving Nixies Easy

Nixie tubes are adored by hackers across the world for their warm glow that recalls an age of bitter nuclear standoffs and endless proxy wars. However, they’re not the easiest thing to drive, requiring high voltages that can scare microcontrollers senseless. Thankfully, it’s possible to score an Arduino shield that does the heavy lifting for you.

The HV supply is the heart of any Nixie driver.

The shield uses HV5812 drivers to handle the high-voltage side of things, a part more typically used to drive vacuum fluorescent displays. There’s also a DHT22 for temperature and humidity measurements, and a DS3231 real time clock. It’s designed to work with IN-12 and IN-15 tubes, with the part selection depending on whether you’re going for a clock build or a combined thermometer/hygrometer. There’s also an enclosure option available, consisting of two-tone laser etched parts that snap together to give a rather sleek finished look.

For those looking to spin up their own, code is available on Github and schematics are also available. You’ll have to create your own PCB of course, but there are guides that can help you along that path. If you’re looking to whip up a quick Nixie project to get your feet wet, this might just be what you need to get started. Of course, you can always go straight to hard mode, and attempt a functional Nixie watch. Video after the break.

Continue reading “Arduino Shield Makes Driving Nixies Easy”

Nixie Power Supply Shows Ins And Out Of Offshore Manufacturing

[Tony] built a high-efficiency power supply for Nixie tube projects. But that’s not what this post is about, really.

As you read through [Tony]’s extremely detailed post on Hackaday.io, you’ll be reading through an object lesson in electronic design that covers the entire process, from the initial concept – a really nice, reliable 170 V power supply for Nixie tubes – right through to getting the board manufactured and setting up a Tindie store to sell them.

[Tony] saw the need for a solid, well-made high-voltage supply, so it delved into data sheets and found a design that would work – as he points out, no need to reinvent the wheel. He built and tested a prototype, made a few tweaks, then took PCBWay up on their offer to stuff 10 boards for a mere $88. There were some gotchas to work around, but he got enough units to test before deciding to ramp up to production.

Things got interesting there; ordering full reels of parts like flyback transformers turned out to be really important and not that easy, and the ongoing trade war between China and the US resulted in unexpected cost increases. But FedEx snafus notwithstanding, the process of getting a 200-unit production run built and shipped seemed remarkably easy. [Tony] even details his pricing and marketing strategy for the boards, which are available on Tindie and eBay.

We learned a ton from this project, not least being how hard it is for the little guy to make a buck in this space. And still, [Tony]’s excellent documentation makes the process seem approachable enough to be attractive, if only we had a decent idea for a widget.

Making A 1940s Radio Digital With Nixies

Classix Philly One Oh Seven Nine is your home for Philly soul right at the top of the dial. That phrase, ‘top of the dial’ doesn’t mean much these days because we all have radios with a digital display and seek buttons. There was a time when radios actually had dials, but [glasslinger] is in a class all by himself. He’s adding a digital display to a 1940s radio, and he’s doing it with Nixie tubes.

The circuitry for the digital display for this AM radio requires getting the frequency the radio is tuned to. This is done by counting the oscillator frequency, then subtracting the IF. [glasslinger] is doing this with an Arduino (hey, it’s a legitimate engineering choice) and a 4040 12-bit binary counter as a pre-scaler. The Arduino does the math and then drives a few 74141 Nixie drivers, which then display the frequency of the receiver in beautiful glass tubes. Add in a single neon bulb for the thousands digit, and you have a four-digit display that will tell you the frequency you’re tuned to on an old AM radio.

The rest of the build consists of fixing up an old radio and gluing the veneer down again with modern glues that will last another seventy years. The finished cabinet was sanded, a bezel for the display was added, and since [glasslinger] has the equipment, he made a new, long neon tube to light up with the volume of the radio. And you thought a cat’s eye detector was cool.

This build is a tour de force, and something that is so incredibly modern but at the same time built on vintage technology. If you’ve got an hour and a half, we highly recommend checking out the build video below.

Continue reading “Making A 1940s Radio Digital With Nixies”