How Cheap Is Cheap?

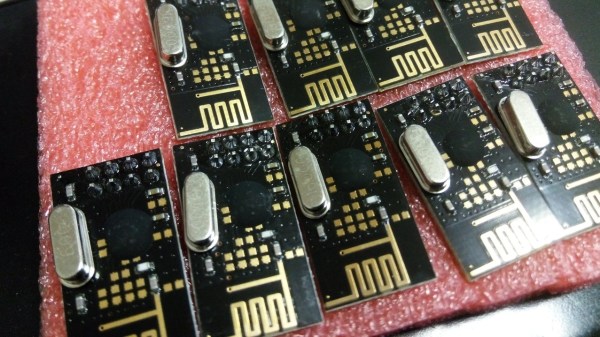
The Nordic Semiconductor nRF24L01 is the older sibling of the nRF24L01+ and is not recommended for new designs anymore. Sometimes, if you’re looking for a cheaper bargain, the older chip may the way to go. [necromant] recently got hold of a bunch of cheap nrf24l01 modules. How cheap ? Does $0.55 sound cheap enough?

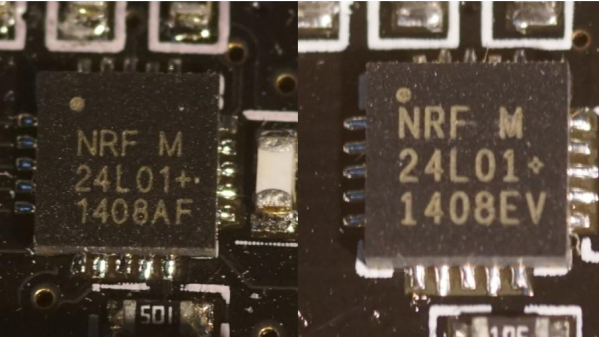
Someone back east worked out how to cost-optimize cheap modules and make them even cheaper. At that price, the modules would have severe performance limitations, if they worked at all. [necromant] decided to take a look under the hood. First off, there’s no QFN package on the modules. Instead they contain a COB (chip on board) embedded in black epoxy. [necromant] guesses it’s most likely one of those fake ASICs under the epoxy with more power consumption and less sensitivity. But there’s a step further you can go in making it cheaper. He compared the modules to the reference schematics, and found several key components missing. A critical current set resistor is missing (unless it’s hiding under the epoxy). And many of the components on the transmit side are missing – which means signal power would be nowhere near close to the original modules.

The big question is if they work or not ? In one test, the radio did not work at all. In a different setup, it worked, albeit with very low signal quality. If you are in Moscow, and have access to 2.4Ghz RF analysis tools, [necromant] would like to hear from you, so he can look at the guts of these modules.

Thanks to [Andrew] for sending in this tip.

Nordic NRF24L01+ – Real Vs Fake

[zeptobars], the folks behind all the decapping hard work and amazing die shots are at it again. This time they decided to look under the hood of two identical looking Nordic nRF24L01+ chips.

The nRF24L01+ is a highly integrated, ultra low power (ULP) 2Mbps RF transceiver IC for the 2.4 GHz ISM (Industrial, Scientific and Medical) band. Popular, widely used and inexpensive – and the counterfeit foundries are drawn to it like honey bees to nectar. But to replicate and make it cheaper than the original, one needs to cut several corners. In this case, the fakes use 350 nm technology, compared to 250 nm in the original and have a larger die size too.

These differences mean the fakes likely have higher power usage and lower sensitivities, even though they are functionally identical. The foundry could have marked these devices as Si24R1, which is compatible with the nRF24L01 and no one would have been wiser. But the lure of higher profits was obviously too tempting. A look through Hackaday archives will dig up several posts about the work done by [zeptobars] in identifying fake semiconductors.

Keystroke Sniffer Hides As A Wall Wart, Is Scary

For those of us who worry about the security of our wireless devices, every now and then something comes along that scares even the already-paranoid. The latest is a device from [Samy] that is able to log the keystrokes from Microsoft keyboards by sniffing and decrypting the RF signals used in the keyboard’s wireless protocol. Oh, and the entire device is camouflaged as a USB wall wart-style power adapter.

The device is made possible by an Arduino or Teensy hooked up to an NRF24L01+ 2.4GHz RF chip that does the sniffing. Once the firmware for the Arduino is loaded, the two chips plus a USB charging circuit (for charging USB devices and maintaining the camouflage) are stuffed with a lithium battery into a plastic shell from a larger USB charger. The options for retrieving the sniffed data are either an SPI Serial Flash chip or a GSM module for sending the data automatically via SMS.

The scary thing here isn’t so much that this device exists, but that encryption for Microsoft keyboards was less than stellar and provides little more than a false sense of security. This also serves as a wake-up call that the things we don’t even give a passing glance at might be exactly where a less-honorable person might look to exploit whatever information they can get their hands on. Continue past the break for a video of this device in action, and be sure to check out the project in more detail, including source code and schematics, on [Samy]’s webpage.

Thanks to [Juddy] for the tip!

Continue reading “Keystroke Sniffer Hides As A Wall Wart, Is Scary”

Everyone’s Favorite Energy Meter Hack, Now Wireless

[Kalle] is at it again with more hacks on electricity use meters. This time, the meter has been hacked to stream their data over the aether wirelessly. Now, data can be grabbed from multiple devices simultaneously, making the possibilities for home energy monitoring limitless

The first project [Kalle] did involved finding a meter from China with capabilities similar to (and cheaper than) the Kill-a-Watt meters. Unlike the Kill-a-Watt which spits out analog values, the Chinese meter sent digital information out on a ribbon cable with the bus lines labeled. Since the meter was so hackable, [Kalle] took it even further in this hack.

With those pesky wires out of the way, the device now uses an Arduino Pro Mini to sniff the energy meter’s data stream. Then it transmits the data wirelessly with a nRF34L01+ transceiver. As a perk, all of these chips fit inside the case of the energy meter, making this a very tidy hack indeed. The project code an incredible amount of detail is available on the project site, so be sure to check this one out for all of your energy monitoring needs!

RFToy Makes Wireless Projects Easier

[Ray] has created RFToy, a simple gadget to aid in setting up wireless systems with a variety of common radio modules. RFToy is an open source microcontroller board running on an ATmega328. While RFToy is Arduino code compatible, [Ray] chose to ditch the familiar Arduino shield layout for one that makes it easier to install RF modules, and is more handheld friendly.

[RFToy] includes headers for the popular nRF24L01 2.4 GHz transceiver, as well as 433/315 transmitters and receivers found in many low-cost wireless electronic devices. The 128×64 pixel OLED screen and 3 button interface make it easy to set up simple user interfaces for testing new designs.

[Ray] hasn’t broken any new ground here. What he has done is create a simple tool for wireless projects. Anyone who’s worked on a wireless system can tell you that tools like this are invaluable for debugging why your circuit isn’t talking. Is it the transmitter? The receiver? Something else in the power supply circuit?

Check out [Ray’s] demo video after the break. In it, he sniffs, records, and plays back signals from several remote-controlled outlets. [Ray] also has a great demo of sending temperature data back and forth using an nRF24L01.

Continue reading “RFToy Makes Wireless Projects Easier”

BORAT: Bathroom Monitor For The Future

A recent company move has left [kigster] and his 35 coworkers in a frustrating situation. Their new building only has two single occupancy bathrooms. To make matters worse, the bathrooms are located on two different floors. Heading to one bathroom, finding it occupied, then running upstairs to find the second bathroom also occupied became an all to common and frustrating occurrence at the office.

It was obvious the office needed some sort of bathroom occupancy monitoring system – much like those available on commercial aircraft. [kigster] asked for a budget of about $200 to build such a system. His request was quickly granted it by office management. They must have been on their way to the bathroom at the time.

borat1
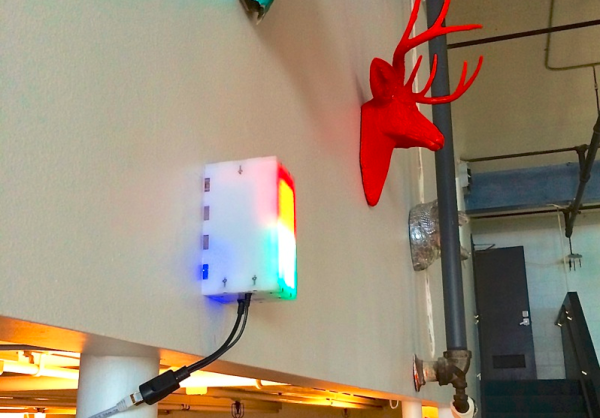
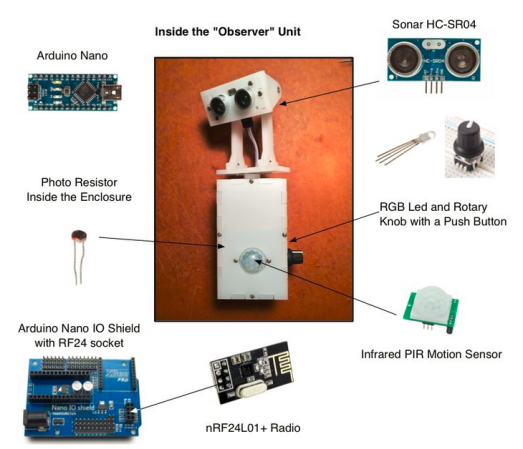
[kigster] began work on BORAT: Bathroom Occupancy Remote Awareness Technology. The initial problem was detecting bathroom occupancy. The easiest method would be to use door locks with embedded switches, much those used in aircraft. Unfortunately, modifying or changing the locks in a rented office space is a big no-no. Several other human detection systems were suggested and rejected. The final solution was a hybrid. Sonar, Passive Infrared (PIR), and light sensors work in concert to detect if a person is in the bathroom. While we think the final “observer unit” is rather cool looking, we’re sure unsuspecting visitors to the office may be wondering why a two eyed robot is staring at them on the throne.

The display side of the system was easy. The entire system communicates with the venerable nRF24L01+ radio modules, so the display just needed a radio module, an arduino, and a way of displaying bathroom status. Two LED matrices took care of that issue.

We really like this hack. Not only is it a great use of technology to solve a common problem, but it’s also an open source system. BORAT’s source code is available on [kigster’s] github.

Want to know more about BORAT? Kigster is answering questions over on his thread in the Arduino subreddit.

Strobe Remote

Reverse Engineering A Wireless Studio Lighting Remote

If you want to take a photograph with a professional look, proper lighting is going to be critical. [Richard] has been using a commercial lighting solution in his studio. His Lencarta UltraPro 300 studio strobes provide adequate lighting and also have the ability to have various settings adjusted remotely. A single remote can control different lights setting each to its own parameters. [Richard] likes to automate as much as possible in his studio, so he thought that maybe he would be able to reverse engineer the remote control so he can more easily control his lighting.

[Richard] started by opening up the remote and taking a look at the radio circuitry. He discovered the circuit uses a nRF24L01+ chip. He had previously picked up a couple of these on eBay, so his first thought was to just promiscuously snoop on the communications over the air. Unfortunately the chips can only listen in on up to six addresses at a time, and with a 40-bit address, this approach may have taken a while.

Not one to give up easily, [Richard] chose a new method of attack. First, he knew that the radio chip communicates to a master microcontroller via SPI. Second, he knew that the radio chip had no built-in memory. Therefore, the microcontroller must save the address in its own memory and then send it to the radio chip via the SPI bus. [Richard] figured if he could snoop on the SPI bus, he could find the address of the remote. With that information, he would be able to build another radio circuit to listen in over the air.

Using an Open Logic Sniffer, [Richard] was able to capture some of the SPI communications. Then, using the datasheet as a reference, he was able to isolate the communications that stored information int the radio chip’s address register. This same technique was used to decipher the radio channel. There was a bit more trial and error involved, as [Richard] later discovered that there were a few other important registers. He also discovered that the remote changed the address when actually transmitting data, so he had to update his receiver code to reflect this.

The receiver was built using another nRF24L01+ chip and an Arduino. Once the address and other registers were configured properly, [Richard’s] custom radio was able to pick up the radio commands being sent from the lighting remote. All [Richard] had to do at this point was press each button and record the communications data which resulted. The Arduino code for the receiver is available on the project page.

[Richard] took it an extra step and wrote his own library to talk to the flashes. He has made his library available on github for anyone who is interested.