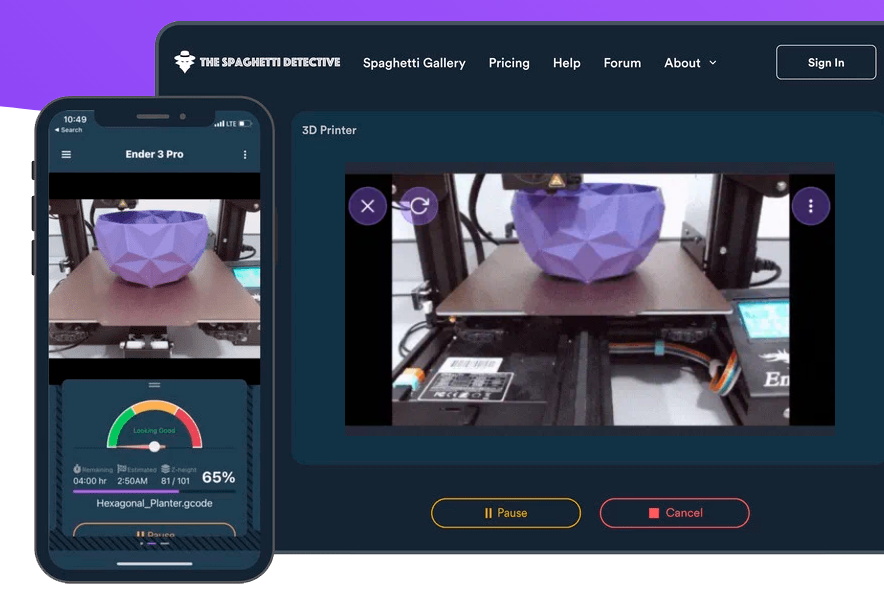
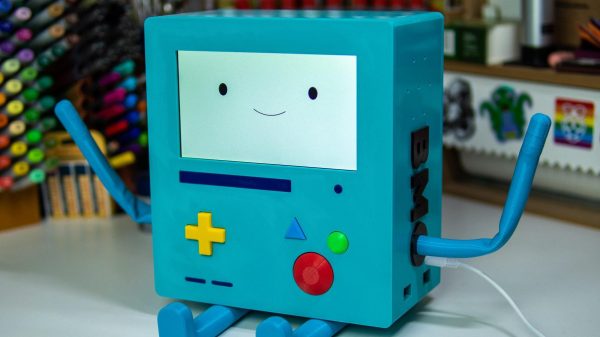
Want Octoprint But Lack A Raspberry Pi? Use An Old Android Phone

3D printers and Octoprint have a long history together, and pre-built images for the Raspberry Pi make getting up and running pretty easy. But there’s also another easy way to get in on the Octoprint action, and that’s to run it on an Android phone with the octo4a project.

A modern smartphone has a lot of useful features that make it attractive as an Octoprint host. There is a built-in touchscreen, easy power management, a built-in camera, and the fact that people regularly upgrade to new phones means that older Android phones — still powerful pieces of hardware in their own right — are readily available at low cost. The project is still relatively new, so don’t forget to check the Octoprint community thread for this project if you give it a try.

If you are wondering what Octoprint is and what it brings to the table, our own Tom Nardi explained what it does and why it matters when he shared his own upgrade experience from 2018. A few details are no longer current — for example one is no longer likely to encounter a Printrbot — but it’s still a perfectly valid primer on adding great management functionality to a 3D printer.

Spaghetti Detective Users Boiled By Security Gaffe

For readers that might not spend their free time watching spools of PLA slowly unwind, The Spaghetti Detective (TSD) is an open source project that aims to use computer vision and machine learning to identify when a 3D print has failed and resulted in a pile of plastic “spaghetti” on the build plate. Once users have installed the OctoPrint plugin, they need to point it to either a self-hosted server that’s running on a relatively powerful machine, or TSD’s paid cloud service that handles all the AI heavy lifting for a monthly fee.

Unfortunately, 73 of those cloud customers ended up getting a bit more than they bargained for when a configuration flub allowed strangers to take control of their printers. In a frank blog post, TSD founder Kenneth Jiang owns up to the August 19th mistake and explains exactly what happened, who was impacted, and how changes to the server-side code should prevent similar issues going forward.

Screenshot from TSD web interface
TSD allows users to remotely manage and monitor their printers.

For the record, it appears no permanent damage was done, and everyone who was potentially impacted by this issue has been notified. There was a fairly narrow window of opportunity for anyone to stumble upon the issue in the first place, meaning any bad actors would have had to be particularly quick on their keyboards to come up with some nefarious plot to sabotage any printers connected to TSD. That said, one user took to Reddit to show off the physical warning their printer spit out; the apparent handiwork of a fellow customer that discovered the glitch on their own.

According to Jiang, the issue stemmed from how TSD associates printers and users. When the server sees multiple connections coming from the same public IP, it’s assumed they’re physically connected to the same local network. This allows the server to link the OctoPrint plugin running on a Raspberry Pi to the user’s phone or computer. But on the night in question, an incorrectly configured load-balancing system stopped passing the source IP addresses to the server. This made TSD believe all of the printers and users who connected during this time period were on the same LAN, allowing anyone to connect with whatever machine they wished.

Changed TSD code from GitHub
New code pushed to the TSD repository limits how many devices can be associated with a single IP.

The mix-up only lasted about six hours, and so far, only the one user has actually reported their printer being remotely controlled by an outside party. After fixing the load-balancing configuration, the team also pushed an update to the TSD code which puts a cap on how many printers the server will associate with a given IP address. This seems like a reasonable enough precaution, though it’s not immediately obvious how this change would impact users who wish to add multiple printers to their account at the same time, such as in the case of a print farm.

While no doubt an embarrassing misstep for the team at The Spaghetti Detective, we can at least appreciate how swiftly they dealt with the issue and their transparency in bringing the flaw to light. This is also an excellent example of how open source allows the community to independently evaluate the fixes applied by the developer in response to a discovered flaw. Jiang says the team will be launching a full security audit of their own as well, so expect more changes getting pushed to the repository in the near future.

We were impressed with TSD when we first covered it back in 2019, and glad to see the project has flourished since we last checked in. Trust is difficult to gain and easy to lose, but we hope the team’s handling of this issue shows they’re on top of things and willing to do right by their community even if it means getting some egg on their face from time to time.

Smart Mirror Talks To 3D Printers

As time goes by, it’s only getting easier to make a magic mirror. You know, a mirror connected to the internet that shows information like news, weather, or whatever you want, right there on top of your stunning visage. In [Forsyth Creations]’ case, that data includes 3D printer activity on the network — something that’s way more relevant to daily life than say, headlines about Kim Jong Un’s weight loss progress. The build video is embedded below.

Thanks to projects like [MichMich]’s MagicMirror, everything is done with modules, including really useful things such as OctoMirror that let you keep an eye on your 3D printer(s) using OctoPrint.

The electronics are pretty simple here — [Forsyth Creations] used the guts of an old monitor for the display and a Raspberry Pi to serve up the modules as a web page. The only tricky part is power, because the LCD is going to need so much more voltage than the Pi and the absolutely necessary LEDs around the edge, but a couple of buck converters do the trick.

After stripping the monitor of all of its unnecessary plastic, [Forsyth Creations] cut rear and front frames to support the electronics. That isn’t a piece of mirror glass, it’s actually one-way acrylic which is lighter and somewhat cheaper. [Forsyth Creations] designed and printed some corner support brackets that double as leveling screw holders to get the acrylic panel dialed in just right, and you can get these for yourself from GitHub. We think this would be a good early woodworking project or something for a long weekend. [Forsyth Creations] built this in three days on an apartment balcony using a minimum of tools.

We especially admire that once it was done, he hung it up with a French cleat. Those are so useful.

Continue reading “Smart Mirror Talks To 3D Printers”

Recore Hacks The Hidden Microcontroller For 3D Printing

No stranger to the world of 3D printers, [Elias Bakken] from the [Intelligent Agent] workshop has released a new controller board called Recore. The typical 3D printer has a dedicated controller which handles the real-time aspects of driving stepper motors. Many setups also have a second computer, often Linux-based, which is dedicated to supporting tasks like running an Octoprint server and interfacing to a digital camera to monitor print progress remotely. [Elias]’s design merges these together into one compact 12 x 12 x 4 cm package.

The Recore board is powered by an AllWinner A64 system on chip (SoC) which packs four ARM Cortex-A53 AArch64 cores running Debian Linux. The applications include Klipper, a project we wrote about when it was first introduced, and the OctoPrint print server. “But Linux is not a real-time operating system”, we hear you cry, “and controlling stepper motor drivers from an A64 SoC is just asking for trouble”. [Elias] could have addressed this problem by putting a secondary microcontroller on the board, but he found an even more elegant solution instead.

It turns out that there is already a secondary microcontroller hidden in plain sight, integrated into the A64 itself. See that small box labeled AR100 at the top of the block diagram? Meet the AR100, a controller originally intended to manage low-power operations of the A64. It is an OpenRISC 32-bit OR1k processor. But the AR100 is extremely underutilized, and [Elias] takes good advantage of this by repurposing it to those real-time tasks associated with a 3D printer controller. Watch the short video down below to learn how he solves a few of the nitty-gritty implementation details such as timers and communicating with the Linux processors. You might learn some tips from the other short videos in the series featuring some interesting debugging and problem solving sessions. There is a project GitHub repository and a Wiki full of good information and testing results.

[Elias] has a long history of building printer controllers. While his last one had to be abandoned because of manufacturing issues, he learned from that experience. Manufacturability was a top priority in the design of the Recore. We’re jealous of the well-appointed [Intelligent Agent] facility in Norway, but even more so of the nomadic lifestyle that [Elias] appears to enjoy — in his videos, he can be seen working from far-flung locales such as a tropical island resort and a laboratory floating in high Earth orbit. We’ve featured [Elias]’s projects in the past, including the Replicate 3D printer controller, a semi-automatic liquor cabinet, and the dog-operated treat dispenser.

Continue reading “Recore Hacks The Hidden Microcontroller For 3D Printing”

3D Printer Control Board Packs A Raspberry Pi Compute Module 4

Traditionally, 3D printer control boards have used simplistic 8-bit microcontrollers to command the stepper drivers and ultimately move the machine where it needs to go. Newer boards have switched over to 32-bit microcontrollers, but they’re still relatively limited computationally. Because of this, a Raspberry Pi running OctoPrint is usually used to provide more complex features such as remote management and live video.

Looking to combine these different devices into a single all-in-one board, [pkElectronics] developed the Sigmoid S7P. With an STM32 microcontroller, TMC2209 stepper drivers, a Raspberry Pi Compute Module 4, and plenty of room for expansion, it promises to be a drop-in upgrade for essentially any 3D printer running on an open source firmware that could be ported over.

An earlier concept for the Sigmoid

According to [pkElectronics], the idea for the Sigmoid had been floating around for several years, but never got off the ground due to the difficulties in dealing with the SO-DIMM interface used by previous iterations of the Compute Module. But with the switch to smaller and denser connector for the CM4, the board finally started to take shape.

Whether you just used it as a convenient way to integrate OctoPrint into your printer, or want to get into something more advanced like Klipper, the Sigmoid S7P looks like a very exciting project. [pkElectronics] says they are considering producing the board commercially if there’s interest, so if you want one of these for your own custom 3D printer build, let them know.

A 3D Printed Camera Arm For Great 3D Print Timelapses

If you’re a maker that publishes projects online, you’ll be well across the production values arms race that’s been raging over the past decade. For those in the 3D printing space, this means that you’ll need to be producing slick timelapse videos of your prints. [BuildComics] is now doing just that, with a custom camera arm to help do the job. (Video, embedded below.)

The arm relies on a 3D-printed gear train that allows a stepper motor to turn it slowly throughout the print’s duration. It’s controlled by an Arduino that receives commands via Firmata. The arm is mounted on top of the printer, holding a webcam above the build plate for a good view. It’s setup via Octolapse to take images as each layer is finished, giving that haunting look of a model materialising on the print bed throughout the duration of the timelapse.

Files are available for those wishing to build their own. The design as used is for the Prusa Mini, but it should be adaptable to other printers without too much trouble. We’ve reported on Octolapse before, with its videos proving to be the gold standard when it comes to the art of the printing time lapse.

Continue reading “A 3D Printed Camera Arm For Great 3D Print Timelapses”

Teardown: Creality Wi-Fi Box

Creality, makers of the Ender series of 3D printers, have released a product called Wi-Fi Box meant to cheaply add network control to your printer. Naturally I had to order one so we could take a peek, but this is certainly not a product review. If you’re looking to control your 3D printer over the network, get yourself a Raspberry Pi and install Gina Häußge’s phenomenal OctoPrint on it. Despite what Creality might want you to believe, their product is little more than a poor imitation of this incredible open source project.

Even if you manage to get it working with your printer, which judging by early indications is a pretty big if, it won’t give you anywhere near the same experience. At best it’ll save you a few dollars compared to going the DIY route, but at the cost of missing out on the vibrant community of plugin developers that have helped establish OctoPrint as the defacto remote 3D printing solution.

That being said, the hardware itself seems pretty interesting. For just $20 USD you get a palm-sized Linux computer with WiFi, Ethernet, a micro SD slot, and a pair of USB ports; all wrapped up in a fairly rugged enclosure. There’s no video output, but that will hardly scare off the veteran penguin wrangler. Tucked in a corner and sipping down only a few watts, one can imagine plenty of tasks this little gadget would be well suited to. Perhaps it could act as a small MQTT broker for all your smart home devices, or a low-power remote weather station. The possibilities are nearly limitless, assuming we can get into the thing anyway.

So what’s inside the Creality Wi-Fi Box, and how hard will it be to bend it to our will? Let’s take one apart and find out.

Continue reading “Teardown: Creality Wi-Fi Box”