A Simpler Sous-vide Hack

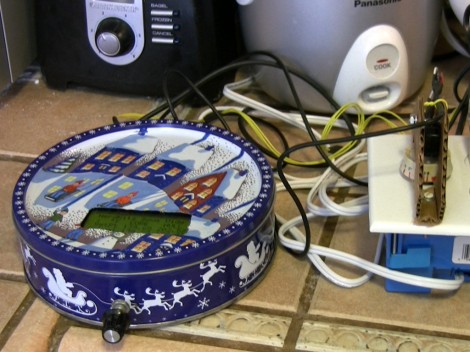
Here are the contronl modules for a sous-vide project over at Nerdkits. [Humberto] and crew continue doing a great job of focusing a project on one goal, then explaining the steps needed to get there. In this case they wanted to build their own sous-vide appliance that was cheap, and didn’t really require the user to deal with mains voltage. We like it because most of the parts can be found at a hardware store and big box store.

He started with a slow cooker, which is pretty standard. Next he needed a way to switch power to the device. Instead of using a solid state relay, he went for a standard dimmer switch. It’s build into a double gang electrical box, and controls an outlet which is occupying the second position in that box. Now current to the slow cooker is limited by the position of the dimmer. The next task was to add a cardboard frame which marries a servo motor to the dimmer’s knob.

With the control scheme in place [Humberto] needed a feedback sensor. He built his own water proof temperature probe by covering an LM34 temperature sensor with shrink tube and sealing the ends. Just one probe in the cooking water isn’t very reliable so he added a second between the slow cooker’s base and ceramic vessel to improve the performace of the PID algorithm. He goes into detail about that in the video after the break.

Continue reading “A Simpler Sous-vide Hack”

Climbing The Mountain Of Quadcopter Design

What a sweet thing it is to see the first outdoor flight of a quadcopter. [Botched] has done a wonderful job of documenting the entire build process. Take a look at all that he has done, then jump after the break to see the extremely stable test flight footage.

Earlier iterations used feedback electronics that he designed, etched, and soldered himself. We think they looked pretty good, but he was not happy with the performance. He spent a bunch of time redesigning the IMU board, but after he printed out the PCB artwork he decided his soldering was not up to the QFN challenge and he went with a pre-assembled breakout board.

His post about PID tuning is quite interesting. He removed two of the motors and mounted those opposite ends of the chassis to a hinged stand. This let him tweak the feedback loop until the two remaining propellers were able to maintain balance even when he nudged the unit.

His test flight footage is accompanied by an on-board camera shot. He simply taped a smart phone to the battery and let it roll. Make sure you turn off your speakers before watching this one or the motor noise will let the boss know you’re reading Hackaday again instead of working.

Continue reading “Climbing The Mountain Of Quadcopter Design”

OsPID: The Open Source PID Controller

Need PID control in your next project? Perhaps this little beauty can help. It’s an Open Source PID controller that also follows the Open Hardware guidelines. [Brett Beauregard] based the project on the newly minted Arduino PID library which he wrote. In the video after the break [Brett] takes apart the device, walking through some of the ways this might be hacked. If you want an overview of every part of this project to-date the best resource is probably his personal blog post.
The front circuit board is the meat and potatoes of the device. It hosts the user interface in the form of buttons, LEDs, and a graphic LCD screen. You can also see the USB mini-b connector which gives you access to the Arduino compatible ATmega328 microcontroller on the back. There is also a piezo buzzer for your alarm needs.
The prototype that [Brett] shows off uses pin connectors to join the main board to the two daughter boards. Unfortunately, the production model moved to dual-sided edge connectors. That’s fine if you you’re using it in its stock condition, but it makes it a bit harder to replace those boards with your own hardware. None-the-less, we love to see great Open Hardware projects brought to market! Continue reading “OsPID: The Open Source PID Controller”

UberFridge Helps Keep Beer Production Going Through The Dog Days Of Summer

uberfridge

[Elco Jacobs] used to let his beer ferment in the kitchen, but when things got too hot over the summer, he had to suspend his ale making for a few months. Not wanting to have to put production on hiatus again, he modified an old refrigerator into an awesome fermentation unit he calls the UberFridge.

The refrigerator features two temperature sensors, one that sits in the fermenting beer, and one that measures the temperature of the fridge. This dual probe setup offers him the ability to closely monitor the fermentation process, which he does via a sharp-looking web interface.

An Arduino serves as the PID controller, talking to a wireless router via a serial connection. The Arduino logs and relays data to the router where it can be viewed via a web browser. Not only can he keep tabs on what’s going on inside the fridge, he can reprogram the Arduino via the web interface as well.

Keep reading to see [Elco] explain the ins and outs of his UberFridge – we’re pretty sure you’ll want to build your own after you do.

[via BuildLounge]

Continue reading “UberFridge Helps Keep Beer Production Going Through The Dog Days Of Summer”

Toaster Oven Reflow Control Without Modifying The Oven

[Eberhard] wanted his own reflow oven but didn’t really want to mess around with the internals that control the heating element. He put his microcontroller programming experience to work and came up with an add-on module that controls the oven by switching the mains power.

The image above shows a board in the midst of the reflow process. If you’re not familiar, solder paste usually comes with a recommended heat curve for properly melting the slurry. [Eberhard] managed to fit three of these temperature profiles into his firmware.

The ATtiny45 which makes up the controller samples oven temperature via the thermistor seen next to the board. A PID algorithm is used to calculate when to switch mains power on and off via a relay. One button and one LED make up the controller’s user interface for scrolling through the three preprogrammed temperature profiles.

It looks like it works great, see for yourself in the clip after the break.

Continue reading “Toaster Oven Reflow Control Without Modifying The Oven”

Kitchen Hacks: Sous Vide Builds Don’t Need To Cost An Arm And A Leg

It’s not that we haven’t seen inexpensive Sous Vide builds. It’s just that we enjoy the fact that [Kelvin’s] Sous Vide machine gives new life to unused things. The cooking vessel is a crock pot which he acquired for just $3. He housed it in a large Styrofoam box which he got for free through his local freecycle program. The circulation pump is a $0.99 fish tank part that pushes about ten gallons per hour.

He even hunted around to find the best prices on the control circuitry. The PID controller is obviously the most important part, as it will regulate the cooking temperature. He found a greatly discounted module that set him back just over $30. It even has a self-learning feature that sounds like it’s handy (not sure if all of these have that though).

Check out the video after the break. We like the use of his old RAM heat sinks to help dissipate heat from the solid state relay that drives the heating element. Since that SSR is inside of the foam box we could see heat becoming an issue. This way it’s dissipated, but not wasted.

Continue reading “Kitchen Hacks: Sous Vide Builds Don’t Need To Cost An Arm And A Leg”

DIY Segway: Fast, Silent, And Open

This is a picture of the guts of a diy Segway project (translated). Everything fits into a tiny space under the platform upon which the rider stands. It’s tight, but makes for a sleek look when the diamond plate is covering up all of the internals.

An ATmega644 controls the vehicle. It does so by using a PID control scheme to monitor a gyroscope, driving the wheels to maintain the center of balance. Electronically, the most complicated part of the build is the motor controller. It seems to be an original design, using an ATmega48 and several other integrated circuits. It was hard for us to figure out how this was implemented, but with some intensive study of the three schematics that go into the module we’d bet you can get to the bottom of things. We certainly like the outcome, as this personal transport is whisper quiet. Take a look at the clip after the break to hear for yourself.

Note: Be careful if you’re reusing the code from the translated link at the top. Google translator also translates the variable names in the code and might break how it works due to inconsistencies in the translation.

Continue reading “DIY Segway: Fast, Silent, And Open”