Tetris

Arduino Tetris On A Multiplexed LED Matrix

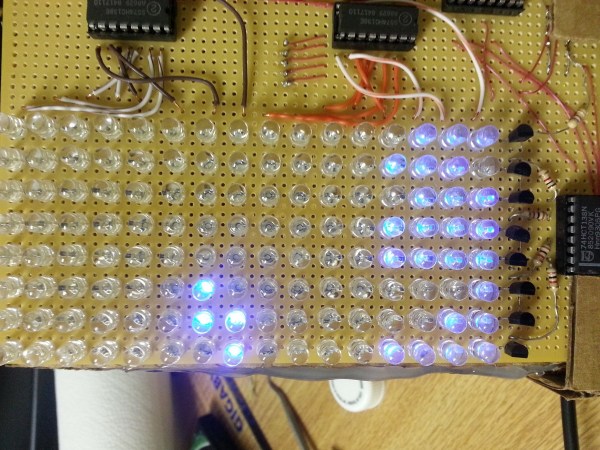
[Alex] needed a project for his microcomputer circuits class. He wanted something that would challenge him on both the electronics side of things, as well as the programming side. He ended up designing an 8 by 16 grid of LED’s that was turned into a game of Tetris.

He arranged all 128 LED’s into the grid on a piece of perfboard. All of the anodes were bent over and connected together into rows of 8 LED’s. The cathodes were bent perpendicularly and forms columns of 16 LED’s. This way, if power is applied to one row and a single column is grounded, one LED will light up at the intersection. This method only works reliably to light up a single LED at a time. With that in mind, [Alex] needed to have a very high “refresh rate” for his display. He only ever lights up one LED at a time, but he scans through the 128 LED’s so fast that persistence of vision prevents you from noticing. To the human eye, it looks like multiple LED’s are lit up simultaneously.

[Alex] planned to use an Arduino to control this display, but it doesn’t have enough outputs on its own to control all of those lights. He ended up using multiple 74138 decoder/multiplexer IC’s to control the LED’s. Since the columns have inverted outputs, he couldn’t just hook them straight up to the LED’s. Instead he had to run the signals through a set of PNP transistors to flip the logic. This setup allowed [Alex] to control all 128 LED’s with just seven bits, but it was too slow for him.

His solution was to control the multiplexers with counter IC’s. The Arduino can just increment the counter up to the appropriate LED. The Arduino then controls the state of the LED using the active high enable line from the column multiplexer chip.

[Alex] wanted more than just a static image to show off on his new display, so he programmed in a version of Tetris. The controller is just a piece of perfboard with four push buttons. He had to work out all of the programming to ensure the game ran smoothly while properly updating the screen and simultaneously reading the controller for new input. All of this ran on the Arduino.

Can’t get enough Tetris hacks? Try these on for size.

Hacking The Crayola Digital Light Designer

[Harry] wrote in with his hack of the Crayola Light Designer. The Light Designer is a pretty unique toy that lets kids write on a cone-shaped POV display with an infrared light pen. [Harry] cracked one open and discovered it has a spinning assembly with a strip of 32 RGB LEDs for the display and a strip of photodiodes to detect pen position. These were ripe for the hacking.

The spinning assembly uses several slip ring connections to send power and data to the spinning assembly. [Harry] connected a logic analyzer to several of the connections to determine which lines were clock, data, and frame select (the strip is split into 2 16-led “frames”). He went on to reverse-engineer the serial protocol so he could drive the strips himself.

Instead of reverse-engineering the microcontroller on the product’s PCB, [Harry] decided to use a Leostick (Arduino Leonardo clone) to control the LEDs and spinner. He mounted the Leostick on the shaft of the spinning assembly, and powered it over the slip ring connections. After adding some capacitance to make up for noisy power from the slip rings, [Harry] had the POV display up and running with his own controller. Check out the video after the break to see the hacked POV display in action.

Continue reading “Hacking The Crayola Digital Light Designer”

Bike Persistance of Vision

Simple POV Bike Effects With WS2811 Strips

[Andrew] wrote in with a new take on the classic persistence of vision bike spoke hack. While many of these POV setups use custom PCBs and discrete LEDs, [Andrew]’s design uses readily available off-the-shelf components: WS2811 LED strips, an Arduino, an Invensense IMU breakout board, and some small LiPo batteries.

[Andrew] also implemented a clever method of controlling his lights. His code detects when the rider taps the brakes in certain patterns, which allows changing between different light patterns. He does note that this method isn’t incredibly reliable due to some issues with his IMU, so now he senses when the rider taps on the handlebars as well.

If you want to build your own bike POV setup, you’re in luck. [Andrew] wrote up detailed instructions that outline the entire build process. He also provides links to sources for each part to make building your own setup even easier. His design is pretty affordable too, coming in at just under $50 per wheel. Check out a video of [Andrew]’s setup in action after the break.

Continue reading “Simple POV Bike Effects With WS2811 Strips”

POV Display Does It On The Cheap

lowBudgetPOV

[Sholto] hacked together this ultra low-budget spinning display. He calls it a zoetrope, but we think it’s actually an LED based Persistence Of Vision (POV) affair. We’ve seen plenty of POV devices in the past, but this one proves that a hack doesn’t have to be expensive or pretty to work!

The major parts of the POV display were things that [Sholto] had lying around. A couple of candy tins, a simple brushed hobby motor, an Arduino Pro Mini, 7 green LEDs, and an old hall effect sensor were all that were required. Fancy displays might use commercial slip rings to transfer power, but [Sholto] made it work on the cheap!

The two tins provide a base for the display and the negative supply for the Arduino. The tins are soldered together and insulated from the motor, which is hot glued into the lower tin. A paper clip contacts the inside of the lid, making the entire assembly a slip ring for the negative side of the Arduino’s power supply. Some copper braid rubbing on the motor’s metal case forms the positive side.

[Sholto] chose his resistors to slightly overdrive his green LEDs. This makes the display appear brighter in POV use. During normal operation, the LEDs won’t be driven long enough to cause damage. If the software locks up with LEDs on though, all bets are off!

[Sholto] includes software for a pretty darn cool looking “saw wave” demo, and a simple numeric display. With a bit more work this could make a pretty cool POV clock, at least for as long as the motor brushes hold up!

Continue reading “POV Display Does It On The Cheap”

The Persistence Of Jumping Rope

POV Jump Rope

[Antonio Ospite] recently took up jump rope to increase his cardio, and also being a hacker decided to have some extra fun with it. He’s created the JMP-Rope — the Programmable Jump Rope.

He’s using the same principle as a normal POV (Persistence of Vision) display, but with a cool twist. He’s managed to put the microcontroller (a Trinket) and battery into the handle of the jump rope. Using a slip ring system, the RGB signal gets passed to the rope, which contains the LEDs. It’s a pretty slick setup, and he’s written another post all about how he did the hardware.

To create the images for his JMP-Rope, he’s outlined the steps to a successful POV image on his blog. These include re-sizing the image to a circle (duh), reducing the color palette, and then performing pixel mapping using a discrete conversion (from polar to Cartesian coordinates). After that it’s just a matter of representing your new-found pixel map in a 1D animation, played column by column. [Antonio] stores these frames on the micro-controller as an RLE (run length encoded) indexed bitmap.

Stick around to see how he made it, and some other cool examples of what it can do!

Continue reading “The Persistence Of Jumping Rope”

Persistence Of Vision Would Make A Great HUD

povtyp

[Eduardo Zola] has just put the finishing touches on this awesome real-time persistence of vision display which displays text as you type!

It looks like the display is mounted on a small DC fan, which [Eduardo] powers using a bench top power supply. This allows him to fine tune the speed manually, without adjusting the the actual POV controller. The display receives the characters from the keyboard via a small USB RF receiver, and it has got a pretty snappy response time.

There isn’t too much more info on the project, but it certainly gives us an idea — could persistence of vision be used to create a kind of heads up display in a vehicle? What do you think?
Continue reading “Persistence Of Vision Would Make A Great HUD”

Fail Of The Week: [Caleb’s] Phosphorescent CD Player

fotw-caleb-hackfail

When [Caleb Kraft] was in full production for Hackaday he pumped a pile of awesome videos. But not every project worked out. He’s been a fan of the Fail of the Week posts, and sent in his own recollection of a project gone wrong. Above you can see his phosphorescent CD player. He prototyped the project in May of last year but technical issues and looming deadlines meant it never saw the light of day. We’ll fill you in on his fail after the jump.

Editor’s note: We need more tips about your own failure! There are a handful of submissions left in our reserves, but to keep this topic as a weekly column we need help tracking down more failed projects. Please document your past failures and send us a link to the write-up. If you don’t have a blog to post it on you may do what [Caleb] has done and email us directly. Remember to include any images and links to video which you may have.

Continue reading “Fail Of The Week: [Caleb’s] Phosphorescent CD Player”