Pi Zero Transforms To Game Boy

[GreatScott] bought a Game Boy case. Normally, you’d assume you wanted this to repair a damaged Game Boy, but in this case [GreatScott] used a Pi Zero and some 3D printing to build a game system into the tiny box. You can see some videos, below.

Two interesting parts of the project are the source of the LCD display (a rearview camera screen) and the selection of batteries. Lithium ion batteries are all the rage. But if you watch the news, you know there are some safety issues with using the batteries, especially if you use them improperly. [GreatScott] decided to go with nickel metal hydride cells which still need a protection circuit, but are typically less of a danger than the newer technology cells.

Continue reading “Pi Zero Transforms To Game Boy”

Hackaday Links Column Banner

Hackaday Links: November 6, 2016

Here’s a life protip for you: get really, really good at one video game. Not all of them; you only want to be good – top 10% at least – at one video game. For me, that’s Galaga. It’s a great arcade game, and now it’s IoT. [justin] has been working on publishing high scores from a Galaga board to the Internet. The electronics are actually pretty simple – just a latch on a memory address, and an ESP8266 for comms.

On with the mergers and acquisitions! Lattice has been sold to Canyon Bridge, a Chinese private equity firm, for $1.3 Billion. Readers of Hackaday should know Lattice as the creators of the iCE40 FPGA platform, famously the target of the only Open Source FPGA toolchain.

The Internet of Chocolate Chip Cookies. Yes, it’s a Kickstarter for a cookie machine, because buying a tube of pre-made cookie dough is too hard. There is one quote I would like to point out in this Kickstarter: “Carbon Fiber Convection Heating Element (1300W) is more energy-efficient than traditional electric elements and heats up instantly.” Can someone please explain how a heating element can be more efficient? What does that mean? Aren’t all resistive heating elements 100% efficient by default? Or are they 0% efficient? The Internet of Cookies broke my brain.

The USB Rubber Ducky is a thumb-drive sized device that, when plugged into a computer, presents itself as a USB HID keyboard, opens up a CLI, inputs a few commands, and could potentially do evil stuff. The USB Rubber Ducky costs $45, a Raspberry Pi Zero and a USB connector costs $6. [tim] built his own USB Rubber Ducky, and the results are great.

Pi Zero Powered Skateboard

There’s something to be said for whizzing around town on your own automatic personal transport. It’s even better when you’ve built it yourself. That’s just what [The Raspberry Pi Guy] did – built a Wiimote controlled, Raspberry Pi Zero powered skateboard and whizzed around Cambridge to show it off.

It’s a fairly simple build – skateboard, battery, motor and mount, controller, Wiimote and Pi Zero. The Raspberry Pi controls the motor controller which in turn controls the motor speed. The Python code that [The Raspberry Pi Guy] wrote comes in at around a hundred lines and manages the motor controller and the Bluetooth connection to the Wiimote, which is used to control the board’s speed while the user controls the steering. [The Raspberry Pi Guy] says he’s gotten up to 30 km/h on the skateboard, which, given a powerful enough motor and a non-bumpy surface isn’t hard to believe.

It may seem a bit of overkill, running a bit of Python on a Raspberry Pi to run a motor (others have done it with something simpler) but it’s a fun project nonetheless. [The Raspberry Pi Guy] describes where he got the parts to put the skateboard together and has released the Python code on his GitHub page.

Continue reading “Pi Zero Powered Skateboard”

Icehat on a Raspberry Pi Zero

Give Your RPi A Cool FPGA Hat

Need additional, custom IO for your Raspberry Pi? Adding an FPGA is a logical way to expand your IO, and allow for high speed digital interfaces. [Eric Brombaugh]’s Icehat adds a Lattice iCE5LP4K-SG48 FPGA in a package that fits neatly on top of the Raspberry Pi Zero. It also provides a few LEDs and Digilent compatible PMOD connectors for adding peripherals. The FPGA costs about six bucks, so this is one cheap FPGA board.

The FPGA has one time programmable memory, but can also be programmed over SPI. This allows the host Pi to flash the FGPA with the latest bitstream at boot. Sadly, this particular device is not supported by the open source Icestorm toolchain. Instead, you’ll need Lattice’s iCEcube2 design software. Fortunately, this chip is supported by the free license.

Icehat is an open source hardware design, but also includes a software application for flashing a bitstream to the FPGA from the Pi and an example application to get you started. All the relevant sources can be found on Github, and the PCB is available on OSHPark.

While this isn’t the first pairing of a Raspberry Pi and FPGA we’ve seen, it is quite possibly the smallest, and can be built by hand at a low cost.

Emulating A GameBoy Advance Inside Of A Gameboy Advance

[Ryzee119]’s GBA might not look so different at first glance. The screen is way better than you remember, but that may just be your memory playing tricks on you. The sound comes out of the speakers. It feels the right weight. It runs off AA batteries. Heck, even the buttons feel right.

emulating-gba-inside-gbaIt’s not until you notice that it really shouldn’t be playing any games without a cartridge inserted that you know something is not right in the Mushroom Kingdom. When you look inside you see the edge of a Raspberry Pi Zero instead of the card edge connector you expected.

It took a lot of work for [Ryzee119] to convert a dead, water damaged, GBA to a thriving emulation station based around a Pi Zero. The first step was desolder the components he couldn’t find anywhere else. The LR buttons, the potentiometer, and even the headphone jack. The famously hard to see screen, of course, had to go.  It was replaced by a nice TFT. Also, the original speaker was too corroded from the water and he sourced a replacement.

Custom replacement PCB

Next he took a good photo of the GBA’s circuit board. We wonder if he used the scanner method mentioned in the comments of this article? He spent a lot of time in Dassault’s DraftSight, a 2D CAD program, outlining the board. Then, after thoroughly verifying the size of the board for the Nth time he imported the outlines to EagleCAD.

He managed to cram quite a bit onto the board while remaining inside the GBA’s original envelope. The switches, potentiometer, and jack went back to their original locations. Impressively, he made his own pad traces for the A, B, and D-Pad buttons. The mod even handles slowly decreasing battery voltages better than the original.

In the end it all snaps together nicely. He’s configured it to boot into the emulator right at start-up. If you’d like one for yourself, all his files are open source. 

Raspberry Pi Zero As A USB Stick

The Raspberry Pi Zero is small enough that it could almost be mistaken for a USB gadget, rather than a standalone computer. Maybe that was the inspiration that drove [Novaspirit] to completely “donglify” his Zero.

This is a great convenience hack if you’ve got a Zero just kicking around. With minimal soldering, he converted the Zero’s onboard female USB jacks into a male USB plug. From there on out, it’s all software, and the video (embedded below) takes you through all the steps on Windows.

Continue reading “Raspberry Pi Zero As A USB Stick”

The Animated Gif Camera, Brought To You By A Raspberry Pi

No one watches video anymore. Cable cutters are digging into Verizon’s profits, and YouTube is a shadow of its 2005 self. What are people consuming now? Animated gifs. This is the bread and butter of the meme economy. Personally, all my investments are sunk deep into Gandolf / Balrog gifs, with each character replaced with Trump and Hillary. I expect a tidy profit on November 9th.

With animated gifs being the de facto method of sharing moving pictures, the world will belong to those who can create them. Phones are fine, but strangely video cameras, DSLRs, and other high-end photography equipment are the norm. This is idiotic, of course, because high-definition images are just a fad, and audio is useless.

Finally, there’s an answer. [Nick Brewer] created a camera that only takes animated gifs. I cannot stress this enough: this animated gif cam is a serious contender for a technical Oscar. Kubrick wept.

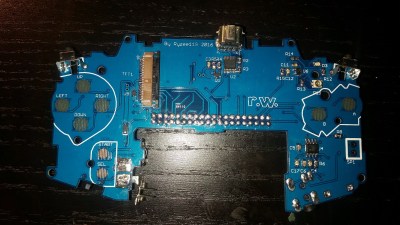
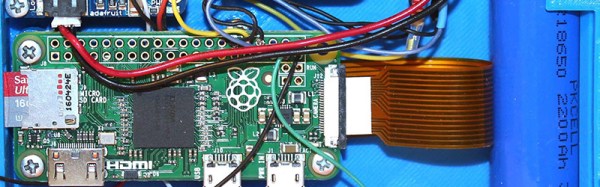
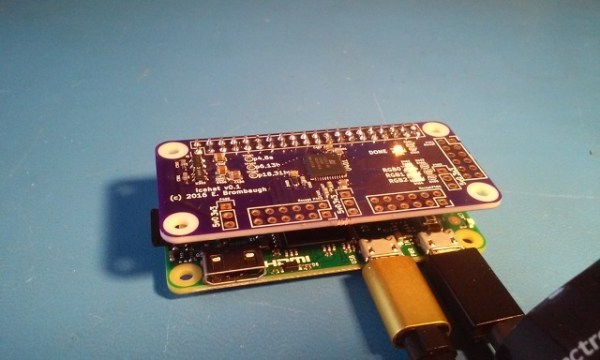
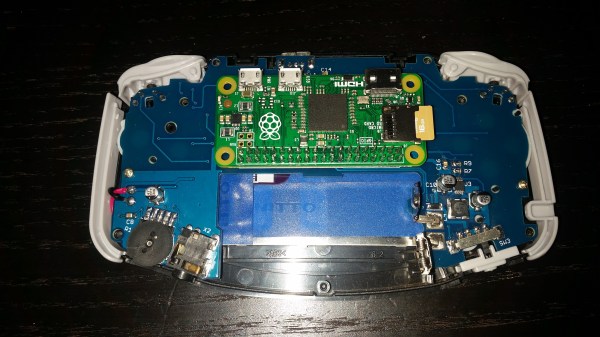
For the hardware, [Nick] went with a Raspberry Pi and Raspberry Pi camera. A combination of software ranging from PiCamera, GraphicsMagick, and GifCam turns this tiny bit of hardware into a machine dedicated to content creation in the hippest new medium. Other hardware includes a battery – either a normal LiPo ‘pouch’ cell, or an 18650 cell. Other hardware includes an Adafruit Powerboost 500 charge controller and a neat illuminated push button.

The 3D-printed enclosure is where this project really shines. Hearkening back to an older time, this camera includes a real viewfinder for all your gonzo giffing. The camera is charged through a completely normal USB port, and even the Pi’s SD card is accessible without disassembling the camera. There are even some paper wrappers for this camera to give it a 90s disposable camera aesthetic.

Of course, this isn’t the first camera dedicated to the creation of animated gifs. Before the C.H.I.P., Next Thing Co released OTTO, a camera designed for gifs. [Nick]’s project, though, is a camera dedicated completely to gifs. It is the greatest technical achievement of our time, for the creation of content in the greatest artistic medium.
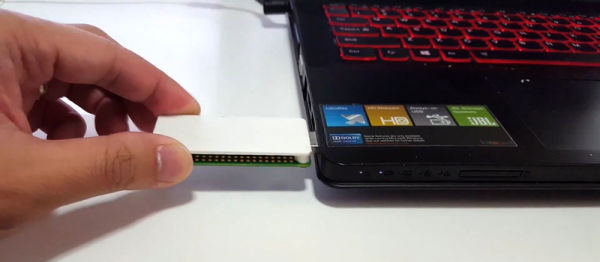
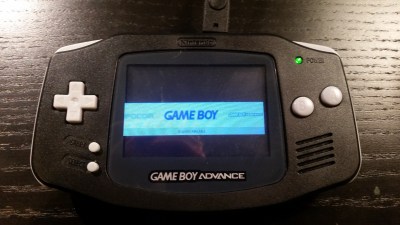