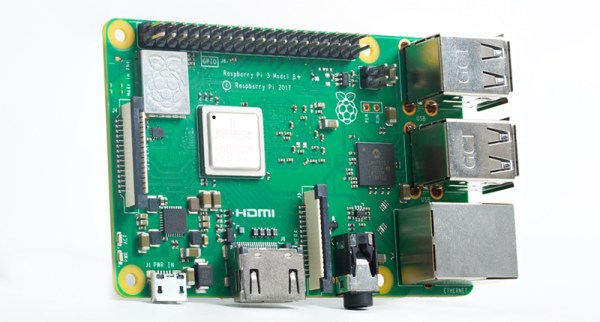
Pedal-Pi, Simple Programmable Guitar Pedal

For several years, [Ray] and [Anna], the team behind ElectroSmash, have been smashing audio electronics and churning out some sweet DIY audio gear. This time around, they’ve built Pedal-Pi — a simple programmable guitar pedal based around the Raspberry-Pi Zero. It is aimed at hackers, programmers and musicians who want to experiment with sounds and learn about digital audio. A lot of effort has gone in to documenting the whole project. Circuit analysis, a detailed BoM, programming, assembly and background information on related topics are all covered on their Forum.

The hardware is split in to three parts. On the input, a MCP6002 rail-to-rail op-amp amplifies and filters the analog waveform and then a MCP3202 ADC digitizes it to a 12-bit signal. The Pi-Zero then does all of the DSP, creating effects such as distortion, fuzz, delay, echo and tremolo among others. The Pi-Zero generates a dual PWM signal, which is combined and filtered before being presented at the output. The design is all through hole and the handy assembly guide can be useful for novices during assembly.  The code examples include a large number of pedal effects, and if you are familiar with C, then there’s enough information available to help you write your own effects.

Even if you don’t plan on building one, technical background such as the Basics of Audio DSP in C for Raspberry Pi Zero, Using MCP3202 ADC with Raspberry Pi Zero and PWM Audio on Raspberry Pi Zero ought to make for interesting reading. Check out the video after the break detailing the build.

If you’d like to check out some of their earlier work, check out 1WAMP, an Open Hardware Guitar Amplifier and pedalSHIELD, an opensource Arduino Guitar Pedal.

Continue reading “Pedal-Pi, Simple Programmable Guitar Pedal”

A Ham Radio Go-Box Packed With Functionality

“When all else fails, there’s ham radio.” With Hurricane Harvey just wrapping up, and Irma queued up to clobber Florida this weekend, hams are gearing up to pitch in with disaster communications for areas that won’t have any communications infrastructure left. And the perfect thing for the ham on the go is this ham shack in a box.

Go-boxes, as they are known, have been a staple of amateur radio field operations for as long as there have been hams. The go-box that [Fuzz (KC3JGB)] came up with is absolutely packed with goodies that would make it a perfect EmComm platform. The video tour below is all we have to go on, but we can see a tri-band transceiver, an RTL-SDR dongle and a Raspberry Pi with a TFT screen for tracking satellites. The Pi and SDR might also be part of a NOAA satellite receiver like the one [Fuzz] describes in a separate video; such a setup would be very valuable in natural disaster responses. Everything is powered by a 12-volt battery which can be charged from a small solar panel.

[Fuzz] is ready for action, and while we genuinely hope he and other hams won’t be needed in Florida, it doesn’t seem likely at this point. You can read more about the public service face of ham radio, or about an even more capable go-box.

Continue reading “A Ham Radio Go-Box Packed With Functionality”

Me Casa Es Techno Casa

“Jarvis, make me a sandwich” is not a reality yet. Though there exist a lot of home automation products out there today, commercial solutions just don’t make the cut for the self-respecting geek. So [Matias] took the DIY route with his La CasaC Home Automation project and achieved the functionality he was after.

[Matias’] project is one of the most elaborate and large-scale DIY home automation projects we have seen in recent years. With over 200 nodes, this project took a number of years of planning and execution. The core of the design is the ever popular Raspberry Pi running OpenHAB to ease the pain of customization and integration with various protocols. To further simplify the ginormous task, the design uses RS485 to communicate between master and slave devices.

Each wall node is managed by a nearby Arduino which in turn talks to a central Arduino Mega. OpenHab takes care of the higher functions such as UI, integration with existing hardware such as the solar heater, media center control,  and RFID and keypad control. Sensor data aggregation and building management is done centrally with data funneled to a separate NAS system as long-term storage.

What makes this project awesome is that [Matias] did not integrate a Raspberry Pi into his house, no! He actually integrated his entire house around the system because this build includes the construction of the house as well. Take a look at this Google Photos Gallery to see the photographic progress of the build. That is amazing!

The code and snippets are available on GitHub for your viewing pleasure though that seems the easy part. If this inspired you, then also take a look at the Raspberry Pi Home Automation of a Gingerbread House if you’d like to try it out before fully committing.

Teenage Engineering The Raspberry Pi

The Teenage Engineering OP-1 is a tiny, portable synthesizer loaded up with 4-track recording, a sampler, sequencers, and a quite good synthesis engine. It also fits in your pocket and looks like a calculator built in West Germany. As you would expect with a synth/sampler/sequencer, you can save sounds, tracks, and other creations to a computer. [Doug] thought if you can connect it to a laptop, you can also connect it to a Raspberry Pi. He created an all-in-one storage solution for the OP-1 using only a Pi and a small character LCD.

The process of connecting the Pi to the OP-1 is pretty simple. First, plug a USB cable into the OP-1 and the Pi. Then, place the OP-1 into Disk Mode, the synth’s method of transferring files between itself and a computer. The Pi then synchronizes, changes the color of its character display from red to green, and becomes a web server available over WiFi where all the files can be accessed.

This is the bare minimum tech required to get files into and off of the OP-1. All you need is a bit of power and a USB connection, and all the files on the OP-1 can be backed up, transferred, or replaced without any other futzing around. It’s perfect for the minimalist OP-1, and a great example of how handy a WiFi enabled Pi can be.

Thanks [Pator] for sending this one in.

RaspiReader, An Open Source Fingerprint Reader

In 2008, the then German interior minister, [Wolfgang Schäuble] had his fingerprint reproduced by members of the German Chaos Computer Club, or CCC, and published on a piece of plastic film distributed with their magazine. [Schäuble] was a keen proponent of mass gathering of biometric information by the state, and his widely circulated fingerprint lifted from a water glass served as an effective demonstration against the supposed infallibility of biometric information.

Diagram showing the fingerprint reader's operation.
Diagram showing the fingerprint reader’s operation.

It was reported at the time that the plastic [Schäuble] fingerprint could fool the commercial scanners of the day, including those used by the German passport agency, and the episode caused significant embarrassment to the politician. The idea of “spoofing” a fingerprint would completely undermine the plans for biometric data collection that were a significant policy feature for several European governments of the day.

It is interesting then to read a paper from Michigan State University, “RaspiReader: An Open Source Fingerprint Reader Facilitating Spoof Detection” (PDF downloadable from the linked page) by [Joshua J. Engelsma], [Kai Cao], and [Anil K. Jain] investigates the mechanism of an optical fingerprint reader and presents a design using the ever-popular Raspberry Pi that attempts to detect and defeat attempts at spoofing. For the uninitiated is serves as a fascinating primer on FTIR (Frustrated Total Internal Reflection) photography of fingerprints, and describes their technique combining it with a conventional image to detect spoofing. Best of all, the whole thing is open-source, meaning that you too can try building one yourself.

If [Cao] and [Jain] sound familiar, maybe it’s from their Samsung Galaxy fingerprint hack last year, so it’s neat to see them at work on the defense side. If you think that fingerprints make good passwords, you’ve got some background reading to do. If you just can’t get enough fingerprints, read [Al Williams]’ fundamentals of fingerprint scanning piece from earlier this year.

Via Hacker News.

Stunning Fake Polaroid Camera Performs Magic

It’s high time us Muggles got our hands on the hardware used to take Magical Photographs as seen in The Daily Prophet. The first pioneering step in that direction has been taken by [Abhishek] who built this moving picture taking polaroid-ish camera, which he’s calling the “Instagif NextStep”. It’s a camera that records a short, three second video, converts it to GIF and ejects a little cartridge which displays the animated photo.

This amazing piece of hardware has been painstakingly built, and the finished product looks great. The nice thing about building such projects, in [Abhishek]’s own words, is that “it involves a bunch of different skill sets and disciplines – hardware, software, 3D modeling, 3D printing, circuit design, mechanical/electrical engineering, design, fabrication etc that need to be integrated for it to work seamlessly.”
Continue reading “Stunning Fake Polaroid Camera Performs Magic”

Repurposing Moving Coil Meters To Monitor Server Performance

Snazzy analog meters can lend a retro flair to almost any project, but these days they often seem to be retasked as indicators for completely different purposes than originally intended. That’s true for these Vu meters repurposed as gauges for a Raspberry Pi server, and we think the build log is as informative as the finished product is good-looking.

As [MrWunderbar] admits, the dancing needles of moving-coil meters lend hipster cred to a project, but getting his Vu meters to cooperate and display network utilization and disk I/O on his Raspberry Pi NAS server was no mean feat. His build log is full of nice details on how to measure the internal resistance of the meter and determine a proper series resistor. He also has a lengthy discussion of the relative merits of driving the meters using a PWM signal or using a DAC; in the end, [MrWunderbar] chose to go the DAC route, and the video below shows the desired rapid but smooth swings as disk and network usage change. He also goes into great depth on pulling usage parameters from psutil and parsing the results for display on the meters.

Looking for more analog meter goodness? We saw a similar CPU load meter a few months back, and there was this mash-up of Nixies and old meters for a solar energy CEO’s desk.

Continue reading “Repurposing Moving Coil Meters To Monitor Server Performance”