Make Your Mailman Nervous With A Wifi Enabled Mailbox

“It’s not a bomb,” the mailman whispered to himself as he reached for [atxguitarist]’s mailbox, giving a nervous glance at the small black box stuck to the side. “This is THAT house, it’s not a bomb. I’m sure it’s not a bomb,” he muttered as a cold bead of sweat ran down his neck. His hand approached slowly, shakily. The mailman gathered courage, then, in a single quick movement, opened the box. He sighed relief as nothing happened. Somewhere in [atxguitarist]’s house a recording wailed “You’ve got mail!”

The mailbox enhancement in question is a hacked Amazon Dash Button in a project box. When the door of the mailbox is opened, a magnetic reed switch simulates a button press on the Dash. The Dash transmodulates the signal into WiFi pixies which are received by a Raspberry Pi. The Pi’s sole purpose in life is to run a 24-line Python script that plays the famous sound from AOL’s mail software and sends a notification to his phone.

Aside from unnerving the mailman, it’s a cool hack and keeps you from slugging it out there in the cold or rain to witness an empty box.

Continue reading “Make Your Mailman Nervous With A Wifi Enabled Mailbox”

DVB-S From A Raspberry Pi With No Extra Hardware

An exciting aspect of the trend in single board computers towards ever faster processors has been the clever use of their digital I/O with DSP software to synthesize complex signals in the analogue and RF domains that would previously have required specialist hardware. When we use a Raspberry Pi to poll a sensor or flash an LED it’s easy to forget just how much raw processing power we have at our fingertips.

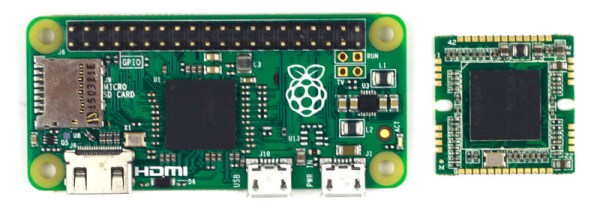
One of the more recent seemingly impossible feats of signal synthesis on a Raspberry Pi comes from [Evariste Courjaud, F5OEO]. He’s created a DVB-S digital TV transmitter that produces a usable output direct from a GPIO pin, with none of the external modulators that were a feature of previous efforts required. (It is worth pointing out though that for legal transmission a filter would be necessary.)

DVB is a collection of digital TV standards used in most of the world except China and the Americas. DVB-S is the satellite version of DVB, and differs from its terrestrial counterpart in the modulation scheme it employs. [Evariste] is using it because it has found favor as a digital mode in amateur radio.

This isn’t the first piece of [F5OEO] software creating useful radio modes from a GPIO pin. He’s also generated SSB, AM, and SSTV from his Pi, something which a lot of us in the amateur radio community have found very useful indeed.

We’ve covered digital TV creation quite a few times in the past on these pages, from the first achievement using a PC VGA card almost a decade ago to more recent Raspberry Pi transmitters using a USB dongle and a home-built modulator on the GPIO pins. Clever signal trickery from digital I/O doesn’t stop there though, we recently featured an astoundingly clever wired Ethernet hack on an ESP8266, and we’ve seen several VHF NTSC transmitters on platforms ranging from the ESP to even an ATtiny85.

Thanks [SopaXorzTaker] for the nudge to finally feature this one.

Bare Metal Media Centre

Sometimes, along comes a build that is simple and bare, and yet exemplifies “hacking” – an art form that uses something in a way in which it was not originally intended. We’ve featured a few Raspberry Pi builds, but this one is less about the Pi and more about putting the rest of the hardware nicely together. [Garage Tech] built this Raspberry-Pi Stand and the end result is brilliant.

MediaPlayerSide-6-5-4It is nothing more than a metal book holder – the kind you are likely to pick up a pair for a few bucks at a charity shop or flea market. He was lucky to also snag a JBL On Stage IIIP Speaker Dock for cheap. Quickly spotting an opportunity, he decided to put together an OpenELEC based media centre using his bounty. Having made up his mind, he needed a couple of other parts to make sure this build looked, and sounded, good. An iQuadio Pi DAC+ , the Pi-DAC+ case from ModMyPi which comes with all the necessary hardware, and the official DSI touch screen.

With all of the stuff on hand, the rest of the build involved a short time at the workbench drilling some holes and slots in the aluminium book holder plate to mount the Pi-DAC case and the display. He drilled the holes and slots such that he can fix the display on either side. Along the way, he discovered an interesting issue regarding the display orientation – check it out. The final result is a nice looking media centre that sits proudly on top of his audio rig.

Raspberry Pi Art Frame Using OpenFrame

Digital picture frames were a fad awhile back, and you can still pick them up at the local big box store. [Ishac Bertran] and [Jonathan Wohl] decided to go open source with digital frames and create the openframe project. The open-source project uses a Raspberry Pi with WiFi and either an HDMI monitor or a monitor that the Pi can drive (e.g., a VGA with an HDMI adapter).

You are probably thinking: Why not just let the Pi display images? The benefit of openframe is you can remotely manage your frames at the openframe.io site. You can push images, websites (like Hackaday.com) or shaders out to any of your frames. You can also draw on public streams of artwork posted by other users.

Continue reading “Raspberry Pi Art Frame Using OpenFrame”

The Pi Zero Mass Storage Picture Frame

The Raspberry Pi Zero – and the not-perpetually-out-of-stock Raspberry Pi A+ – only have one USB port, but behind that port is a lot of functionality. This is an OTG USB port, and just like the USB port on your smartphone, this little plug can become any kind of USB device. Transforming the Pi into a USB gadget allows it to be a serial connection, MIDI device, audio source or sink, or a USB mass storage device.

[Francesco] was especially interested in the USB mass storage capability of the Raspberry Pi Zero and built a small project to show off its capabilities. He turned a Pi Zero into the controller for a digital picture frame, constantly displaying all the image files on a small screen.

The build started with [Andrew Mulholland]’s guide for Pi Zero OTG modes, with just a few modifications. When the Pi is plugged into a PC, it automatically becomes a 100 Megabyte USB storage device. You don’t need that much space on a digital picture frame, anyway.

While setting up a digital picture frame is easy enough, there’s still a tremendous amount of untapped potential in using the Pi Zero as a USB gadget. With enough buttons, switches, and sensors, the Pi can become a wearable MIDI device, or with the Pi camera module, an IP webcam. Neat stuff, and we can’t wait to see what the community comes up with next.

Building A Better Game Boy With A Pi

The most collectible Game Boy, by far, would be the Game Boy Micro. This tiny Game Boy is small enough to lose in your pocket. It can only play Game Boy Advance games, the screen is tiny, but just look at the prices on eBay: it’s one of the few bits of consumer electronics that could be seen as an investment in retrospect.

The popularity of the Game Boy Micro, the ability for the Raspberry Pi to emulate old game consoles, and the introduction of the Raspberry Pi Zero could only mean one thing. It’s the PiGrrl Zero, a modern handheld to play all your retro games.

The design goals for the PiGRRL Zero were simple enough: a 2.2 inch 320×240 display, a d-pad, four buttons on the face and two shoulder buttons. There’s a big battery, audio output, and a 3D printed case. This would be somewhat unremarkable if it weren’t for the PCB designed for PiGRRL Zero. It’s designed to be soldered directly onto the Raspberry Pi Zero, taking advantage of the mostly component-free back side of this tiny single board computer.

With this PCB, the Pi Zero is turned into a tiny battery-powered computer running emulations of all the classics. NES, SNES, Sega, and of course Game Boy Advance games are readily playable on this devices, and for a price that’s a fair bit lower than what a mint condition Game Boy Micro goes for. Our judges thought it was cool enough to be one of the winners of the Pi Zero Contest. Check it out!


Raspberry_Pi_LogoSmall

The Raspberry Pi Zero contest is presented by Hackaday and Adafruit. Prizes include Raspberry Pi Zeros from Adafruit and gift cards to The Hackaday Store!
See All the Entries

BlinkenBone Meets The PiDP8

Years ago when the old mainframes made their way out of labs and into the waiting arms of storage closets and surplus stores, a lot got lost. The interesting bits – core memory boards and the like – were cool enough to be saved. Some iconic parts – blinkenlight panels – were stashed away by techs with a respect for our computing history.

For the last few years, [Jörg] has been making these blinkenlight panels work again with his BlinkenBone project. His work turns a BeagleBone into a control box for old console computers, simulating the old CPUs and circuits, allowing them to work like they did thirty years ago, just without the hundreds of pounds of steel and kilowatts of power. Now, [Jörg] has turned to a much smaller and newer blinkenlight panel, the PiDP-8.

The PiDP-8 is a modern, miniaturized reproduction of the classic PDP 8/I, crafted by [Oscar Vermeulen]. We’ve seen [Oscar]’s PiDP a few times over the last year, including a talk [Oscar] gave at last year’s Hackaday Supercon. Having a simulated interface to a replica computer may seem ridiculous, but it’s a great test case for the interface should any older and rarer blnkenlight panels come out of the woodwork.