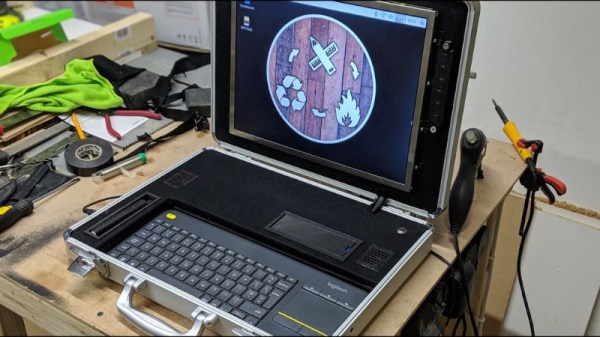
Decent laptop computers have been available for decades now. Despite this, there’s still something charming and enigmatic about a computer hidden within a briefcase. [MakeFailRepeat] wanted just such a rig, so did the maker thing and built one.
The project began when [MakeFailRepeat] was donated a 15″ monitor that ran on 12V. Naturally, it needed to be used in an awesome project, and the build began. MDF panels were cut to mount the screen inside an aluminium briefcase, and covered in black felt for a pleasing look and feel. A Logitech wireless keyboard and touchpad combo is used for input. The brains of the operation is a Raspberry Pi, equipped with a UPS HAT to handle battery and mains power, and an Adafruit Speaker Bonnet for sound.
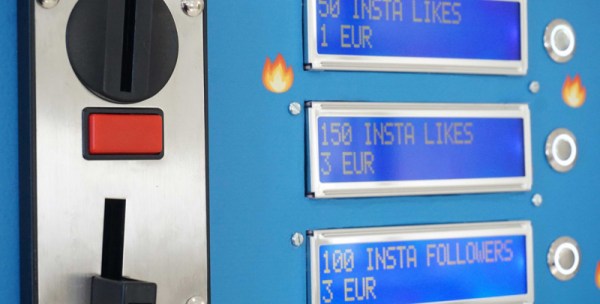
You feel that you’re unpopular and no one likes you. The bad news is that if that’s the case in the real world there’s no easy way to fix it. The good news is there’s a great substitute — your popularity on Instagram. With this vending machine you can replace your personality with followers on Instagram. It’s just a shame we have to wait a year until Coachella.
This project is an interactive installation from [Dries Depoorter] that makes it possible to buy followers and likes in just a few seconds. It’s not limited to Instagram — you can get followers on FaceBook, YouTube, and Twitter, too. The hardware consists of a Raspberry Pi 3B+, an Arduino, coin acceptor, a few character LCDs running over I2C, and somewhat surprising for a one-off ‘art installation’, a lot of DIN rails mounted to a real industrial enclosure. Someone here knows what they’re doing; there’s something resembling cable management inside this box and this vending machine is built to last.
Using this vending machine is as easy as sticking a few Euro coins in the slot and selecting the number of followers or likes you’d like. In a few minutes afterward, hundreds of notifications pop up on your phone. There’s no mention of the software in this vending machine aside from it being written in Python, which makes us wonder where these Instagram bots are based. Check out the video below.
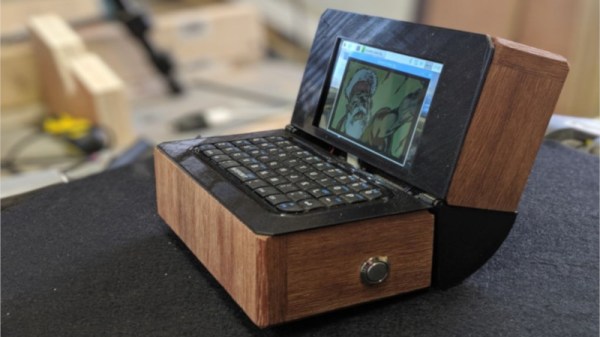
Building a handheld Raspberry Pi rig is practically a hacker rite of passage these days. Off-the-shelf parts keep getting better, and we’re now starting to see affordable compact LCD screens with decent resolution become common. [MakeFailRepeat] got his hands on a HyperPixel screen, and decided to whip up a neat project with it.
The result is a charming little laptop, packing a 4″ screen with 800×480 resolution. Input is via multi-touch, as well as an integrated keyboard. The frame of the laptop is wooden, with a 3D printer supplying parts for the hinge mechanism. To round out the aesthetics, the top of the device was given a decorative copper inlay. Power management is via a UPS hat, which allows the device to switch seamlessly between battery and mains power.
A project like this is a great way to learn a wide range of valuable skills. It involves woodworking and 3D design, as well as the basic configuration of a single board computer. They come in all shapes and sizes, like this tiny RetroPie handheld, or this slick laptop build. Video after the break.
Since the beginnings of the Raspberry Pi, [Tibbbbz] has wanted to build a DIY guitar effects board and amp simulator. A device like this, and similar ones sold by Boss and Kemper, put a bunch of processing power inside a metal enclosure with some footswitches and a pair of quarter inch jacks for input and output. Mash some buttons and wicked toanz come out the other end. Now this is actually possible with a Pi, and it’ll sound great too.
Because this is an audio application, latency is critical. It doesn’t really matter if you have 200 milliseconds of latency when scrolling through your Facebook feed, but for real-time audio processing anything over five milliseconds is disorienting and nearly unusable. [Tibbbbz] is using a standard, off-the-shelf USB audio adapter that gets the latency down to about that level. A Raspberry Pi is never going to have latency as low as a handful of transistors in a analog effects pedal, but it’s close enough.
For the audio system, it’s all about JACK audio: a wonderful frontend for the Linux audio system. The actual pedal emulation is happening with Guitarix. For the hardware part of this build, there’s actually not that much going on here apart from a USB sound card and a touch screen display. The footswitches are the most interesting as they’re wired up as buttons in a repurposed USB keyboard controller board. This repurposing of a USB keyboard is rather interesting, because it vastly simplifies the entire build. All of this is wrapped up in a wedge-shaped walnut pedalboard that’s sturdy enough to live on the stage at least part of the time. You can check out the demos here.
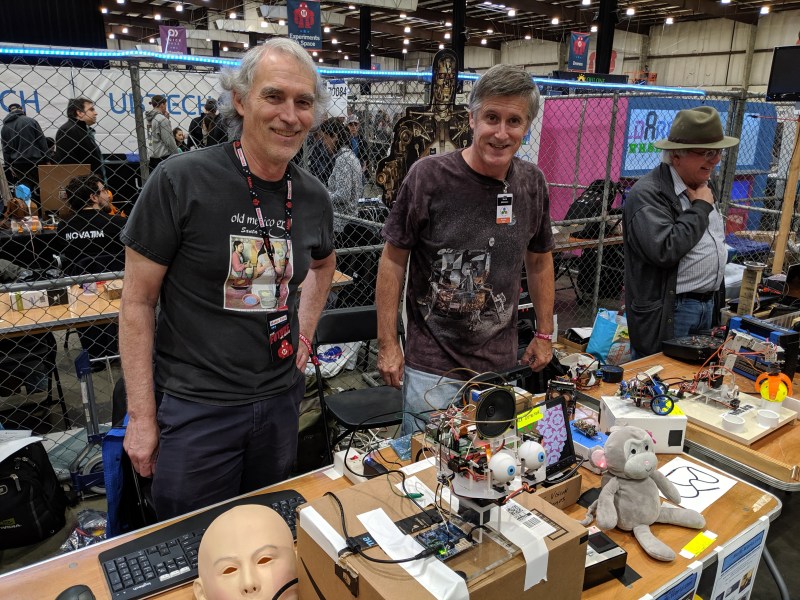
I spent a good chunk of Saturday afternoon hanging out at the Homebrew Robotics Club booth at Maker Faire Bay area. They have a ton of really interesting robot builds on display and I just loved hearing about what went into these two in particular.
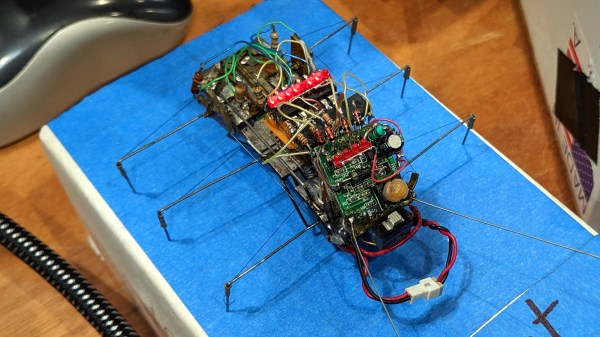
It’s obvious where BugBot gets its name. The six-legged walker is the creation of [Mark Johnston] who built the beast in a time where components for robots were much harder to come by. Each leg is driven by a very thin strand of muscle wire which contracts when high voltage is run through it. One of the really tricky parts of the build was finding a way to attach this wire. It has a very low melting point, so trying to solder it usually results in melting right through. His technique is to wrap the wire around the leg itself, then slide a small bit of brass tubing over it and make a crimp connection.
PIC microcontroller and muscle wire connections visible in this closeup
The underside of BugBot is impressive too! Two hoops normally hold the battery which is not shown here
At the heart of the little bug is a PIC microcontroller that is point-to-point soldered to the rest of the components. This only caused real problems once, when Mark somehow bricked the chip and had to replace it. Look close and you’ll see there’s a lot of fiddly bits to work around to pull that off. As I said, robot building was more difficult before the explosion of components and breakout modules hit the scene. The wireless control components on this were actually salvaged out of children’s RC toys. They’re not great by any stretch of the imagination, but it was the best source at the time and it works! You can find a demo of the robot embedded after the jump.
Ralph Campbell (left) and Mark Johnston (right)
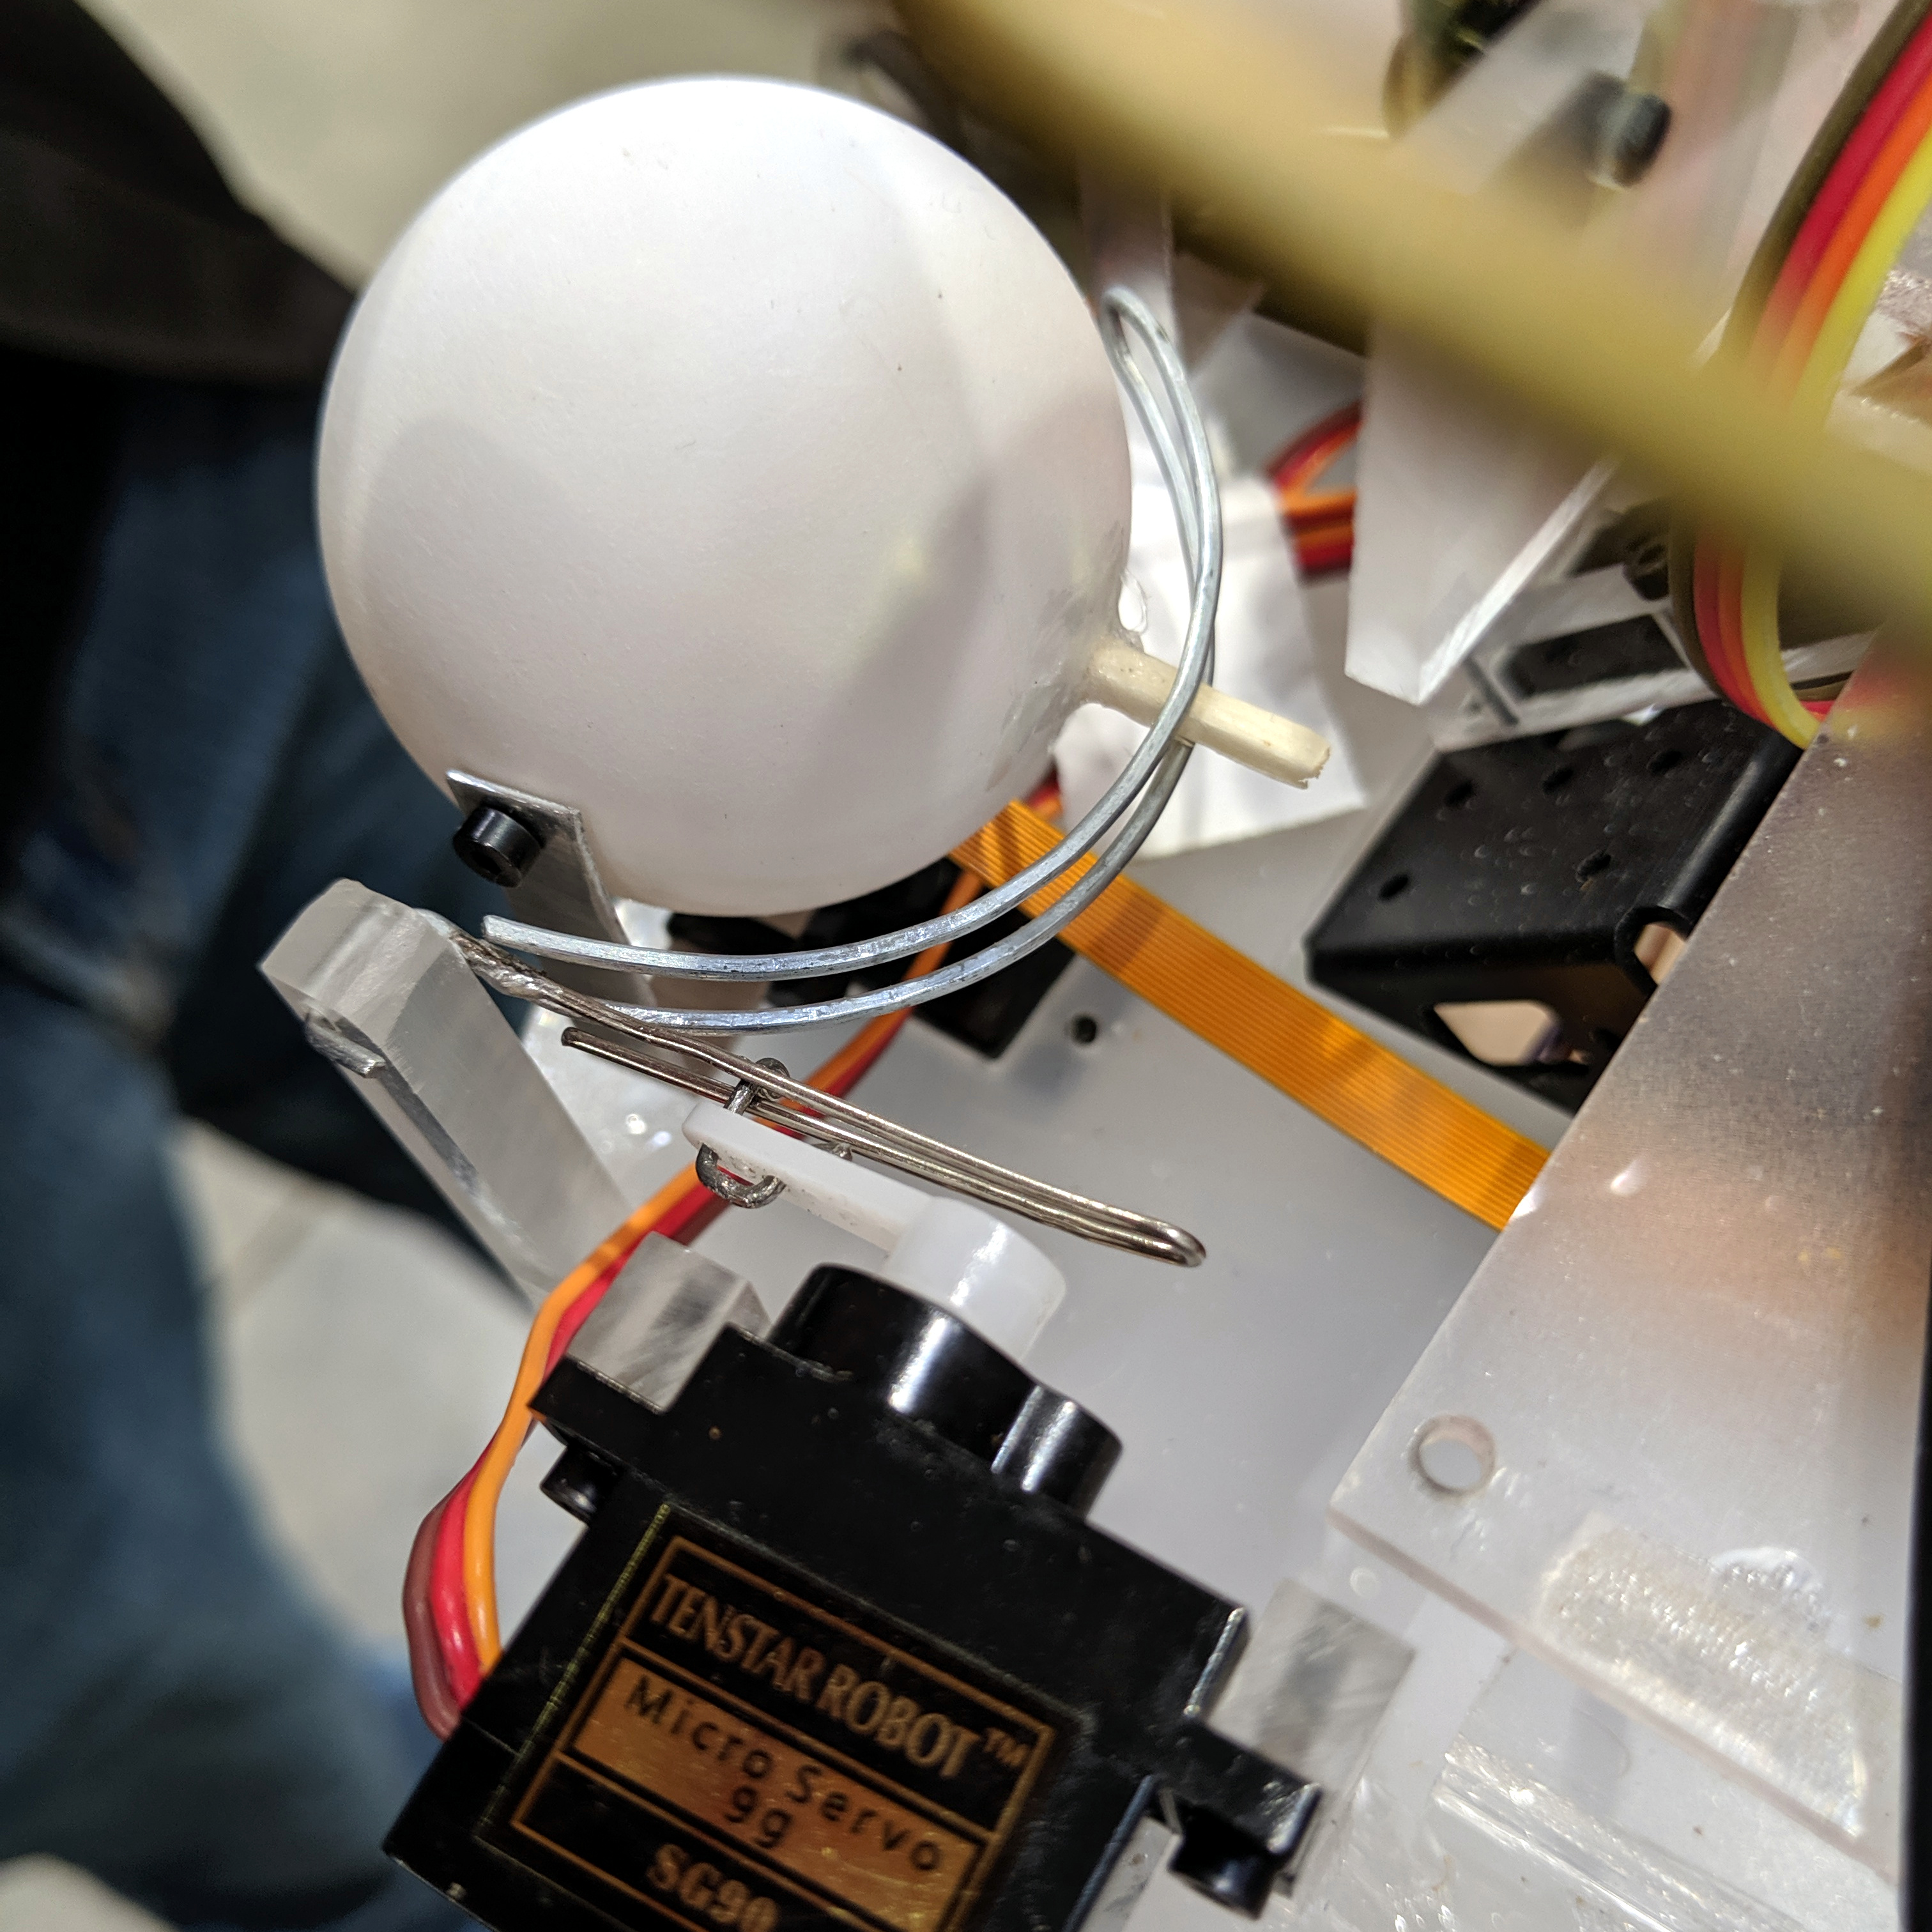
An Android robot was on display, but of course, I was most interested in seeing what was beneath the skin. In the image above you can see the mask sitting to the left of the “Pat” skeleton. Ralph Campbell has been working on this build, and plans to incorporate interactive features like facial recognition and gesture recognition to affect the gaze of the robot.
Overview of “Pat” without skin
Hoops are coat hangers soldered together
Inside each of the ping pong ball eyes is a Raspberry Pi camera (actually the Adafruit Spy Camera because of its small board size). Ralph has a separate demonstration for facial recognition that he’s in the process of incorporating. But for me, it was the mechanical design of the bot that I find fascinating.
The structure of the skull is coat hanger lashed and soldered together using magnet wires. The eyes move thanks to a clever frame made out of paper clips. The servos to the side of each eye move the gaze up and down, while a servo beneath the eye takes care of left and right. A wooden match stick performs double duty — keeping the camera in place as the pupil of the eye, and allowing it to pivot along the paperclip track of the vertical actuator. It’s as simple as it can be and I find it quite clever!
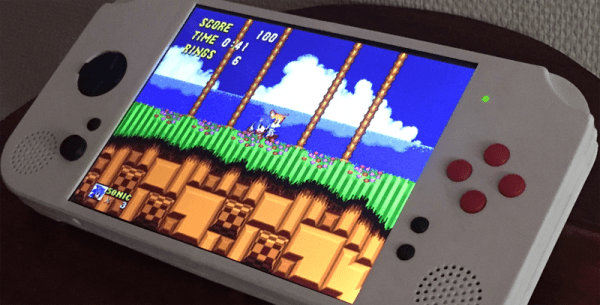
A retro game console is a fun all-arounder project. You’ve got electronics, mechanical design, and software considerations. For this year’s Hackaday Prize, is going all in. The Portable Retro Game Console with 7.9-inch Display is a work of art, and everything that a retro console could be.
This build is based on the Raspberry Pi 3 A+ instead of the B model for space-saving considerations. The screen is a beautiful 7.9 inch IPS panel with 2048 x 1536 resolution. Stereo 3 W speakers pump out the tunes, and an 8000 mAh provides somewhere between 3 and 6 hours of play time.
While using a Raspberry Pi 3 for retro gaming is fun, there’s a world of oppurtunity for emulating bigger and badder consoles thanks to more powerful single board computers. The Nvidia Jetson Nano is far more powerful than the Raspberry Pi 3, and could conceivably emulate N64 and PlayStation games. The Atomic Pi, the fantastic computer that totally isn’t industrial surplus repackaged as an educational computer, already is proven to emulate N64 games. Imagine taking a portable console out of your backpack and playing Conker’s Bad Fur Day on the bus. Oh, that’s cheeky, but it is possible thanks to the amazing work of hardware creators.
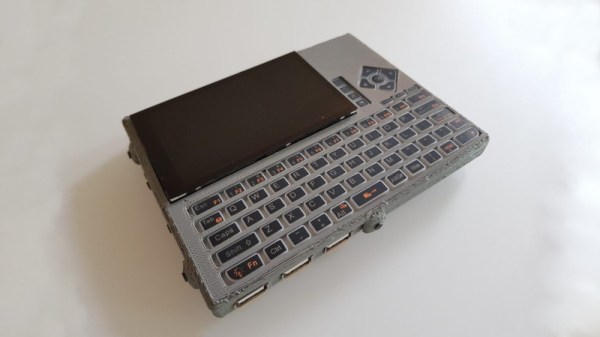
The Raspberry Pi line of single-board computers are remarkably useful things, but they generally require some accessories to be hooked up to become a useful computing platform. [Ramin Assadollahi] wanted a pocket-sized computer to work on without the distractions so common on smartphones, so whipped up the PocketPi to do the job.
It’s a testament to the popularity of the Raspberry Pi platform that [Ramin] was able to put this project together with so many off-the-shelf parts. A Pi Zero W was chosen for its compact size, while a HyperPixel 4.0 screen was chosen for its high resolution in a small package. These parts were combined with a 3000 mAh battery, Adafruit Powerboost 1000C and a small USB keyboard and hub. It’s all wrapped up in a tidy 3D printed package, giving the pocket-sized computer a classic late-1980s look, albeit with much more horsepower under the hood.
It looks like a fun and useful machine to have when out and about, and the full QWERTY keyboard makes input easy. We’ve seen [Ramin]’s work before – with last year’s StickPi implementing an e-paper display. Video after the break.