Code On Your Phone With CircuitPython Editor

[foamyguy] loves Python and messing around with electronics. Boards such as Adafruit’s Circuit Playground Express make it easy for him to take both anywhere. He recently found himself wanting to program Circuit Python boards in the field, but doesn’t always have a laptop on him. So he created an Android app to make on-the-go programming fast and easy.

Using CircuitPython Editor and one or two USB cables, you can program Circuit Python boards with most Android device, including Tinkerboards. It features serial communication, a basic code editor, and a REPL sandbox for code-based castle building. [foamyguy]’s most recent addition to this work in progress is a macro creation tool that lets you edit and store modular, repeatable tasks, like turning all the NeoPixels blue, or lighting them up in a smiley face pattern. The Circuit Python board will draw its power from the Android device, so keep that in mind before you program some crazy light show.

You can get the app in the Play store or download it directly from the ‘hub. If you have any trouble setting it up, check out [foamyguy]’s Adafruit guide.

Program This Badge In Lisp

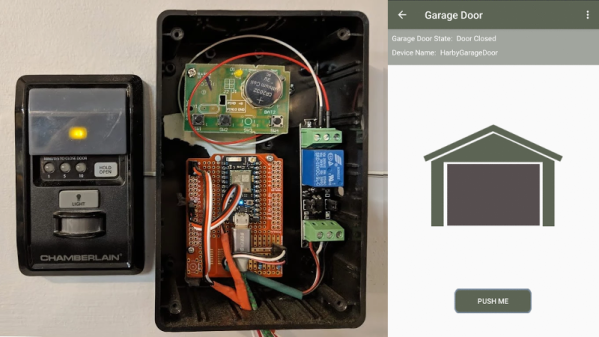
This hardware badge is a computer programmed with Lisp. You can write your own programs right on the badge using the built-in keyboard, as long as you know Lisp.

If there’s one thing we really like to see, it’s people advancing their own projects based on inspiration from others. The Lisp Badge by [David Johnson-Davies] is a perfect example. With an interface inspired by [Voja Antonic’s] hardware design for the 2018 Hackaday Belgrade Conference Badge, this version is an upgrade of an earlier single-board Lisp machine, now sporting an integrated keyboard.

Unlike the Belgrade badge, which is programmed in BASIC, this new badge is programmed in uLisp, a subset of common lisp designed for microcontrollers. Let’s face it, BASIC is retro, but Lisp is even more so, only pre-dated by FORTRAN as the oldest high-level language. So, if you’re into retro-style programming on small devices (physically small, that is), you should consider building one of these.

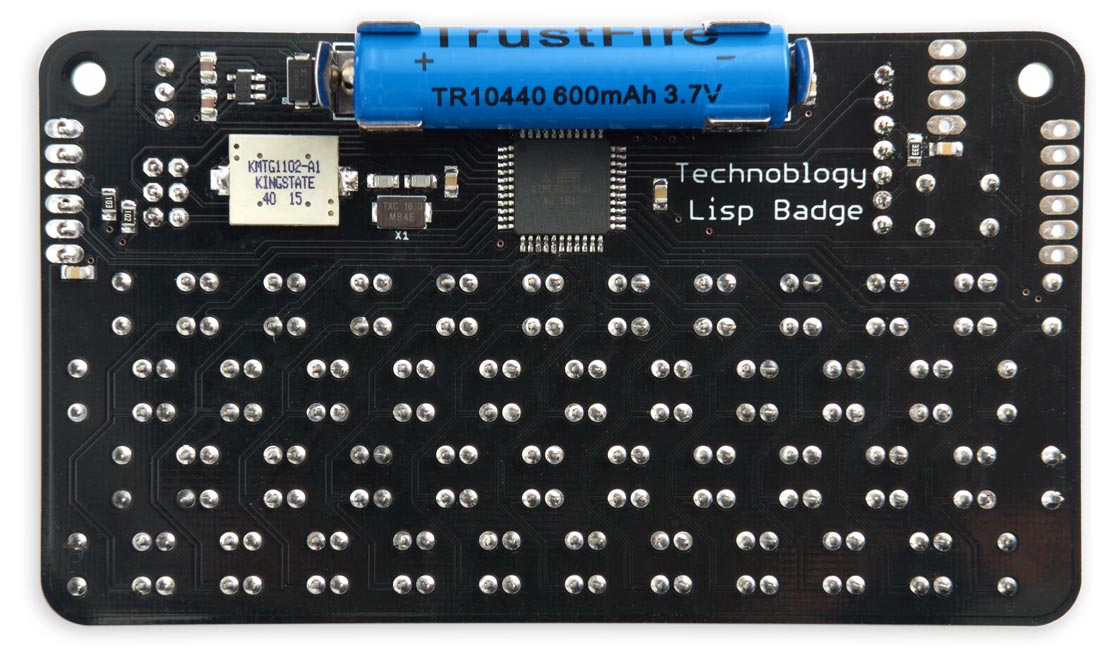
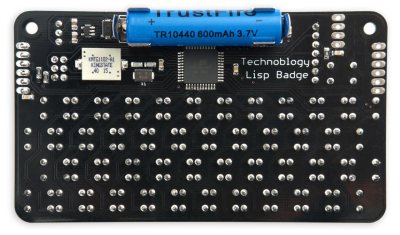
A 16 MHz ATmega 1284P serves as the badge’s brain, allowing storage for 2,816 Lisp cells, while the 256×64 pixel OLED display shows 8 lines of 42 characters in 16 gray levels. A full complement of I/O connections includes four analog inputs, two analog outputs, I2C, SPI, serial, and a handful of GPIOs for interfacing with just about anything. Power comes from a LiPO battery, which at a nominal voltage of 3.7 V doesn’t quite meet the datasheet requirements for running the processor at 16 MHz, although it seems to work fine in practice. Really cautious builders could opt for a 12 MHz crystal transplant to avoid any possibility of problems.

The keyboard layout is optimized for uLisp programming: unnecessary keys have been removed and the all-important parenthesis are afforded their own dedicated keys on the bottom row. This is presumably for convenience of use, but we suspect this will also make it easier to replace the parenthesis key switches when they inevitably wear out from overuse [obligatory Lisp/parenthesis joke].

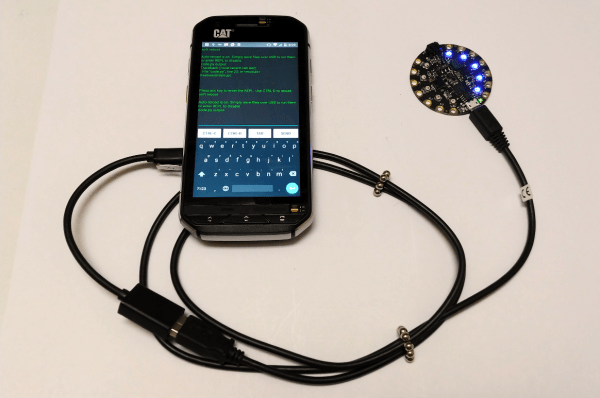
As far as entering uLisp programs, you can simply use the keyboard. The built-in editor buffers a full screen of text, and includes parenthesis matching that highlights each pair as you type. We’re guessing that we won’t see Emacs implemented in the near future, so this bracket management is a great feature for a badge-based editor. If you find the keyboard difficult to type on, you can also enter programs over the serial port.

The other thing we really like to see is open-source projects. [David] doesn’t let us down on this point, either. The Eagle design files for the PCB as well as the source code for the badge are available on GitHub. The PCB is also shared on OSH Park, and there are detailed instructions for installing the bootloader and uploading the code.

If programmable badges is your thing, also check out the 2018 Hackaday Supercon Badge, the successor the Belgrade design.

Thanks to [Sven] for the tip!

Electrifying A Vintage Outboard Motor

Clamped or bolted to the stern of the boat, outboard motors offer a very easy and (relatively) economical way of powering small craft. The vast majority of these outboards are gasoline powered, with electric models generally limited to so-called “trolling motors” which are often used to move slowly and quietly during fishing. That might be fine for most people, but not [Olly Epsom].

An engineer focusing on renewable energy by profession, [Olly] wanted to equip his small inflatable dinghy with a suitably powerful “green” propulsion system. Deciding nothing on the market quite met his requirements, especially for what manufacturers were charging, he decided to convert an old gas outboard to electric. Not only did he manage to do it for less money than a turn-key system would have cost, but he ended up with a system specifically geared to his exact requirements. Something he says will come in handy if he ever gets around to converting the dinghy to remote control so he can use it as a wildlife photography platform.

Put simply, an outboard motor consists of a gasoline engine with a vertical shaft that’s coupled to a right-angle gearbox with a propeller on the end. Beyond that they’re a fairly “dumb” piece of gear, so replacing the engine on top with something else should be (at least in theory) a pretty simple job. Especially on the small older model that [Olly] decided to use as a donor unit. The 1974 Johnson 2 HP motor didn’t have any tricky electronics in it to contend with; the thing didn’t even have a clutch.

Once [Olly] had removed the old gas engine from the top of the outboard, he designed an adapter plate in OnShape and had it cut out of aluminum so he could mount a beefy 1 kW 48 V brushless electric motor in its place. Connecting the new electric motor to the carcass of the outboard actually ended up being simpler than putting the original motor on, as this time around he didn’t need to reconnect the cooling pumps which would usually pull water from down by the propeller and recirculate it through the engine.

While the mechanical aspects of this project are certainly cool, we’re especially interested in the control system for this newly electric outboard. It uses a 3.2 inch Nextion color touch screen and Arduino Nano to provide a very slick looking digital “dashboard” which can convey motor status and other information at a glance. Unfortunately, [Olly] says the details on that part of the project will be saved for a future post, leaving us with only a single picture of the system’s interface for us to drool over until then.

We’ve seen the occasional seafaring project that made use of an electric trolling motor, and we’ve even seen an electric drill put in some overtime spinning a prop in the water. Converting gasoline boat over to electric is however a rarity. But much like electric car conversions, such projects may become more common as the cost and complexity of powerful electric propulsion systems continues to fall.

[Thanks to Alex for the tip.]

Adventures In Automating A Candle Factory

Have you ever considered the manufacture of candles? Not necessarily manufacturing them yourself, but how they are manufactured in a small-scale industrial setting? It’s something that has been of great concern to Michael Schuldt as he grappled with the task of automating a simple manual candle production process.

It’s not just an interesting subject, but the topic of manufacturing automation is something we can all learn from. This was the subject of his Adventures in Manufacturing Automation talk at the recent Hackaday Superconference which you’ll find below the break. Let’s dive in and see what this is all about!

Continue reading “Adventures In Automating A Candle Factory”

35C3: Biggest Communication Congress, Yet Little Chaos

Every year for the past 35 years, the German Chaos Computer Club has met just after Christmas for a few days of “Spaß am Gerät” — having fun with the machines. And that’s everything from trying to bring an old PDP-8 back into running condition to forging new software to replace the old and busted social media platforms that permeate our lives. The sum total of around 17,000 people doing the nerdy stuff that they love, and sharing it together, is both amazing and inspiring. Four days of little sleep and much socializing later, I bet there was still another four days’ worth of stuff to see.

The official theme this year was “Refreshing Memories” which honestly sounds a bit too much like a cola slogan, but was a great opportunity to think back on the hacks of the past that got us where we are. Assemblies put up shrines to their hacker heroes of the past. Retro computers were everywhere, in the talks and on the floor. This year’s Congress was a great time to look back and remember, but also to create new memories for the future. On that front, it was a total success.

But the unofficial theme this year was “Smooth Running”. Everything went very well, which is no small feat considering that the infrastructure, decoration, security, and even the medical response teams are from the Chaos community. It’s the depth of engagement that makes this work: of the 17,000 people who showed up, just over 4,000 of them volunteered for “angel” shifts — meaning they helped guard the doors, staff the info desks, or build up or tear down. It was the largest ever CCC, and you could feel it, but they pulled it off, and then some.

The angels are geeks just like you and me, and since everything went so smoothly, they had time to play. For instance, the phone operations people offer DECT phone service so that attendees can bring in their home phones and use them at Congress. In years past, the lines to register and enroll phones were painfully long. This year, it all happened online, and the result is that the phone ops crew got bored. That explains how they had time to establish roaming home-phone wireless service in some of the normal Leipzig city trams. Wait, what?

Continue reading “35C3: Biggest Communication Congress, Yet Little Chaos”

State Machine Controls Garage Door Over The Internet

Home automation has been a hot-button topic time and again since the dawn of the personal computer age. These days, thanks to modern communications technology, it’s possible to do some pretty cool stuff. [Brad Harbert] decided to automate his garage door, controlling it over the Internet.

The build relies on a Particle Photon to do the heavy lifting of connecting the door to the Internet. Particle offer a cloud service that makes setting up such a project easy for the first timer, and [Brad] was able to get things working quickly. A relay is used to activate the garage door remote button, as it was desired to leave the main control board of the garage door opener untouched. Reed switches are used to sense the position of the door, and [Brad] coded a state machine to ensure the door’s current state is always known.

It’s a simple project, but [Brad]’s use of state machine techniques and position sensing mean it’s less likely he’ll get home to find his garage open and his possessions missing. If you’re new to programming simple physical devices, you could take a page out of his logbook. Of course we’ve seen similar builds before, like this one from parts from the scrapbin.

Linux Fu: The Kitchen Sync

One of the great things about Linux and similar operating systems is they are configurable. If you don’t like something, there’s a great chance you can change it easily with a few entries in a file somewhere. For example, take bash — a very popular shell by any measure. If you want a different style of command line editing, there’s an option. You want the tab key to match files regardless of case? Another option. Usually, these are set in one of your so-called profile files like .bashrc in your home directory.

As long as you are sitting in front of your single computer working, this is great. You customize your .bashrc and other files to your heart’s content and then you work in an environment that acts the way you want it to. The problem is when you have a lot of computers. Maybe you have a web server, a desktop, a firewall machine, and a few dozen Raspberry Pi computers. How do you keep all the configurations the same? Then once they are the same, how do you keep them up to date?

Continue reading “Linux Fu: The Kitchen Sync”