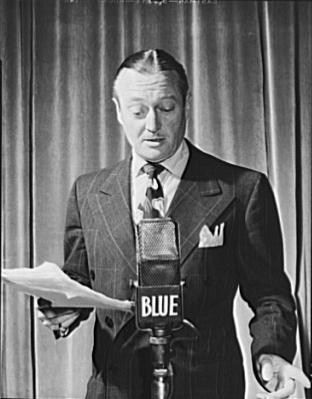
Tape Loop Echo Made With An Actual Tape Loop

A lot of digital processes are named after an old analog device that they’ve since replaced. It’s not uncommon to “tape” a show nowadays, for example, even though the recording work is actually done by a digital video recorder. Sometimes, though, the old analog devices have a certain je ne sais quoi that is desirable even in today’s digital world. This is certainly the case with [Dima]’s tape loop echo which is actually made with a physical tape loop.

The process of building the tape loop hardware is surprisingly non-technical. By positioning a recording head and a playback head right next to one another, a delay is introduced. An echo is created by mixing the original live sound signal with this delayed signal coming from the tape By varying the speed of the tape or altering several other variables, many different-sounding effects can be achieved.

Although in practice it’s not as simple as it sounds (the device required a lot of trial-and-error), the resulting effect is one that Pink Floyd or Beck would surely be proud of. Analog isn’t the only way to go though, there are plenty of digital effects that are easily created, and some with interesting mounting options as well.

Continue reading “Tape Loop Echo Made With An Actual Tape Loop”

Make A Microphone Out Of A Hard Drive

[Rulof Maker] has a penchant for making nifty projects out of old electronics. The one that has caught our eye is  a microphone made from parts of an old hard drive. The drive’s arm and magnet were set aside while  the aluminum base was diagonally cut into two pieces.  One piece was later used to reassemble the hard drive’s magnet and arm onto a wooden platform.

v2_mic
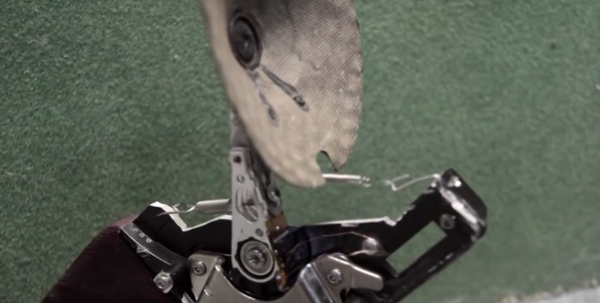
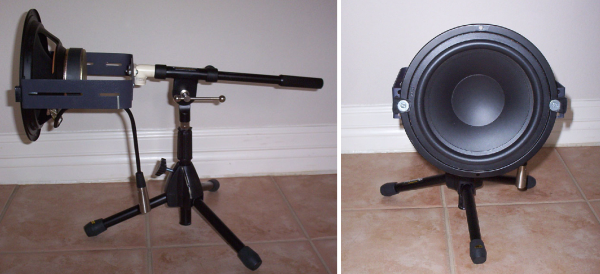
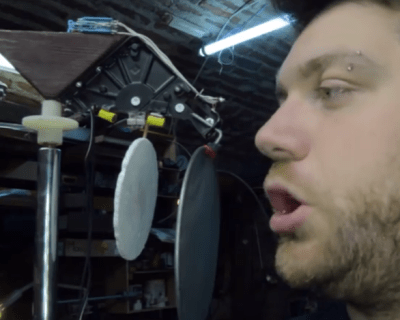
The drive’s arm and voice coil actuator are the key parts of this project. It was modified with a metal extension so that a paper cone cut from an audio speaker could be attached, an idea used in microphone projects we’ve previously featured. Copper wire scavenged from the speaker was then soldered to voice coil on the arm as well as an audio jack. In the first version of the Hard Drive Microphone, the arm is held upright with a pair of springs and vibrates when the cone catches sound.

While the microphone worked, [Rulof] saw room for improvement. In the second version, he replaced the mechanical springs with magnets to keep the arm aloft. One pair was glued to the sides of the base, while another pair recovered from an old optical drive was affixed to the arm. He fabricated a larger paper cone and added a pop filter made out of pantyhose for good measure. The higher sound quality is definitely noticeable. If you are interested in more of [Rulof’s] projects, check out his YouTube channel.

Continue reading “Make A Microphone Out Of A Hard Drive”

bass drum speaker mic

DIY Bass Drum Microphone Uses Woofer Cone As Diaphragm

Anyone into audio recording knows that recording drums is a serious pain. Mic setup and positioning can make or break a recording session. One particular hurdle is getting a great sound out of the bass drum. To overcome this, [Mike] has built a microphone using an 8″ woofer in an attempt to capture the low-end frequencies of his bass drum. Using a speaker as a microphone isn’t a new idea and these large diaphragm bass drum mics have taken commercial form as the DW Moon Mic and the now-discontinued Yamaha SubKick.

The project is actually quite simple. The speaker’s positive terminal is connected to Pin 2 of a 3-pin XLR microphone connector. The speaker’s negative terminal is connected to the connector’s Pin 1. [Mike] made a bracket to connect the woofer to a mic stand, which in turn was cut down to position the woofer at bass drum height. The setup is then plugged into a mixer or pre-amp just like any other regular microphone.

[Mike] has since made some changes to his mic configuration. It was putting out way too hot of a signal to the preamp so he added an attenuation circuit between the speaker and XLR connector. Next, he came across an old 10″ tom shell and decided to transplant his speaker-microphone from the open-air metal rack to the aesthetically pleasing drum shell. Check out [Mike’s] project page for some before and after audio samples.

Adding Stereo To Monophonic Audio

board

A lot of awesome stuff happened up in [Bruce Land]’s lab at Cornell this last semester. Three students – [Pat], [Ed], and [Hanna] put in hours of work to come up with a few algorithms that are able to simulate stereo audio with monophonic sound. It’s enough work for three semesters of [Dr. Land]’s ECE 5030 class, and while it’s impossible to truly appreciate this project with a YouTube video, we’re assuming it’s an awesome piece of work.

The first part of the team’s project was to gather data about how the human ear hears in 3D space. To do this, they mounted microphones in a team member’s ear, sat them down on a rotating stool, and played a series of clicks. Tons of MATLAB later, the team had an average of how their team member’s heads heard sound. Basically, they created an algorithm of how binarual recording works.

To prove their algorithm worked, the team took a piece of music, squashed it down to mono, and played it through an MSP430 microcontroller. With a good pair of headphones, they’re able to virtually place the music in a stereo space.

The video below covers the basics of their build but because of the limitations of [Bruce]’s camera and YouTube you won’t be able to experience the team’s virtual stereo for yourself. You can, however, put on a pair of headphones and listen to this, a good example of what can be done with this sort of setup.

Continue reading “Adding Stereo To Monophonic Audio”

Recording Audio With Chrome Using HTML5

recording-audio-with-chrome

The Dubjoy project was stopped dead in its tracks when the newest version of the Google Chrome browser stopped using Adobe’s flash plugin and transitioned to their own called Pepper Flash. The aim of development was to produce a browser-based editor for translating the audio track of a video clip. After a bit of head scratching and a lot of research they decided to try ditching the use of Flash and implemented a way to record audio using HTML5.

There were quite a few issues along the way. The initial recording technique generated raw audio files, which are not playable by Chrome’s HTML5 audio player. This can be worked around by buffering the raw audio, then converting it to a different format once the recording is finished. The user also needs to monkey with the Chromes flags to enable HTML5 audio. So they did get it working, but it’s not yet a smooth process.

We love seeing the neat stuff you can do with HTML5. One of our favorites is the use of a tablet’s accelerometer as a browser game controller.

[via Reddit]

Building An Isolation Booth For Your Home Recording Studio

[Brattonwvu] wanted to lay down some tracks with as high an audio quality as possible. To help get rid of the noise pollution of the everyday world he built this isolation booth in his attic.

The project started off with a trip to the home store for some 2×4 stock and OSB to use as sheathing. The framing is as you would expect, but to help deaden the sound he went with a surprising material. He’s filled the cavities between each 2×4 with stuffed animals and old clothes. The same is done in the walls and the inside surfaces are all covered in fabric to prevent echoing. The door has a lip and we can just make out what looks like weather stripping to provide a seal. There is just one opening in the box, where a PVC pipe allows electrical and microphone cables to pass through. [Brattonwvu] reports that you can hear your heartbeat in your ears when standing inside the sealed booth.

Build A Tetrahedral Ambisonic Microphone

[Dan Hemingson’s] been refining a design for building a tetrahedral ambisonic recording system. This is a set of four microphones used to record audio that can later be mixed down for a three-dimensional listening experience. His goal is an easy and inexpensive build while maintaining the highest fidelity standards possible. Lucky for us he’s made a set of extremely detailed build instructions you can use to make your own. In addition to the mounting bracket seen above he has also developed a pre-amp module that connects to the four mics; it’s part of the build instructions with schematic and board layout files available as well.

[Thanks Isaac]