Siri As A Lippy And Sometimes Profane Television Remote

If the addition of Siri to your iPhone has given you a somewhat-real life companion (and hope that you might not be forever alone) this hack is right up your alley. [Todd Treece] built a hardware fixiture for the living room which bridges the gap between Apple’s new digital assitant and your television.

The box itself is an Arduino with a WiFly shield and the hardware necessary to make it a universal infrared remote control. He mounted it on the underside of his end table, with the IR LED in line-of-sight for the television. Using SiriProxy he’s added functionality that lets you request a channel change either by the name of the network, or the channel number.

As you can see in the video after the break, Siri has some strong opinions on the quality of programming for certain channels. That and contempt for your inability to just change the channel yourself. But this setup does augment your remote control experience by giving you a synopsis of what’s playing right now for the channel you’ve requested.

Continue reading “Siri As A Lippy And Sometimes Profane Television Remote”

Lamp Fading And Remote Control For The Lazy

[Dmitry Grinberg] has to walk all the way across his bedroom to switch the lamp on and off. The drudgery of this finally became too much, so he built a remote control and added dimming for good measure. Above you can see the circuitry for the remote and the receiver, as well as the finished remote housed in what he calls a ‘Chinese Altoids tin’.

After the break you’ll find [Dmitry’s] demo video. The remote control is quite responsive, and the dimming has great resolution. That’s thanks to a power N-channel MOSFET which switches the AC with the help of a full wave rectifier. The PIC 12F617 that controls the MOSFET is powered separately, and [Dmitry] mentions that you must use a transformer and not a switch-mode power supply to avoid a fire. We’d like to know more about this, so leave a comment if you are able to explain further.

The remote and receiver communicate via Infrared. The protocol is operating with 38 kHz signals using an easily sourced receiver tuned to that frequency. [Dmitry] shares all the details about the encoding scheme that he uses. Recreating this communications pairing is a great way to test your understanding of this technique. But if you need a refresher, here’s a tutorial to push you in the right direction. Continue reading “Lamp Fading And Remote Control For The Lazy”

For The Trade Show Booth That Has Everything, A Blimp!

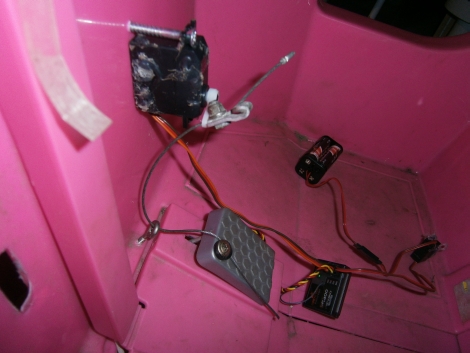
Trade shows are all about attracting attention and getting people to learn about your product, so what could be better than a custom-built RC blimp? Sure, you could just buy one, but what’s the fun in that? After several design iterations, [Tretton37] came up with a blimp known as the [LeetZeppelin] controlled by an Arduino, an XBee module, as well as a Wiimote controller connected to a computer.

The hack itself is a great example of repurposing off-the-shelf materials into something more interesting and unique. In addition to the components listed above, hobby servos were modded to allow for thrust motor control in conjunction with Legos for the gearing and “pillow-block bearings.” A list of the “important” parts used in this hack is furnished on their site as well as a video of it in action, which is also after the break.

As for the results of this hack as a trade-show attention grabber, Fredrik Leijon had this to say: “We think that all the gazing at the sky and half opened mouths proves that it was a huge success!”

[youtube http://www.youtube.com/watch?v=geMrAmBJsls&w=470&h=315%5D

Hackaday Links: November 24, 2011

Finally an Arduino shield that does nothing

The folks at Evil Mad Scientist labs have finally created the Googly Eye Shield for Arduinos. With it’s pass-through .100 headers, it adds googly eyes to your Arduino projects. Of course, instead of in addition to the googly eyes you could add a breadboard, making it somewhat useful. A million fake internet points goes to the first person to implement Xeyes on this thing.

Phat beats from kids toys

[Ville] couldn’t afford an Akai MPC for laying down some beats. Wanting a real tactile interface, he hacked this kid’s toy. It’s just an RCA cable attached to the tiny chip inside the toy. The new line out goes to his mixers where he does some pretty impressive stuff.

Mona Lisa is Vigo the Carpathian

What did we just say about real-life Xeyes? [Geert] just made a print of the Mona Lisa follow you around the room with her eyes (Dutch, translation). The build is a pair of servos and a DIY motion capture app running on a laptop. Now we need to find a print of Vigo…

Quantifying heat sink efficiencies

[Mike] is an experimenter at heart. He was wondering about the efficiency of small, clip-on heat sinks versus the ones we use to defrost frozen food. The results are exactly as you would expect, but he did find something interesting – his experimental technique didn’t find much of a difference between thermal paste/grease/pads and no thermally conductive material.

Mini-fig sized R/C LEGO car

The guys at Brickmodder.net took a car from a LEGO set and made it remote control. The drive train and steering both use servos controlled by the smallest 3-channel receiver they could find.

A Very Simple Android Recon Vehicle

Desperately in need of a graduation paper, [Andrei] decided to build a few computer controlled recon vehicles (PDF warning), and we’re really impressed with the minimalist approach [Andrei] took.

The Computer Operated Recon Entity (C.O.R.E.) mk. I is based around a laptop. Instead of an Arduino, [Andrei] used a car stereo amp to control the motors. The two channel amp [Andrei] picked out has four outputs. Tying a motor to each output gives a four-wheel drive robot that’s really clever in its simplicity. With an onboard webcam, [Andrei] can do live video streaming from his remote vehicle. Outputting a specific tone with the sound card allows for full control of the robot.

The C.O.R.E. mk. II uses a Samsung Galaxy I5500 phone – the cheapest Android phone [Andrei] could find. The setup is similar to the mk. I C.O.R.E. with a WiFi connection sending video back to a base station. Control of the two motors is still handled by playing sound files and sending that to a stereo amp connected to the motors.

Check out the C.O.R.E. mk. II going Bach and forth after the break.

Continue reading “A Very Simple Android Recon Vehicle”

Prototyping A Bluetooth To IR Remote Control Translator

[James] is one of those guys on a quest to control everything with one device. His tool of choice is an Android phone, which can do quite a lot right out of the box. But he was never satisfied with its lack of IR remote control abilities. He fixed that feature-gap by building a Bluetooth to Infrared translator.

The hardware he used for the prototype is quite simple. A cheap serial Bluetooth modem from eBay lets him connect to his phone. An Arduino board listens for data from the modem and converts incoming commands to flashes on an IR LED. Voila, he can control the tube with his phone.

We love the potential of this hack. The Bluetooth module runs from 3.3V, and reading serial data and flashing an LED is extremely simple. You should be able to use a small uC, say an ATtiny13, and a 3.3V regulator to miniaturize the module. We could see this plugging into the USB port on the back of a TV for power, with a wire extension to put the LED into position. The only shortfall is the inability to turn the TV on remotely when drawing power this way.

Remote codes aren’t particularly large to store either. So this would be pretty easy to extend to full control of all IR-compatible home entertainment devices. You just need a tool to discover the remote control codes.

Continue reading “Prototyping A Bluetooth To IR Remote Control Translator”

How To Decode IR Remote Control Signals With Your PICkit 2

[SpiralBrain] needed to figure out the coding scheme used by an IR remote control so that he could use it with his own project. He built an IR receiver board for the PICkit 2 and figured out how to use some of the Microchip software to measure the timing of the incoming signal.

The hardware’s dead simple; a 38 kHz IR receiver does the heavy lifting by filtering out errant infrared light. When it does detect a signal with the correct frequency the output pin drives the base of a transistor to toggle the input pin on the PICkit 2. The breakout board has a pin header which makes it a snap to detach and store for later use. The PICkit 2 Logic Tool software captures this input, by setting the correct pin as a trigger and choosing a 10 kHz sample rate.

As we discussed in our PIC programming with Linux tutorial, the PICkit 2 really is far superior to its replacement, the PICkit 3. [SpiralBrain] mentions that it is more versatile than the newer version but doesn’t go so far as to tell us whether you can use this hardware with the PICkit 3 or not.