PCB Dielectric Constant Measurements, Three Ways

FR4 is FR4, right? For a lot of PCB designs, the answer is yes — the particular characteristics of the substrate material don’t impact your design in any major way. But things get a little weird up in the microwave range, and having one of these easy methods to measure the dielectric properties of your PCB substrate can be pretty handy.

The RF reverse-engineering methodsĀ [Gregory F. Gusberti] are deceptively simple, even if they require some fancy test equipment. But if you’re designing circuits with features like microstrip filters where the permittivity of the substrate would matter, chances are pretty good you already have access to such gear. The first method uses a ring resonator, which is just a PCB with a circular microstrip of known circumference. Microstrip feedlines approach but don’t quite attach to the ring, leaving a tiny coupling gap. SMA connectors on the feedline connect the resonator to a microwave vector network analyzer in S21 mode. The resonant frequencies show up as peaks on the VNA, and can be used to calculate the effective permittivity of the substrate.

Method two is similar in that it measures in the frequency domain, but uses a pair of microstrip stubs of different lengths. The delta between the lengths is used to cancel out the effect of the SMA connectors, and the phase delay difference is used to calculate the effective permittivity. The last method is a time domain measurement using a single microstrip with a couple of wider areas. A fast pulse sent into this circuit will partially reflect off these impedance discontinuities; the time delay between the reflections is directly related to the propagation speed of the wave in the substrate, which allows you to calculate its effective permittivity.

One key takeaway for us is the concept of effective permittivity, which considers the whole environment of the stripline, including the air above the traces. We’d imagine that if there had been any resist or silkscreen near the traces it would change the permittivity, too, making measurements like these all the more important.

Continue reading “PCB Dielectric Constant Measurements, Three Ways”

Acoustic Engine Harnesses The Power Of Sound

If you think sonic booms from supersonic aircraft are a nuisance, wait until the sky is full of planes propelled by up-scaled versions of this interesting but deafening audio resonance engine.

Granted, there’s a lot of work to do before this “Sonic Ramjet” can fly even something as small as an RC plane. Creator [invalid_credentials] came up with the idea for a sound-powered engine after listening to the subwoofers on a car’s audio system shaking the paint off the body. The current design uses a pair of speaker drivers firing into 3D printed chambers, which are designed based on Fibonacci ratios to optimize resonance. When the speakers are driven with a low-frequency sine wave, the chambers focus the acoustic energy into powerful jets, producing enough thrust to propel a small wheeled test rig across a table.

It’s fair to ask the obvious question: is the engine producing thrust, or is the test model moving thanks to the vibrations caused by the sound? [invalid_credentials] appears to have thought of that, with a video showing a test driver generating a powerful jet of air. Downloads to STL files for both the large and small versions of the resonating chamber are provided, if you want to give it a try yourself. Just be careful not to annoy the neighbors too much.

Thanks to [cabbage] for the tip via [r/3Dprinting].

Few Things Are Cheaper Than This Antenna

As far as hobbies go, ham radio tends to be on the more expensive side. A dual-band mobile radio can easily run $600, and a high-end HF base station with the capability of more than 100 watts will easily be in the thousands of dollars. But, like most things, there’s an aspect to the hobby that can be incredibly inexpensive and accessible to newcomers. Crystal radios, for example, can be built largely from stuff most of us would have in our parts drawers, CW QRP radios don’t need much more than that, and sometimes even the highest-performing antennas are little more than two lengths of wire.

For this specific antenna, [W3CT] is putting together an inverted-V which is a type of dipole antenna. Rather than each of the dipole’s legs being straight, the center is suspended at some point relatively high above ground with the two ends closer to the earth. Dipoles, including inverted-Vs, are resonant antennas, meaning that they don’t need any tuning between them and the radio so the only thing needed to match the antenna to the feed line is a coax-to-banana adapter. From there it’s as simple as attaching the two measured lengths of wire for the target band and hoisting the center of the antenna up somehow. In [W3CT]’s case he’s using a mast which would break the $8 budget, but a tree or building will do just as well.

The video on the construction of this antenna goes into great detail, so if you haven’t built a dipole yet or you’re just getting started on your ham radio journey, it’s a great place to get started. From there we’d recommend checking out an off-center-fed dipole which lets a dipole operate efficiently on multiple bands instead of just one, and for more general ham radio advice without breaking the bank we’d always recommend the $50 Ham series.

Continue reading “Few Things Are Cheaper Than This Antenna”

Hackaday Links Column Banner

Hackaday Links: August 21, 2022

As side-channel attacks go, it’s one of the weirder ones we’ve heard of. But the tech news was filled with stories this week about how Janet Jackson’s “Rhythm Nation” is actually a form of cyberattack. It sounds a little hinky, but apparently this is an old vulnerability, as it was first noticed back in the days when laptops commonly had 5400-RPM hard drives. The vulnerability surfaced when the video for that particular ditty was played on a laptop, which would promptly crash. Nearby laptops of the same kind would also be affected, suggesting that whatever was crashing the machine wasn’t software related. As it turns out, some frequencies in the song were causing resonant vibrations in the drive. It’s not clear if anyone at the time asked the important questions, like exactly which part of the song was responsible or what the failure mode was on the drive. We’ll just take a guess and say that it was the drive heads popping and locking.

Continue reading “Hackaday Links: August 21, 2022”

Hackaday Links Column Banner

Hackaday Links: October 3, 2021

It’s one thing to speculate about what’s happening with the Mars helicopter Ingenuity, but it’s another to get an insider’s view on recent flight problems. As we previously reported, Ingenuity is starting to face a significant challenge, as a seasonal atmospheric pressure drop on Mars threatens to make the already rarefied air too thin to generate useful lift. Mission controllers tested the chopper at higher rotor speeds, and while that worked, later attempts to fly using that higher speed resulted in an abort. The article, written by one of the NASA/JPL engineers, is a deep dive into the problem, which occurred when Ingenuity sensed excessive wiggle in two of the servos controlling the rotor swashplate. The thought is that accumulated wear in the servos and linkages might be causing the problem; after all, Ingenuity has made thirteen flights so far, greatly exceeding the five flights originally programmed for it. Here’s hoping they can adapt and keep the helicopter flying, but whatever they do, it’ll have to wait a few weeks until Mars completes its conjunction and pops back out from behind the Sun.

With all the attention understandably paid to the recent 20th anniversary of the 9/11 terror attacks, it’s easy to forget that barely a month after that day, a series of what appeared to be follow-on attacks started: the Anthrax Attacks. Members of Congress and media outlets were targeted via the mail with highly refined anthrax spores, leading to the deaths of five people, with dozens more injured and exposed to anthrax. IEEE Spectrum has an interesting article that goes into some of the technology that was rapidly deployed in an attempt to sanitize the mail, including electron beam and X-ray irradiation to kill any spores. The article also points out how this wasn’t the first time people were afraid of the mail; outbreaks of yellow fever in 1899 led to fumigation of the mail with sulfur, after perforating it with a wicked-looking paddle.

Attention PCB-design newbies — now’s your chance to learn the entire PCB design process from the ground up, with the guidance of industry professionals. TeachMePCB is back again this year, offering to teach you everything you need to know about properly laying out a PCB design in pretty much any EDA software you want. The course requires a two- to five-hour commitment every week for two months, after which you’ll have designed a PCB for a macropad using a Raspberry Pi Pico. The course facilitator is Mark Hughes from Royal Circuits, who did a great Hack Chat with us last year on PCB finishes. This seems like a great way to get up to speed on PCB design, so if you’re interested, act soon — 460 people are already signed up, and the deadline is October 10.

Some of us really love factory tours, no matter what the factory is making. All the better when the factory makes cool electronics stuff, and better still when it’s our friends at Adafruit showing us around their New York City digs. True, it’s a virtual tour, but it has pretty much become a virtual world over the last couple of years, and it’s still a great look inside the Adafruit factory. Hackaday got an in-person tour back in 2015, but we didn’t know their building used to be a Westinghouse radio factory. In fact, the whole area was once part of the famed “Radio Row” that every major city seemed to have from the 1920s to the 1960s. It’s good to get a look inside a real manufacturing operation, especially one that’s right in the heart of a city.

And finally, those with a fear of heights might want to avoid watching this fascinating film on the change-out of a TV transmitter antenna. The tower is over 1,500′ (450 m) tall, lofting an aging antenna over the flat Florida terrain. Most of the footage comes from body-mounted cameras on the riggers working the job, including the one very brave soul who climbed up the partially unbolted antenna to connect it to the Sikorsky S64 Skycrane helicopter. It’s a strange combination of a carefully planned and slowly executed ballet, punctuated by moments of frenetic activity and sheer terror. The mishap when releasing the load line after the new antenna was placed could easily have swept the whole rigging crew off the antenna, but luckily nobody was injured.

Continue reading “Hackaday Links: October 3, 2021”

Keep Coffee Warm Through Induction Heating

Transformers have an obvious use for increasing or decreasing the voltage in AC systems, but they have many other esoteric uses as well. Electric motors and generators are functionally similar and can be modeled as if they are transformers, but the truly interesting applications are outside these industrial settings. Wireless charging is essentially an air-core transformer that allows power to flow through otherwise empty space, and induction cooking uses a similar principle to induce current flow in pots and pans. And, in this case, coffee mugs.

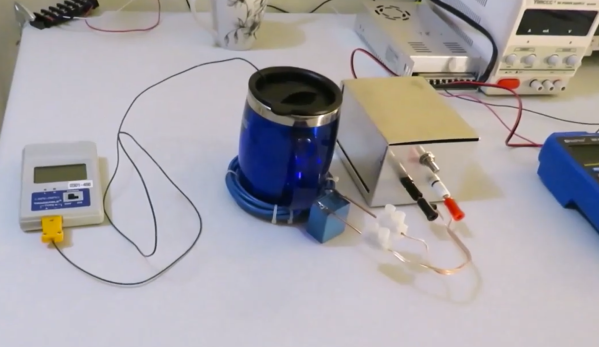
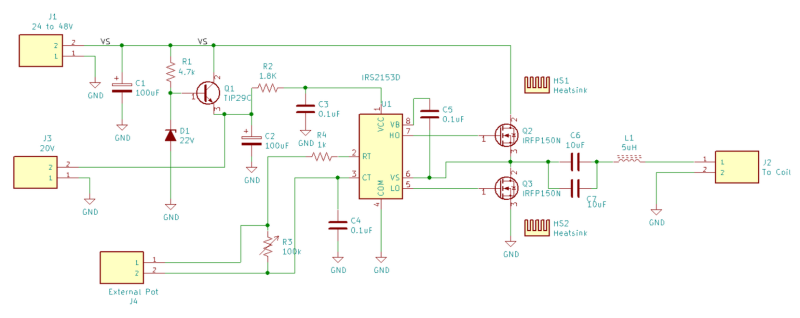
[Sajjad]’s project is an effort to keep his coffee warm while it sits on his desk. To build this special transformer he places his mug inside a coil of thick wire which is connected to a square wave generator. A capacitor sits in parallel with the coil of wire which allows the device to achieve resonance at a specific tuned frequency. Once at that frequency, the coil of wire efficiently generates eddy currents in the metal part of the coffee mug and heats the coffee with a minimum of input energy.

While this project doesn’t work for ceramic mugs, [Sajjad] does demonstrate it with a metal spoon in the mug. While it doesn’t heat up to levels high enough to melt solder, it works to keep coffee warm in a pinch if a metal mug isn’t available. He also plans to upgrade it so it takes up slightly less space on his desk. For now, though, it can easily keep his mug of coffee hot while it sits on his test bench.

Continue reading “Keep Coffee Warm Through Induction Heating”

Bricking Your 3D Printer, In A Good Way

In our vernacular, bricking something is almost never good. It implies that something has gone very wrong indeed, and that your once-useful and likely expensive widget is now about as useful as a brick. Given their importance to civilization, that seems somewhat unfair to bricks, but it gets the point across.

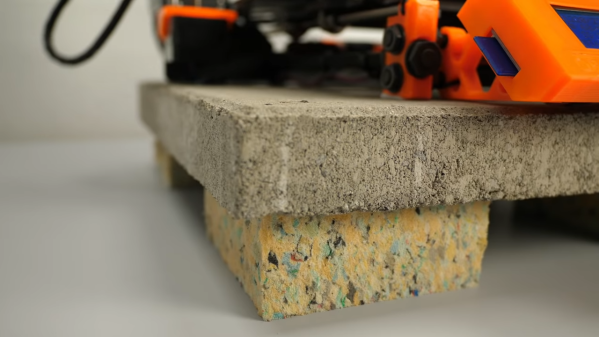
It turns out, though, that bricks can play an important role in 3D-printing in terms of both noise control and print quality. As [Stefan] points out in the video below, living with a 3D printer whirring away on a long print can be disturbing, especially when the vibrations of the stepper motors are transmitted into and amplified by a solid surface, like a benchtop. He found that isolating the printer from the resonant surface was the key. While the stock felt pad feet on his Original Prusa i3 Mk 3S helped, the best results were achieved by building a platform of closed-cell packing foam and a concrete paver block. The combination of the springy foam and the dampening mass of the paver brought the sound level down almost 8 dBA.

[Stefan] also thoughtfully tested his setups on print quality. Machine tools generally perform better with more mass to damp unwanted vibration, so it stands to reason that perching a printer on top of a heavy concrete slab would improve performance. Even though the difference in quality wasn’t huge, it was noticeable, and coupled with the noise reduction, it makes the inclusion of a paver and some scraps of foam into your printing setup a no-brainer.

Not content to spend just a couple of bucks on a paver for vibration damping? Then cast a composite epoxy base for your machine — either with aluminum or with granite.

Continue reading “Bricking Your 3D Printer, In A Good Way”