High Current Measurement Probe For Oscilloscopes

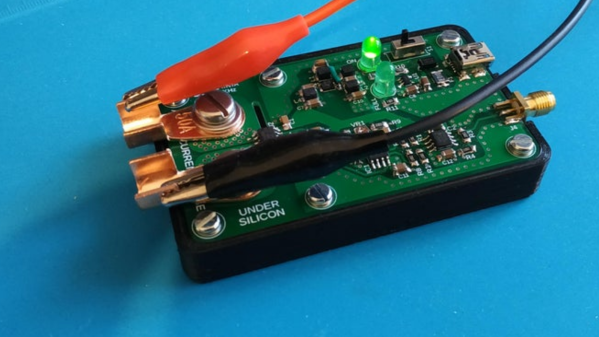
A decent current measurement sensor ought to be an essential part of every hacker’s workbench. One that is capable of measuring DC, as well as low and high frequencies with reasonable accuracy. And bonus credits if it can also withstand high bus voltages – such as those found in mains utility or electric vehicle work. [Undersilicon] couldn’t find one that ticked all the boxes, so he built an ACS730 based AC/DC current probe capable of measuring up to 25 A at frequencies up to 1 MHz.

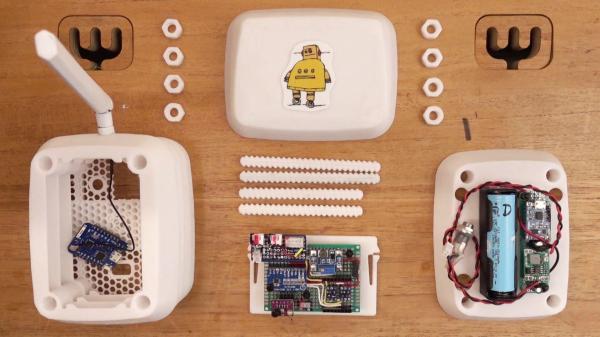
Allegro Microsystems has a wide offering of current sensor IC’s. The ACS730 features a -3 dB bandwidth of 1 MHz, and -1 dB bandwidth of 500 kHz. Since it is galvanically isolated, it can be used in AC mains applications up to 297 Vrms and for DC up to 420 V. And as he intended to use it as an oscilloscope accessory, the analog output suited the application nicely. A pair of precision op-amps provide the voltage output scaled to 100 mV/A. The board is powered off a 1000 mAh LiPo battery that can run the sensor for about 15 ~ 20 hours. The power supply section consists of a charge circuit for the LiPo, and a split rail dual output power supply converter for the op-amps.

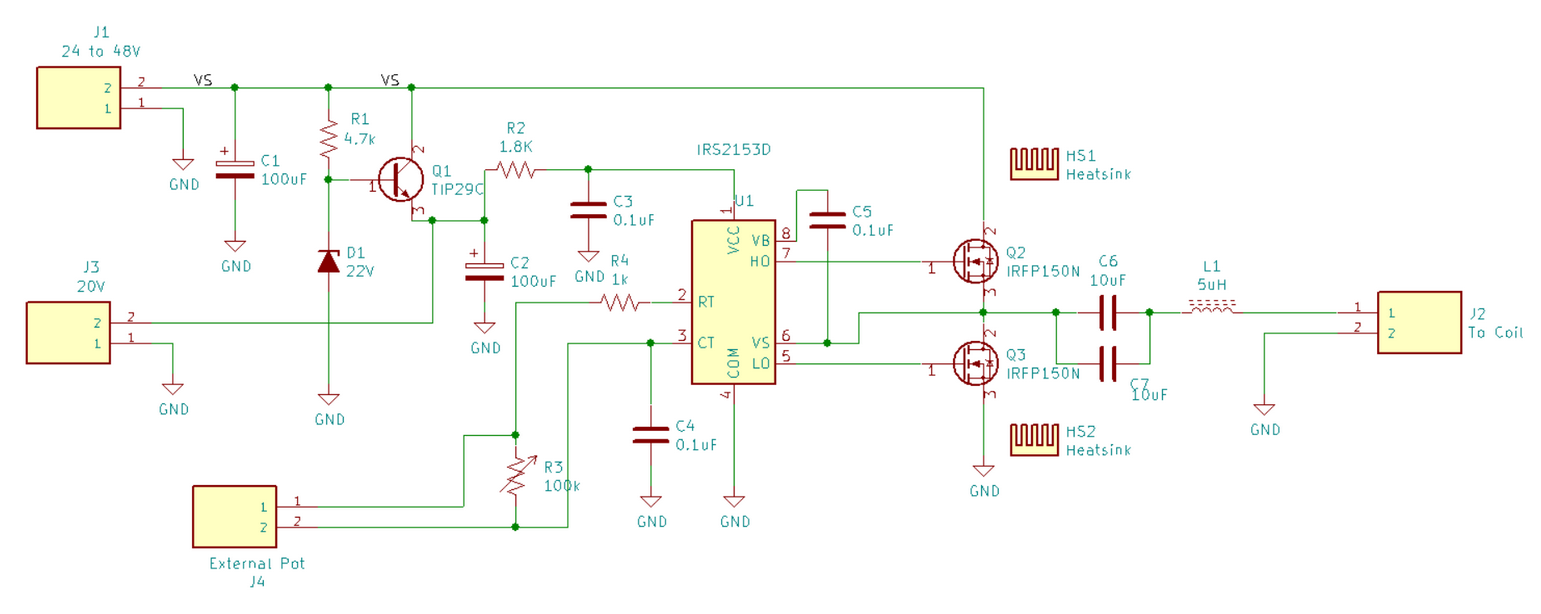
The ACS730 has a 2.5 V output when measured current is zero, and is scaled for 40 mV/A. This gives an output voltage swing from -0.5 V for -50 A to +4.5 V for +50 A. This is where the AD823ARZ dual 16 MHz, Rail-to-Rail FET Input Amplifiers step in. One pair is used to obtain a 2.5 V reference from the 5 V supply, and also to buffer the analog output from the ACS730. The second pair subtracts the 2.5 V offset, and applies a gain of 2.5 to get the 100 mV/A output. Dual power supply for the op-amps comes from a TPS65133 Split-Rail Converter, ±5V, 250mA Dual Output Power Supply. Lastly, LiPo charging is handled by the MCP73831 Single Cell, Li-Ion/Li-Polymer Charge Management Controller.

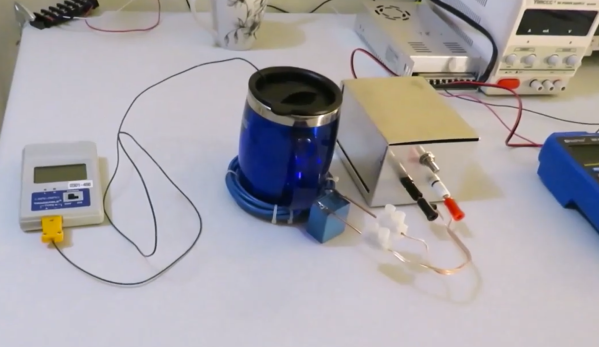
Initial testing of direct currents has shown fairly accurate performance. But he’s observed some noise when measuring currents below 1 A which requires some debugging to figure out the source. [Undersilicon] has provided the CAD files for both the PCB and 3D printed enclosure, giving you access to everything you need to build one yourself. If you’re looking for something a bit more heavy duty, you might be interested in this +/-50 A, 1.5 MHz sensor encased in concrete.

LED Brightness Adjustment Uses Itself As Sensor

This is a story about a successful system that nevertheless failed to make the cut. An experimental LED brightness adjustment is something [Mitxela] explored in a project for a high-precision clock; one that shows time down to the nearest millisecond, and won’t flicker or otherwise look weird when photographed with a high-speed camera. To pull this off means reinventing many things about a clock display, including how to handle brightness adjustment elegantly. Now, to be clear, the brightness adjustment idea described here is something that did not end up being used, but it’s interesting enough that [Mitxela] wrote it up and we’re very glad he did.

The idea was to have a smooth and seamless automatic brightness adjustment, ideally with no added components. Since LEDs can be used as light sensors, [Mitxela] saw an opportunity to use elements of the clock displays themselves as sensors. This is how it works: a charge in the p-n junction that makes up an LED will decay at a rate proportional to the amount of light hitting the junction. By measuring the speed of this decay, it’s therefore possible to tell how much light is hitting the LED. It’s effective and elegant, but there are a few practical issues to deal with.

The first failed idea was to employ as sensors the unused decimal points in the seven-segment LED modules, but that turned out to have issues. One was the common-cathode wiring of the display modules; this makes them very convenient to drive as displays, but made using the decimal point as a light sensor impractical. The other issue was that the built-in diffuser that makes the displays easier to read absorbs a lot of ambient light. A much better option was to use the LEDs in the colon separators between digits, since they’re independent. Naturally they still have to light up in addition to being used as sensors, but [Mitxela] made a successful prototype by performing the necessary measurements in between the LEDs being driven by PWM.

Despite how clever and efficient the solution was, in the end what sank it was the fact that the LEDs just don’t do a very good job of sensing ambient light for this purpose. The LEDs are simply too directional. Even after sanding away the top (lens) part of the LEDs, they still had a very narrow field of view. As [Mitxela] describes it, tilting the clock towards the ceiling could send it to full brightness, and the shadow of one’s head falling across the clock would plummet it into “night mode” dimness. In short, it responded to what was directly in front of it, rather than the ambient light level as a whole.

It’s a reminder that sometimes a solution simply won’t tick all the right boxes, and it can happen for unexpected reasons. Still, LEDs are versatile things. Not only can they sense light, but as the name implies they’re also diodes. As diodes can be used as temperature sensors that means LEDs can as well.

Hackaday Links Column Banner

Hackaday Links: April 11, 2021

Bad news, Martian helicopter fans: Ingenuity, the autonomous helicopter that Perseverance birthed onto the Martian surface a few days ago, will not be taking the first powered, controlled flight on another planet today as planned. We’re working on a full story so we’ll leave the gory details for that, but the short version is that while the helicopter was undergoing a full-speed rotor test, a watchdog timer monitoring the transition between pre-flight and flight modes in the controller tripped. The Ingenuity operations team is going over the full telemetry and will reschedule the rotor test; as a result, the first flight will occur no earlier than Wednesday, April 14. We’ll be sure to keep you posted.

Anyone who has ever been near a refinery or even a sewage treatment plant will have no doubt spotted flares of waste gas being burned off. It can be pretty spectacular, like an Olympic torch, but it also always struck us as spectacularly wasteful. Aside from the emissions, it always seemed like you could at least try to harness some of the energy in the waste gasses. But apparently the numbers just never work out in favor of tapping this source of energy, or at least that was the case until the proper buzzword concentration in the effluent was reached. With the soaring value of Bitcoin, and the fact that the network now consumes something like 80-TWh a year, building portable mining rigs into shipping containers that can be plugged into gas flaring stacks at refineries is now being looked at seriously. While we like the idea of not wasting a resource, we have our doubts about this; if it’s not profitable to tap into the waste gas stream to produce electricity now, what does tapping it to directly mine Bitcoin really add to the equation?

What would you do if you discovered that your new clothes dryer was responsible for a gigabyte or more of traffic on your internet connection every day? We suppose in this IoT world, such things are to be expected, but a gig a day seems overly chatty for a dryer. The user who reported this over on the r/smarthome subreddit blocked the dryer at the router, which was probably about the only realistic option short of taking a Dremel to the WiFi section of the dryer’s control board. The owner is in contact with manufacturer LG to see if this perhaps represents an error condition; we’d actually love to see a Wireshark dump of the data to see what the garrulous appliance is on about.

As often happens in our wanderings of the interwebz to find the very freshest of hacks for you, we fell down yet another rabbit hole that we thought we’d share. It’s not exactly a secret that there’s a large number of “Star Trek” fans in this community, and that for some of us, the way the various manifestations of the series brought the science and technology of space travel to life kick-started our hardware hacking lives. So when we found this article about a company building replica Tricorders from the original series, we followed along with great interest. What we found fascinating was not so much the potential to buy an exact replica of the TOS Tricorder — although that’s pretty cool — but the deep dive into how they captured data from one of the few remaining screen-used props, as well as how the Tricorder came to be.

And finally, what do you do if you have 3,281 drones lying around? Obviously, you create a light show to advertise the launch of a luxury car brand in China. At least that’s what Genesis, the luxury brand of carmaker Hyundai, did last week. The display, which looks like it consisted mostly of the brand’s logo whizzing about over a cityscape, is pretty impressive, and apparently set the world record for such things, beating out the previous attempt of 3,051 UAVs. Of course, all the coverage we can find on these displays concentrates on the eye-candy and the blaring horns of the soundtrack and gives short shrift to the technical aspects, which would really be interesting to dive into. How are these drones networked? How do they deal with latency? Are they just creating a volumetric display with the drones and turning lights on and off, or are they actually moving drones around to animate the displays? If anyone knows how these things work, we’d love to learn more, and perhaps even do a feature article.

Parts of the automated soil moisture monitoring station

Solar Stevenson Screen For Smart Sprinkler

It’s not infrequent that we see the combination of moisture sensors and water pumps to automate plant maintenance. Each one has a unique take on the idea, though, and solves problems in ways that could be useful for other applications as well. [Emiliano Valencia] approached the project with a few notable technologies worth gleaning, and did a nice writeup of his “Autonomous Solar Powered Irrigation Monitoring Station” (named Steve Waters as less of a mouthful).

Of particular interest was [Emiliano]’s solution for 3D printing a threaded rod; lay it flat and shave off the top and bottom. You didn’t need the whole thread anyway, did you? Despite the relatively limited number of GPIO pins on the ESP8266, the station has three analog sensors via an ADS1115 ADC to I2C, a BME280 for temperature, pressure, and humidity (also on the I2C bus), and two MOSFETs for controlling valves. For power, a solar cell on top of the enclosure charges an 18650 cell. Communication over wireless goes to Thingspeak, where a nice dashboard displays everything you could want. The whole idea of the Stevenson Screen is clever as well, and while this one is 3D printed, it seems any kind of stacking container could be modified to serve the same purpose and achieve any size by stacking more units. We’re skeptical about bugs getting in the electronics, though.

We recently saw an ESP32-based capacitive moisture sensor on a single PCB sending via MQTT, and we’ve seen [Emiliano] produce other high quality content etching PCBs with a vinyl cutter.

Keep Coffee Warm Through Induction Heating

Transformers have an obvious use for increasing or decreasing the voltage in AC systems, but they have many other esoteric uses as well. Electric motors and generators are functionally similar and can be modeled as if they are transformers, but the truly interesting applications are outside these industrial settings. Wireless charging is essentially an air-core transformer that allows power to flow through otherwise empty space, and induction cooking uses a similar principle to induce current flow in pots and pans. And, in this case, coffee mugs.

[Sajjad]’s project is an effort to keep his coffee warm while it sits on his desk. To build this special transformer he places his mug inside a coil of thick wire which is connected to a square wave generator. A capacitor sits in parallel with the coil of wire which allows the device to achieve resonance at a specific tuned frequency. Once at that frequency, the coil of wire efficiently generates eddy currents in the metal part of the coffee mug and heats the coffee with a minimum of input energy.

While this project doesn’t work for ceramic mugs, [Sajjad] does demonstrate it with a metal spoon in the mug. While it doesn’t heat up to levels high enough to melt solder, it works to keep coffee warm in a pinch if a metal mug isn’t available. He also plans to upgrade it so it takes up slightly less space on his desk. For now, though, it can easily keep his mug of coffee hot while it sits on his test bench.

Continue reading “Keep Coffee Warm Through Induction Heating”

The Dynamotor Simplified

[Robert Murray-Smith] doesn’t like the price of inverters to convert DC to AC. That led him to build a dynamotor, or what is sometimes called a motor-generator set. These devices are just DC motors driving a generator. Of course, motors can also be used as generators and [Robert] had a stack of brushless motors in the form of PC fans. A two-fan dynamotor was born.

The brushless motors are attractive because, traditionally, the brushes are what usually fail on a dynamotor. The fan that will act as a generator needs some surgery, but it is simple. He scraped off all the control electronics and connected wires to the coils to form a three-phase generator. There’s no need for the fan blades in that configuration, either. If you were using ordinary motors and a generator, getting shafts concentric would be an important task. With the fans, it is simple to just line up the mounting holes and you get perfect alignment for free.

How does it work? [Robert] has a second video showing the output on a scope. You can see both videos below. The dynamotor makes a good-looking sine wave, probably much better than most reasonable-priced solid state inverters. He didn’t mention how much current he could successfully draw, but it probably isn’t much. You’d also need a transformer to replace a commercial inverter that would put out line voltage, so that would be some more loos in the system. On the other hand, if you wanted AC at a lower voltage, you might just replace all the transformers, if you were building a piece of gear yourself.

We’ve looked at how these things work in some detail. There were common in old tube radios, particularly military ones.

Continue reading “The Dynamotor Simplified”

A Fresh E-Ink Newspaper Delivered Every Morning

[Greg Raiz] recently set out to make it easy to read multiple newspapers in the morning over breakfast. Inspired by a similar project, he built an e-ink newspaper that hangs on his wall, delivering fresh news every ten minutes.

The project started with a 32″ Visionect e-ink display configured as a thin client. With a battery life measured in months thanks to the low power electronics, most of the work here was focused on the backend. A docker container running on a local NAS server collects newspapers via freedomforum.org, formats them to fit the aspect ratio of the display, and serves them up. [Greg] is really trying to preserve the design and thought that goes into the front page of each of these publications as traditional newspaper layouts are often designed by hand.

We love the simplicity and the “it-just-works” feel of this project as there are no buttons, wires, or anything that you need to fiddle with. [Greg] points out that it could also be used for other purposes, and we’d love to see a large calendar such as this e-ink calendar or perhaps even a 32″ version of this e-ink laptop. The code for this is on his GitHub with a video after the break.

Continue reading “A Fresh E-Ink Newspaper Delivered Every Morning”