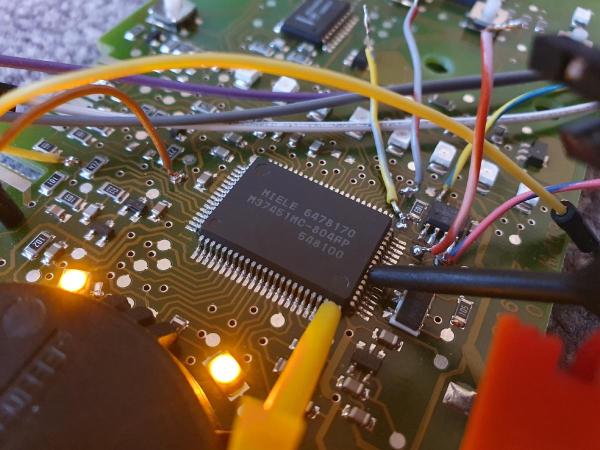
Reverse Engineering The Miele Diagnostic Interface

The infrared transceiver installed on the washing machine. (Credit: Severin)

Since modern household appliances now have an MCU inside, they often have a diagnostic interface and — sometimes — more. Case in point: Miele washing machines, like the one that [Severin] recently fixed, leading to the firmware becoming unhappy and refusing to work. This fortunately turned out to be recoverable by clearing the MCU’s fault memory, but if you’re unlucky, you will have to recalibrate the machine, which requires very special and proprietary software.

Naturally, this led [Severin] down the path of investigating how exactly the Miele Diagnostic Utility (MDU) and the Program Correction (PC) interface communicate. Interestingly, the PC interface uses an infrared LED/receiver combination that’s often combined with a status LED, as indicated by a ‘PC’ symbol. This interface uses the well-known IrDA standard, but [Severin] still had to track down the serial protocol.

Continue reading “Reverse Engineering The Miele Diagnostic Interface”

Another Thermal Printer, Conquered

The arrival of cheap thermal printer mechanisms over the last few years has led to a burst of printer hacking in our community, and we’re sure many of you will like us have one knocking around somewhere. There are a variety of different models on the market, and since they often appear in discount stores we frequently see new ones requiring their own reverse engineering effort. [Mel] has done some work on just such a model, the Core Innovation CTP-500, which can be found at Walmart.

The write-up is a tale of Bluetooth reverse engineering as much as it is one about the device itself, as he sniffs the protocol it uses, and finds inspiration from the work of others on similar peripherals. The resulting Python app can be found in his GitHub repository, and includes a TK GUI for ease of use. We like this work and since there’s an analogous printer from a European store sitting on the Hackaday bench as we write this, it’s likely we’ll be giving it a very close look.

Meanwhile if [Mel] sounds a little familiar it might be because of their print-in-place PCB holder we featured recently.

LLM Dialogue In Animal Crossing Actually Works Very Well

In the original Animal Crossing from 2001, players are able to interact with a huge cast of quirky characters, all with different interests and personalities. But after you’ve played the game for awhile, the scripted interactions can become a bit monotonous. Seeing an opportunity to improve the experience, [josh] decided to put a Large Language Model (LLM) in charge of these interactions. Now when the player chats with other characters in the game, the dialogue is a lot more engaging, relevant, and sometimes just plain funny.

How does one go about hooking a modern LLM into a 24-year-old game built for an entirely offline console? [josh]’s clever approach required a lot of poking about, and did a good job of leveraging some of the game’s built-in features for a seamless result.

Continue reading “LLM Dialogue In Animal Crossing Actually Works Very Well”

Hosting A Website On A Disposable Vape

For the past years people have been collecting disposable vapes primarily for their lithium-ion batteries, but as these disposable vapes have begun to incorporate more elaborate electronics, these too have become an interesting target for reusability. To prove the point of how capable these electronics have become, [BogdanTheGeek] decided to turn one of these vapes into a webserver, appropriately called the vapeserver.

While tearing apart some of the fancier adult pacifiers, [Bogdan] discovered that a number of them feature Puya MCUs, which is a name that some of our esteemed readers may recognize from ‘cheapest MCU’ articles. The target vape has a Puya PY32F002B MCU, which comes with a Cortex-M0+ core at 24 MHz, 3 kB SRAM and 24 kB of Flash. All of which now counts as ‘disposable’ in 2025, it would appear.

Even with a fairly perky MCU, running a webserver with these specs would seem to be a fool’s errand. Getting around the limited hardware involved using the uIP TCP/IP stack, and using SLIP (Serial Line Internet Protocol), along with semihosting to create a serial device that the OS can use like one would a modem and create a visible IP address with the webserver.

The URL to the vapeserver is contained in the article and on the GitHub project page, but out of respect for not melting it down with an unintended DDoS, it isn’t linked here. You are of course totally free to replicate the effort on a disposable adult pacifier of your choice, or other compatible MCU.

Using An MCU’s Own Debug Peripheral To Defeat Bootrom Protection

The patient hooked up for some reverse-engineering. (Credit: Caralynx, Twitter)

Released in July of 2025, the Tamagotchi Paradise may look somewhat like the late 90s toy that terrorized parents and teachers alike for years, but it’s significantly more complex and powerful hardware-wise. This has led many to dig into its ARM Cortex-M3-powered guts, including [Yukai Li] who recently tripped over a hidden section in the bootrom of the dual-core Sonix SNC73410 MCU that makes up most of the smarts inside this new Tamagotchi toy.

Interestingly, [Yukai] did see that the visible part of the bootrom image calls into the addresses that make up the hidden part right in the reset handler, which suggests that after reset this hidden bootrom section is accessible, just not when trying to read it via e.g. SWD as the hiding occurs before the SWD interface becomes active. This led [Yukai] to look at a way to make this ROM section not hidden by using the Cortex-M3’s standard Flash Patch and Breakpoint (FPB) unit. This approach is covered in the project’s source file.

With this code running, the FPB successfully unset the responsible ROM hide bit in the OSC_CTRL register, allowing the full bootrom to be dumped via SWD and thus defeating this copy protection with relatively little effort.

Heading image: PCB and other components of a torn-down Tamagotchi Paradise. (Credit: Tamagotchi Center)

A thick, rectangular device with rounded corners is shown, with a small screen in the upper half, above a set of selection buttons.

Further Adventures In Colorimeter Hacking

One of the great things about sharing hacks is that sometimes one person’s work inspires someone else to take it even further. A case in point is [Ivor]’s colorimeter hacking (parts two and three), which started with some relatively simple request spoofing to install non-stock firmware, and expanded from there until he had complete control over the hardware.

After reading [Adam Zeloof]’s work on replacing the firmware on a cosmetics spectrophotometer with general-purpose firmware, [Ivor] bought two of these colorimeters, one as a backup. He started with [Adam]’s method for updating the firmware by altering the request sent to an update server, but was only able to find the serial number from a quality-control unit. This installed the quality-control firmware, which encountered an error on the device. More searching led [Ivor] to another serial number, which gave him the base firmware, and let him dump and compare the cosmetic, quality-control, and base firmwares.

Continue reading “Further Adventures In Colorimeter Hacking”

Battery Repair By Reverse Engineering

Ryobi is not exactly the Cadillac of cordless tools, but one still has certain expectations when buying a product. For most of us “don’t randomly stop working” is on the list. Ryobi 18-volt battery packs don’t always meet that expectation, but fortunately for the rest of us [Badar Jahangir Kayani] took matters into his own hands and reverse-engineered the pack to find all the common faults– and how to fix them.

[Badar]’s work was specifically on the Ryobi PBP005 18-volt battery packs. He’s reproduced the schematic for them and given a fairly comprehensive troubleshooting guide on his blog. The most common issue (65%) with the large number of batteries he tested had nothing to do with the cells or the circuit, but was the result of some sort of firmware lock.

It isn’t totally clear what caused the firmware to lock the batteries in these cases. We agree with [Badar] that it is probably some kind of glitch in a safety routine. Regardless, if you have one of these batteries that won’t charge and exhibits the characteristic flash pattern (flashing once, then again four times when pushing the battery test button), [Badar] has the fix for you. He actually has the written up the fix for a few flash patterns, but the firmware lockout is the one that needed the most work.

[Badar] took the time to find the J-tag pins hidden on the board, and flash the firmware from the NXP micro-controller that runs the show. Having done that, some snooping and comparison between bricked and working batteries found a single byte difference at a specific hex address. Writing the byte to zero, and refreshing the firmware results in batteries as good as new. At least as good as they were before the firmware lock-down kicked in, anyway.

He also discusses how to deal with unbalanced packs, dead diodes, and more. Thanks to the magic of buying a lot of dead packs on e-Bay, [Badar] was able to tally up the various failure modes; the firmware lockout discussed above was by far the majority of them, at 65%. [Badar]’s work is both comprehensive and impressive, and his blog is worth checking out even if you don’t use the green brand’s batteries. We’ve also embedded his video below if you’d rather watch than read and/or want to help out [Badar] get pennies from YouTube monetization. We really do have to give kudos for providing such a good write up along with the video.

This isn’t the first attempt we’ve seen at tearing into Ryobi batteries. When they’re working, the cheap packs are an excellent source of power for everything from CPap machines to electric bicycles.

Thanks to [Badar] for the tip.

Continue reading “Battery Repair By Reverse Engineering”