Repair A Misbehaving Motor Controller Board

It can be a real drag to fix a circuit board which has stopped working as intended, especially if you don’t have any reference material for the product. That’s the position that [Todd Harrison] found himself in when the controller for his mini-lathe gave up the ghost. He undertook and hefty repair process and eventually mapped out and repaired the driver board.

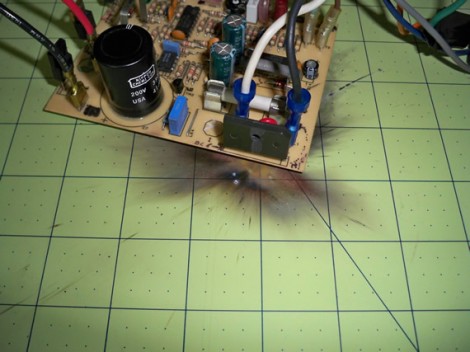
First off, we’re happy to report his success at the end of a year-long troubleshooting process; the entirety of which occupies six different posts. The link at the top is the conclusion, and you’ll find his final test video after the break. But as you can see from the image above, he was met with a lot of problems along the way. The first two segments show him reverse engineering the PCB, with a giant schematic coming out of the process. In part 3 he then started probing the board while it was live, with the smell of hot electronics causing him to disconnect the power every thirty seconds. One time he took too long and blew a resistor with the pictured results.

In the end it was a shorted PWM chip to blame. He tested a couple of different replacement options, dropped in the new part, and is now back in business. Continue reading “Repair A Misbehaving Motor Controller Board”

Help [Chris] Boot His Cray-1 Supercomputer

[Chris Fenton] needs your help. After constructing a 1/10th scale, cycle accurate Cray-1 supercomputer and finding a disk with Cray software on it, he’s ready to start loading the OS. There’s a small problem, though: no one knows how to boot the thing.

[Chris] posted a disk image for a Cray-1/X-MP with the help of the people at archive.org. Now he needs your help – if you think you can reverse engineer the file system, [Chris] will pay handsomely with a miniature model of a Cray printed on his MakerBot. In any case, it seems like a fun challenge.

From our quick glance at the disk image with a HEX editor, it looks like [Chris] has something special on his hands. We see a few references to “Cray memory and registers,” as well as “IOP-0 Kernel, Version 4.2.2” in the header along with a few dates referencing July of 1989.  This is consistent with the history of the source disk pack. If you think you’ve got what it takes to reverse engineer the file system of a Cray-1, this is your chance.

Reverse Engineering The Icebreaker POV Toy

[Ch00f] spent some serious time figuring out how the Icebreaker POV toy works. This is a pretty cool device about the size of a toothbrush holder. It’s in a clear plastic case, which lets the row of 32 surface mount LEDs shine through. But making light isn’t their only function. You can use the device to scan in a high-contrast design, then ‘play it back’ using the persistence of vision display properties of the LED strip.

Perhaps the biggest question on [Ch00f’s] mind was how the sensing is done. He made a series of observations, then started monkeying around with the LEDs to investigate them. It seems that one LED is lit up while the ones around it are used as light sensors. This becomes more confusing once he realized that the display was multiplexed.

His write-up includes a collection of schematics that can be pieced together to conceptualize the entire circuit. The image above was taken during this process, using an LED to check the connections on a part. This let him prove that it’s an N-channel MOSFET. He plans to take what learned and roll it into his own project.

[via Reddit]

Reverse Engineering Bluetooth Using Android And SPOT As An Example

[Travis Goodspeed] wrote in to tell us about his work reverse engineering the Bluetooth communications on this SPOT module. He’s targeted the post as a general guide to sniffing Bluetooth transmissions, but was inspired to use the SPOT as an example after seeing this other SPOT hack. We know he’s a fan of getting things to work with his Nokia N900, and that’s exactly where he ended up with the project.

This module was manufactured to be controlled by an Android phone. But there’s no control app available for the Nokia handset. Since Android uses the open-source Bluez package for the Bluetooth protocol, it’s actually pretty easy to get your hands on the packets. After grabbing a few test sets he shows how he deciphered the packets, then wrote a quick Python script to test out his findings. After working his way through the various commands available (grabbing the SPOT serial number, getting position data from it, etc) [Travis] wrote up a frontend in QT mobility for use on the N900.

Reverse Engineering A Korg Monotribe

Yesterday, Korg released a firmware update to their ribbon controller synth, the Monotribe. The firmware is just an audio file that needs to be played to the sync input of the box. [gravitronic] thought this was rather interesting, so he decided to decode the monotribe firmware. It’s the first step to custom Monotribe firmware, and on the path towards reverse engineering this neat box.

After converting the firmware update to a .wav, [gravitronic] looked at the file with a hex editor and found that each sample is two bytes, and the left and right channels are the same. That made enough sense, so after getting rid of one channel, he sent it through Python to take a look at the patterns of ones and zeros.

Of course, [gravitronic] arbitrarily chose high = 1, low = 0, and little-endianness. The first result didn’t produce a nice “KORG SYSTEM FILE” in the header, so he tried other combinations until the output file looked reasonable. The result is the actual .bin file that’s going to serve as the basis for a nice homebrew firmware. You can grab [gravitronic]’s Python script here and decode your own firmware.

Getting Useful Data From A Dirt Cheap RFID Reader

cheap-rfid-reader

[Aaron] was looking for a cheap RFID reader that had some easy to follow documentation and a standardized interface. Most everything he saw was pretty expensive, so he decided to buy a cheap $10 reader from eBay to see how easy it would be to work with.

The reader came with very little documentation, but [Aaron] did know that the device identifies itself as a USB keyboard, outputting scan tag data into a text editor. That functionality wasn’t incredibly useful, so he took it apart to see if he could interface with it in some other manner. Exposing the PCB revealed an unknown IC for which he could find no documentation, but the board did include some breakout pins, so [Aaron] started by probing those for data.

He tried reading the data in both a terminal program and with a logic analyzer, but nothing seemed to make a whole lot of sense. He turned the sampling rate of the sniffer down, and things started looking a little better. After comparing the data from the sniffer with known tag codes, he noticed that each digit had an offset of 39 applied, so he whipped up a bit of code to correct the numbers.

[Aaron] did a good amount of legwork to get usable data from the reader, but at a cost of $10 it can’t be beat. We certainly know what we’re going to be hunting for on eBay this afternoon…

Snooping Around In The Iclicker Hardware And Firmware

[Arko] was compelled to purchase an iclicker to use in some of his college courses. It’s similar in size to a television remote control except it only has six buttons and it communicates via radio frequency instead of infrared light. The idea is that classrooms have a base station that the instructor uses, and he or she can ask questions of the class and have instant feedback. Results are often projected on a screen for all to see but only the instructor can get at the breakdown of who answered in what way. In [Arko’s] case, the class awards participation points that you can only get by using this device. He decided to actually learn something from the expenditure by reverse engineering the device.

Preliminary hardware inspection told him that it uses an ATmega8 microcontroller and there’s a standard 6-pin ISP footprint just waiting to be populated with a surface mount pin header. Once he soldered on that header, he tried to read out the firmware but the iClicker reset itself. He guessed that there was something going on with the power and ground lines so he soldered directly to them and was able to dump the data–the security fuses are not set. He goes on to snoop in the EEPROM to find where the device ID is stored, and then to watch some of the SPI communications to see what the microcontroller is sending to the radio chip. But there’s a lot left to discover and he’s planning at least two follow-up post to share what he finds.

Just looking to repair your dead device? Check out this tip on battery problems with the iclicker.