The Original Seven (Eight?) Segment Display

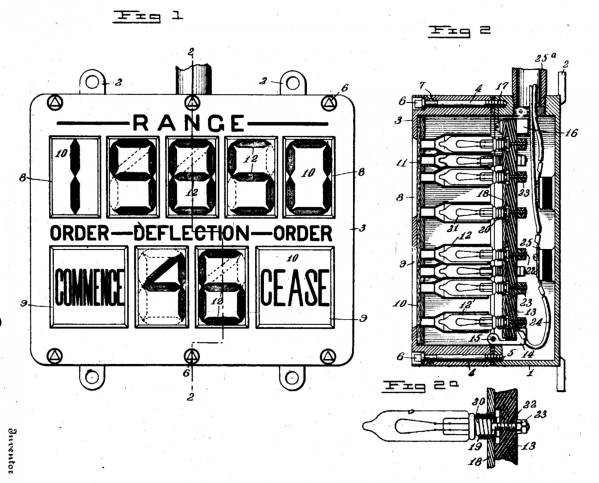
The seven-segment LED display is ubiquitous. But how old do you think the fundamental idea behind it is? You nixie tube fans will be thinking of the vacuum-tube era, but a reader sent us this patent filed in 1908 where [Frank W. Wood] builds a numeric display with plain-vanilla light bulbs, slots cut in wood, and lots of wires.

The OCR on the patent is poorly done — you’re going to want to download the PDF and read it locally. But as it states in the patent, “Referring again to Fig. 1, the novel arrangement of the lamp compartments will be readily understood.”

Technically it’s not a seven-segment display at all. [F.W. Wood] designed these really nice-looking “4”s with the diagonal heads, and so he needed eight segments per digit. But the basic idea shines through, if you pardon the pun.

The other figures demonstrate the machine that’s used to send the signals to light up the lights. It’s a rotating drum with the right contacts on the bottom side to make connections and turn on the right lights at the other end. Low tech, but it’s what was available at the time.

We’re stoked that we’re not responsible for wiring this thing up, and we’re a bit awed by how old the spirit behind one of our most ubiquitous technologies is.

Thanks to [mario59] for the nostalgic tip!

A Tiny Bubble Display Alarm Clock

For one reason or another, we’re starting to see a lot of projects featuring some old seven-segment HP bubble displays. Yes, those displays once relegated to ancient electronic calculators are making a comeback for reasons we can’t understand why, other than speculation that someone found a bunch of NOS displays. [Markus] picked up a few of these olde tymie displays and built a very nice bubble display alarm clock.

To keep things simple, [Markus] didn’t go the usual ATMega with RTC route. Instead, he’s using an MSP430, a 32kHz crystal, and a few buttons to construct this tiny alarm clock. It’s powered by a single AAA battery, and in a nice change of pace from fancy, professionally made boards, [Markus] built this on some perfboard with a little bit of enameled wire.

It’s a neat little clock, and with the speaker and most likely extreme battery life thanks to the MSP430, a wonderful portable, classic-looking alarm clock. Video of [Markus] manipulating the time below.

Continue reading “A Tiny Bubble Display Alarm Clock”

Fabricate Your Own 7-Segment Displays

We see more and more projects that use custom molds and casting materials. The latest is this custom seven segment display which [Ray74] put together. The idea of making your own LED displays couldn’t be much easier than this — everything but the LEDs and wire is available at the craft store.

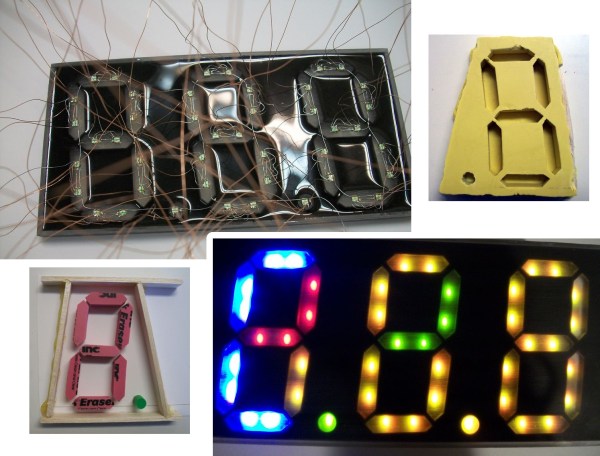
He started by making models of each segment out of pink erasers. The lower left image of the vignette above shows the eraser segments super glued to some poster board. The decimal is a pencil eraser, with a fence of wood to contain the molding material. Amazing Mold Putty was mixed and pressed into place resulting in the mold shown in the upper right.

From there, [Ray] cast the clear epoxy three times. Once dried the clear pieces were sanded, which will shape them up physically but also serves to diffuse the light. They were then placed inside of another mold form and an epoxy pour — this time doped with black enamel paint — finishes the 7-segment module. The final step is to glue the LEDs on the back side and wire them up.

This definitely trumps the build which Hackaday Alum [Kevin Dady] pulled off using hot glue sticks as light pipes.


7-Segment Display Matrix Visualizes More Than Numbers

digit-7-segment-visualization

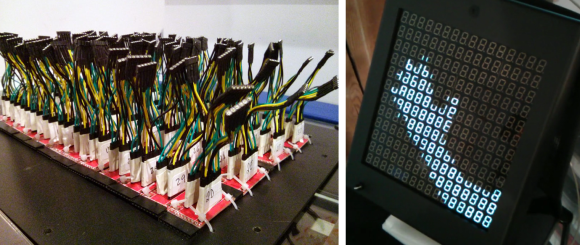
You can pretty much tell that this is an outstretched hand shown on a large grid of 7-segment displays. But the only reason you have to look twice is because it is a still photo. When you see the video below it’s more than obvious what you’re looking at… partly because the device is being used as an electronic mirror.

In total there are 192 digits in the display. To make things easier, four-digit modules were used, although we still couldn’t resist showing you the well-organized nightmare that is the wiring scheme. Each module is driven by its own discrete Arduino (driving 28 LEDs as they’re apparently not connecting the decimal point). All 48 Arduino boards receive commands from a Raspberry Pi which is running openFrameworks to generate the animations.

Now of course the project was well under way before [Peter] discovered a similar display from more than a year ago. But we’re glad that didn’t stop them from forging ahead and even building on the idea. They added a camera to the display’s frame which lets it mirror back whatever is in front of it.

What popped into our minds was one of the recent entries for the Trinket contest.

Continue reading “7-Segment Display Matrix Visualizes More Than Numbers”

A Love Note In 14 Segments

14

[Terry] wanted to come up with a little electronics project for his kids, and also came up with something to keep the wife happy. It’s an adorable 14-segment love letter, pieced together with some leftover LED displays and a bit of solder.

There isn’t a microcontroller anywhere to be seen in this project – all the illuminated segments are tied to a switch, and aside from a few resistors there isn’t much to this circuit. The simplicity means it’s a great way for [Terry] to get his kids involved in electronics.

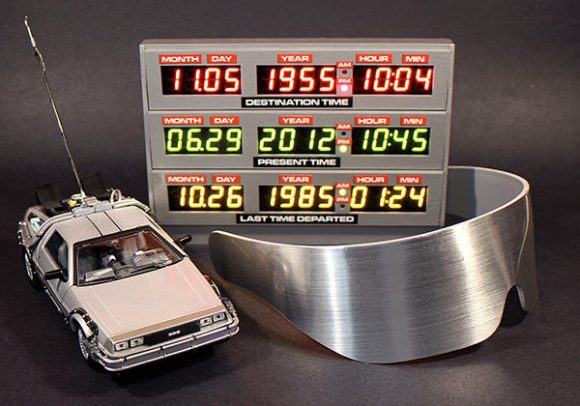
If you’re wondering why [Terry] didn’t throw multiple Arduinos, shift registers, or LED drivers into the build, consider this: sometimes segment displays can be static. The time circuit prop from Back to the Future (but not this modern recreation) was wired up in a similar manner, as only a few specific dates needed to be displayed. Either way, we’re thinking good on [Terry] for introducing his kids to a soldering iron and doing something special for his lady friend.

Adafruit Builds The Back To The Future Time Circuit Display

back-to-the-future-time-circuit-clock

If you were growing up in the ’80s this display panel will be instantly recognizable. It’s the time circuit display which [Doc Brown] built into his 88 mph per hour DeLoren time machine. If this still doesn’t jog your memory (or if — *gasp* — you’ve never seen the movie Back to the Future) take a gander at the montage video below.

The thing is, if you look really closely you’ll find this isn’t an exact match. Hackaday alum [Phil Burgess] put together a guide for Adafruit that shows how to build this version. But the movie actually cheated when it came to the month display. In production the month was displayed as alpha characters by painting glass slides. To make that happen here you would need some sixteen segment modules (like in this project). But we don’t mind the change one bit. The nostalgic look stands on its own even if it’s not an exact replica.

We’re sure you’ve figured out by now that this is backed by a dead-accurate real time clock (chronodot) and powered by a Teensy microcontroller board. Which means you can use it for just about any of your timekeeping needs.

Continue reading “Adafruit Builds The Back To The Future Time Circuit Display”

Lots Of Seven Segment Displays With A Single ATtiny

7seg

These days they’ve been replaced with character LCD displays or even brightly colored graphical displays, but if you’re trying to display data on one of your projects, there’s nothing like the classic red glow of a red seven segment display. [five volts] got his hands on a few ancient segmented displays, but controlling even one took up more microcontroller pins than he was ready to spare. The solution to this problem was to use a shift register and control multiple segment displays with an 8 pin microcontroller.

[volts] is using an ATtiny13 to control six seven segment displays. Each display is mounted on a hand-etched board, with a shift register and a handful of resistors soldered to the back. By having the microcontroller shift bits down the line, [volts] created an extremely easy to interface 6-digit segment display, and the entire device can be expanded even more.

The board files and schematics are available on [volt]’s project page. A great project if you’re just starting out to etch your own boards.