Building Keyboards With Resin Printers

Aside from putting a whole lot of tact switches on a board, no one has quite figured out how to make very small keyboards for wearable projects. [Madaeon] might have the answer, and it’s using a resin-based 3D printer to create a flexible keyboard without silicone.

The world of small keyboards is filled with what are effectively the squishy parts of a remote control. This uses a piece of silicone and tiny carbon ‘dots’ on the underside of each button. Press the button, and these carbon dots bridge two traces on a PCB, closing a switch. No one has yet mastered home-casting silicone, although the people behind the ESP32 WiPhone have been experimenting with aluminum molds.

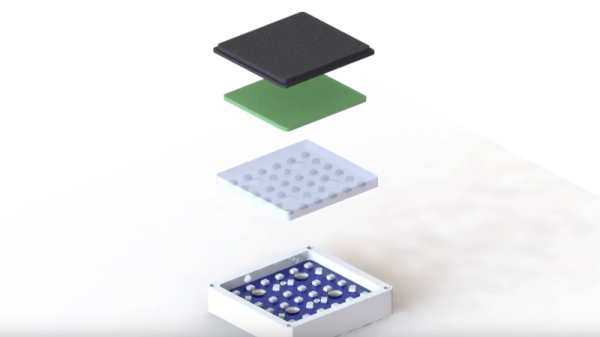
Instead of going down the path of casting and curing silicone, [Madaeon] decided to use 3D printing, specifically resin 3D printing, using a very flexible resin. The build process is what you would expect — just some button-shaped objects, but this gets clever when it comes to bridging the connections on the keyboard matrix. This is done with conductive paint, carefully applied to the underside of each button.

Right now this is a viable means of getting a tiny keyboard easily. The color is a garish pink, and the labels on each button aren’t quite as visible as anyone would like, but the latter can be fixed with silkscreening, just like how it’s done on the silicone buttons for remote controls.

Need A Small Keyboard? Build Your Own!

If you want keyboards, we can get you keyboards. If you want a small keyboard, you might be out of luck. Unless you’re hacking Blackberry keyboards or futzing around with tiny tact switches, there’s no good solution to small, thin, customization keyboards. There’s one option though: silicone keyboards. No one’s done it yet, so I figured I might as well.

Unfortunately, there is no readily available information on the design, construction, or manufacture of custom silicone keypads. There is a little documentation out there, but every factory that does this seems to have copy and pasted the information from each other. Asking a company in China about how to do it is a game of Chinese Whispers. Despite this, I managed to build a custom silicone keypad, and now I’m sharing this information on how to do it with you.

Continue reading “Need A Small Keyboard? Build Your Own!”

Reproducing Vintage Plastic Parts In Top-Notch Quality

Plastic is a highly useful material, but one that can also be a pain as it ages. Owners of vintage equipment the world over are suffering, as knobs break off, bezels get cracked and parts warp, discolor and fail. Oftentimes, the strategy has been to rob good parts from other broken hardware and cross your fingers that the supply doesn’t dry up. [Eric Strebel] shows us that’s not the only solution – you can replicate vintage plastic parts yourself, with the right tools.

In the recording industry there’s simply no substitute for vintage gear, so a cottage industry has formed around keeping old hardware going. [Eric] was tasked with reproducing VU meter bezels for a classic Neve audio console, as replacement parts haven’t been produced since the 1970s.

The first step is to secure a good quality master for replication. An original bezel is removed, and polished up to remove scratches and blemishes from 40+ years of wear and tear. A silicone mold is then created in a plywood box. Lasercut parts are used to create the base, runner, and vents quickly and easily. The mold is then filled with resin to produce the final part. [Eric] demonstrates the whole process, using a clear silicone and dyed resin to make it more visible for the viewer.

Initial results were unfortunately poor, due to the silicone and hardener used. The parts were usable dimensionally, but had a hazy surface finish giving very poor optical qualities. This was rectified by returning to a known-good silicone compound, which was able to produce perfectly clear parts first time. Impressively, the only finishing required is to snap off the runner and vents. The part is then ready for installation. As a final piece of showmanship, [Eric] then ships the parts in a custom laser-engraved cardboard case. As they say, presentation is everything.

With modern equipment, reproducing vintage parts like knobs and emblems is easier than ever. Video after the break.

Continue reading “Reproducing Vintage Plastic Parts In Top-Notch Quality”

The Repair And Refurbishment Of Silicone Keyboards

There are a lot of retrocomputers out there sitting in garages and attics, and most of them need work. After thirty or forty years, you’re looking at a lot of corrosion, leaking caps, and general wear and tear. When it comes to extreme refurbishment, we haven’t seen anyone better than [Drygol], and this time he’s back with an exceptional example of how far repair and refurbishment can go. He’s repairing the silicone keyboard of a Commodore 116 using some very interesting techniques, and something that opens up the door to anyone building their own silicone keypad.

This project comes from from a member of a demoscene group that found an old C116 that needed a lot of work. The C116 shipped with a silicone membrane keyboard instead of the mechanical keyswitches of the C64 and other, higher-end computers. Unfortunately, this silicone keypad had a few keys ripped out of it. No one, as far as we can tell, has ever figured out how to make these silicone keypads from scratch, but [Drygol] did come up with a way to replace the ripped and missing keys. The process starts with making a silicone mold of the existing keyboard, then casting silicone into the negative of that mold. After a few attempts , [Drygol] had a custom silicone button that matched the shape and color of the original C116 keyboard. The only thing left to do was to attach tiny conductive carbon pads to the bottom of the newly cast buttons and fit them into the existing keyboard.

This is an interesting refurbishment, because there are a lot of vintage computers that used silicone keyboards in the place of mechanical keyswitches. The Speccy, The Commodore TED machines, and a lot of vintage calculators all used silicone keyboards. Until now, no one has figured out how to make DIY silicone keypads, and repairing silicone was out of the question. [Drygol]’s attempt isn’t perfect — it needs key labels, but screen or pad printing will take care of that — but it’s the best we’ve seen yet and opens the doors to a lot of interesting projects in the world of vintage computer repair.

This 3D Printer Is Soft On Robots

It always seems to us that the best robots mimic things that are alive. For an example look no further than the 3D printed mesh structures from researchers at North Carolina State University. External magnetic fields make the mesh-like “robot” flex and move while floating in water. The mechanism can grab small objects and carry something as delicate as a water droplet.

The key is a viscous toothpaste-like ink made from silicone microbeads, iron carbonyl particles, and liquid silicone. The resulting paste is amenable to 3D printing before being cured in an oven. Of course, the iron is the element that makes the thing sensitive to magnetic fields. You can see several videos of it in action, below.

Continue reading “This 3D Printer Is Soft On Robots”

Cloning Knobs For Vintage Testing Equipment

Knobs! Shiny candy-colored knobs! The last stand of skeuomorphism is smart light switches! Everyone loves knobs, but when you’re dealing with vintage equipment with a missing knob, the odds of replacing it are slim to none. That’s what happened to [Wesley Treat] when he picked up a vintage Philco tube tester. The tester looked great, but a single knob for a rotary switch was missing. What to do? Clone some knobs! You only need some resin and a little bit of silicone.

The process of copying little bits of plastic or bakelite is fairly standard and well-tread territory. Go to Michaels or Hobby Lobby, grab some silicone and resin, make a box, put your parts down, cover them in silicone, remove the parts, then put resin in. For simple parts, and parts with flat bottoms like knobs, this works great. However, there’s something weird about the knob on this old Philco tube tester. Firstly, it doesn’t fit a standard 1/4″ shaft — it’s a bit bigger. There’s also no set screw. Instead, this knob has a stamped spring aligning it with the flat part of the D-shaft in this rotary switch. This means a copy of this knob wouldn’t be useful to anyone else, and that no other knob would work with this tube tester.

However, a bit of clever engineering would make a copy of this knob fit the existing switch. Once the resin was cured, [Wesley] drilled out the hole, then sanded a dowel down to fit into the flat of the D-shaft. It took a little kergiggering, but the knob eventually fit onto one of the rotary switches. Not bad for a few bucks in silicone and resin.

You can check out the entire build process below.

Continue reading “Cloning Knobs For Vintage Testing Equipment”

Soft Silicone Pneumatics Are 3D-printed In A Tub Of Gel

We’ve seen our fair share of soft silicone robots around here. Typically they are produced through a casting process, where molds are printed and then filled with liquid silicone to form the robot parts. These parts are subsequently removed from the molds and made to wiggle, grip, and swim through the use of pneumatic or hydraulic pumps and valves. MIT’s Self-Assembly Lab has found a way to print the parts directly instead, by extruding silicone, layer by layer, into a gel-filled tank.

The Self-Assembly Lab’s site is unfortunately light on details, but there is a related academic paper (behind a paywall, alas) that documents the process. From the abstract, it seems the printing process is intended for more general purpose printing needs, and is able to print any “photo or chemically cured” material, including two-part mixtures. Additionally, because of the gel-filled tank, the material need not be deposited in flat layers like a traditional 3D-printer. More interesting shapes and material properties could be created by using the full 3d-volume to do 3D extrusion paths.

To see some of the creative shapes and mechanisms developed by MIT using this process, check out the two aesthetically pleasing videos of pulsating soft white silicone shapes after the break.

Continue reading “Soft Silicone Pneumatics Are 3D-printed In A Tub Of Gel”