Design And Testing Of The Form 2

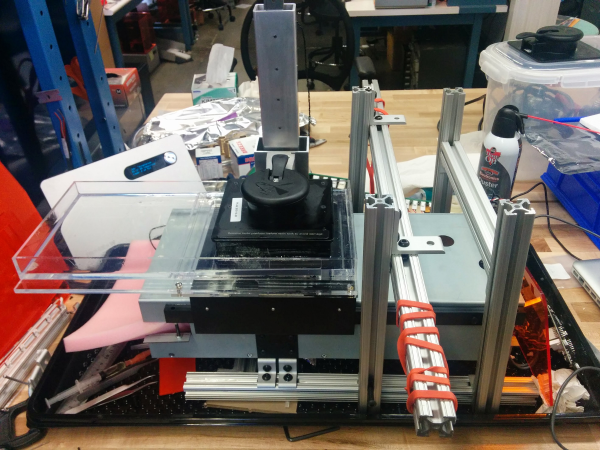
Formlabs makes a pretty dang good SLA printer by all accounts. Though a bit premium in the pricing when compared to the more humble impact of FDM printers on the wallet, there’s a bit more to an SLA printer. The reasoning becomes a bit more obvious when reading through this two part series on the design and testing of the Form 2.

It was interesting to see what tests they thought were necessary to ensure the reliable operation of the machine. For example the beam profile of every single laser that goes into a printer is tested to have the correctly shaped spot. We also thought the Talcum powder test was pretty crazy. They left a printer inside a sandblast cabinet and blasted it with Talcum powder to see if dust ingress could cause the printer to fail; it didn’t.

The prototyping section was a good read. Formlabs was praised early on for the professional appearance of their printers. It was interesting to see how they went from a sort of hacky looking monstrosity to the final look. They started by giving each engineer a Form 1 and telling them to modify it in whatever way they thought would produce a better layer separation mechanism. Once they settled on one they liked they figured out how much space they’d need to hold all the new mechanics and electronics. After that it was up to the industrial designer to come up with a look that worked.

They’re promising a third part of the series covering how the feedback from beta testing was directed back into the engineering process. All in all the Form 2 ended up being quite a good printer and the reviews have been positive. The resin from Formlab is a little expensive, but unlike others they still allow users to put the printer in open mode and use other resin if they’d like. It was cool to see their engineering process.

Portable Battery Bank Only Looks Like A Bomb

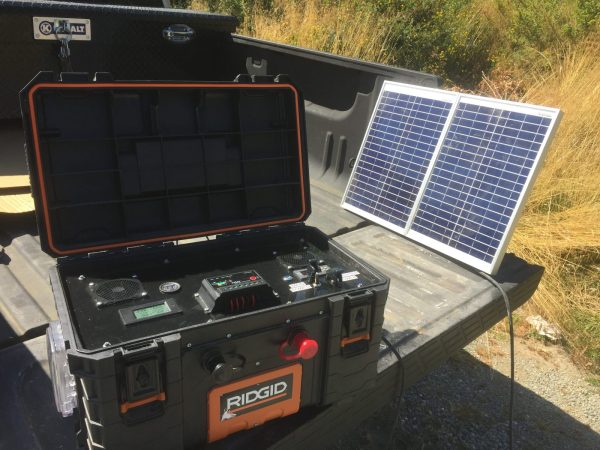
If one of the design goals of [wsw4jr]’s portable solar battery bank build was to make something that the local bomb squad would not hesitate to detonate with a water cannon if he leaves it unattended, then mission accomplished.

We kid, but really, the whole thing has a sort of “Spy vs. Spy” vibe that belies its simple purpose. A battery bank is just an array of batteries, some kind of charge controller, and an inverter. The batteries are charged by any means possible – in this case by a small array of solar panels. The mains output of the inverter is used to power whatever doodads you have.

[wsw4jr] didn’t mention of the inverter specs, but from the size of the batteries and the wiring – both of which he admits are not yet up to snuff in his prototype – it’s a safe guess that the intended loads are pretty small.  Tipping the scale at 60 pounds, the unit tends toward the luggable end of the portability scale. Still, this could be a great tool for working out in the field, or maybe even tailgating.

We’ve seen expedient battery banks and emergency power from cordless drill batteries before, but this build is quite a bit more sophisticated. We’ll be watching for updates on this one.

Parts Bin Emergency Lights Deal With Tornado’s Aftermath

Sometimes having a deep inventory of parts in your shop is a pain – the clutter, the dust, the things you can’t rationally justify keeping but still can’t bear to part with. But sometimes the parts bin delivers and lets you cobble together some emergency lighting when a tornado knocks out your power.

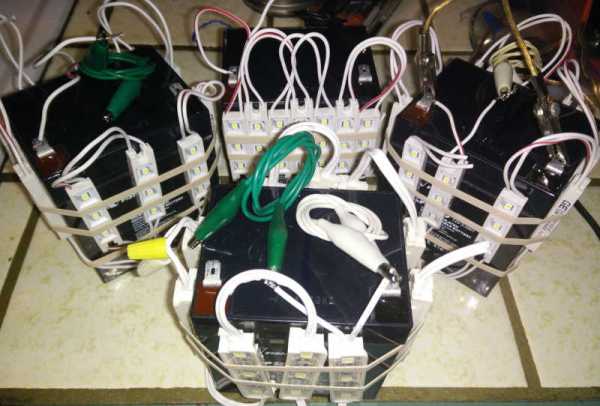
It has been hard to avoid discussions of the weird weather in the US this winter. The eastern half of the country has had record warm temperatures, the west has been lashed by storms, and now December tornadoes have ripped through Texas and other parts of the south, with terrible loss of life and wide-ranging property damage. [TheTimmy] was close enough to one massive EF4 tornado to lose power on Saturday night, and after the charm of a candlelight Christmas evening wore off, he headed to the shop. He had a bunch of sealed lead acid batteries from old UPSs and a tangle of 12V LED modules, and with the help of some elastic bands and jumper clips he wired up a bunch of lights for around the house. Safer than candles by a long shot, and more omnidirectional than flashlights to boot.

The power came back before the batteries ran out of juice, so we don’t get to see any hacks for recharging batteries in a grid-down scenario. Still, it’s good to see how a deep parts bin and good mindset can make a positive impact on an uncomfortable situation. We’ve seen similar hacks before, like this hacked cordless tool battery pack or powering a TV with 18650 batteries. Be sure to share your story of epic power-outage hacks in the comments below.

Are Your 3D Prints Toxic?

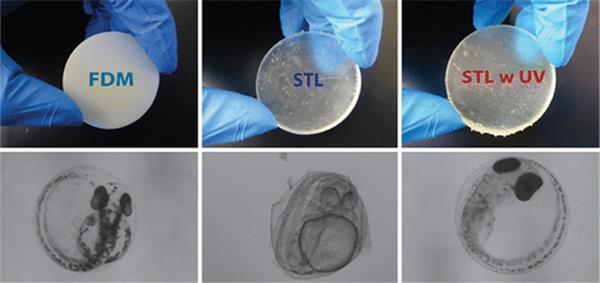
With the rising popularity and increasing availability of 3D printers, it was inevitable that someone would start looking into the potential environmental impact presented by them. And now we have two researchers from the University of California Riverside sounding the alarm that certain plastics are toxic to zebrafish embryos (abstract only; full paper behind a paywall).

As is often the case with science, this discovery was serendipitous. Graduate student [Shirin Mesbah Oskui] was using 3D printed tools to study zebrafish embryos, a widely used model organism in developmental biology, but she found the tools were killing her critters. She investigated further and found that prints from both a Stratasys Dimension Elite FDM printer and from a Formlabs Form 1+ stereolithography printer were “measurably toxic” to developing zebrafish embryos. The resin-based SLA printed parts were far worse for the fish than the fused ABS prints – 100% of embryos exposed to the Form 1+ prints were dead within seven days, and the few that survived that long showed developmental abnormalities before they died. Interestingly, the paper also describes a UV-curing process that reduces the toxicity of the SLA prints, which the university is patenting.

Of course what’s toxic to zebrafish is not necessarily a problem for school kids, as the video below seems to intimate. Still, this is an interesting paper that points to an area that clearly needs more investigation.

Continue reading “Are Your 3D Prints Toxic?”

Hackaday Links Column Banner

Hackaday Links: September 13, 2015

One more go at new enclosures for the Amiga 1200. Yes, it’s a Kickstarter campaign, and we mentioned a similar the same campaign last month. The previous campaign received a little more than half of the desired funding in a 30-day campaign. The new campaign received half its funding in a week. The only difference? Now you can put a Raspberry Pi in a newly manufactured A1200 case. And they say Raspberry Pi consumerism isn’t a thing…

Cheap SLA printing service. [Ian] and Dangerous Prototypes have made a name for themselves with dirt cheap, acceptable quality PCBs. Now they’re going for custom prints on a resin machine. It’s $0.95 per gram (density is 1.3g/cc). That’s cheap.

[James Willis] built a floppy drive orchestra. There are 16 drives in this orchestra, all controlled by an FPGA. Here’s the writeup.

Here’s a video overview of a real, huge, rideable hexapod robot. ‘Wow’ is just about the only thing we got for this.

Western Digital introduced a hard drive made specifically for the Raspberry Pi. It’s a hard drive with a USB interface, and a USB cable that connects to the Pi, the drive, and a power adapter. In other news, externally powered USB hard drives exist. You can buy a 2TB drive for the price of the 1TB PiDrive. What was that thing about Raspi consumerism?

Next week is the Open Hardware Summit in Philadelphia. We’ll be there (or rather, I will). We’ll have a post on the OHS badge up on Monday. Would anyone like to go see the lady made out of soap? It’s right around the corner from the venue.

Astoundingly Great $60 3D Printer Called Chimera Bests Your Printer

When most people think of 3D printing, they think of Fused Deposition Modelling (FDM) printers. These work by heating a material, squirting it out a nozzle that moves around, and letting it cool. By moving the nozzle around in the right patterns while extruding material out the end, you get a part. You’ve probably seen one of the many, many, many FDM printers out there.

Stereolithography printing (SLA) is a different technique which uses UV light to harden a liquid resin. The Chimera printer uses this technique, and aims to do it on the cheap by using recycled parts.

First up is the UV light source. DLP projectors kick out a good amount of UV, and accept standard video inputs. The Mitsubishi XD221u can be had for about $50 off eBay. Some modifications are needed to get the focus distance set correctly, but with that complete the X and Y axes are taken care of.

For the Z axis, the build platform needs to move. This was accomplished with a stepper motor salvaged from a disk drive. An Arduino drives the motor to ensure it moves at the right rate.

Creation Workshop was chosen as the software to control the Chimera. It generates the images for the projector, and controls the Z axis. The SLA process allows for high definition printing, and the results are rather impressive for such a cheap device. This is something we were just talking about yesterday; how to lower the cost of 3D printers. Obviously this is cheating a bit because it’s banking on the availability of cheap used parts. But look at it this way: it’s based on older technology produced at scale which should help a lot with the cost of sourcing this stuff new. What do you think?

Hackaday Links Column Banner

Hackaday Links: January 25, 2015

Misumi is doing something pretty interesting with their huge catalog of aluminum extrusions, rods, bolts, and nuts. They’re putting up BOMs for 3D printers. If you’ve ever built a printer with instructions you’ve somehow found on the RepRap wiki, you know how much of a pain it is to go through McMaster or Misumi to find the right parts. Right now they have three builds, one with linear guides, one with a linear shaft, and one with V-wheels.

So you’re finally looking at those fancy SLA or powder printers. If you’re printing an objet d’arte like the Stanford bunny or the Utah teapot and don’t want to waste material, you’re obviously going to print a thin shell of material. That thin shell isn’t very strong, so how do you infill it? Spheres, of course. By importing an object into Meshmixer, you can build a 3D honeycomb inside a printed object. Just be sure to put a hole in the bottom to let the extra resin or powder out.

Remember that episode of The Simpsons where Homer invented an automatic hammer? It’s been reinvented using a custom aluminum linkage, a freaking huge battery, and a solenoid. Next up is the makeup shotgun, and a reclining toilet.

[Jan] built a digitally controlled analog synth. We’ve seen a few of his FM synths VA synths built from an LPC-810 ARM chip before, but this is the first one that could reasonably be called an analog synth. He’s using a digital filter based on the Cypress PSoC-4.

The hip thing to do with 3D printers is low-poly Pokemon. I don’t know how it started, it’s just what the kids are doing these days. Those of us who were around for Gen 1 the first time it was released should notice a huge oversight by the entire 3D printing and Pokemon communities when it comes to low-poly Pokemon. I have corrected this oversight. I’ll work on a pure OpenSCAD model (thus ‘made completely out of programming code’) when I’m sufficiently bored.

*cough**bullshit* A camera that can see through walls *cough**bullshit* Seriously, what do you make of this?