Hackaday Links: Sunday, May 26th, 2013

hackaday-links-chain

The warmer months cometh and it’s time to think of this year’s Burning Man. [Matt’s] already set himself up with a sound-reactive LED project he calls the Seed of Life.

Older readers, and those who really know their hobby electronic history, will know the name Heathkit. Many readers tipped us off about their triumphant return. We’re not sure what form this reincarnation will take, but you can help shape it by participating in the survey.

Dust off that MSP430 launchpad and turn it into a composite video Pong console.

Here’s a way to use your Android phone as a computer mouse.

We’re not quite sure what this is, but turn your volume down before watching the video about a modular sythesizer hack.

[Arkadiusz Spiewak] wrote in to share some of the printing success (translated) he’s had recently with the H-bot style printer we saw a while back.

Strap an Arduino and an Electric Imp to your arm (and everyone else’s) and it’ll remember everyone you meet. You know, kind of like Google Glass but with geeky arm-wear instead of geeky headgear?

And finally, [Nerick] has just finished a thermometer project using Nixie tubes (translated).

Atari Punk Stick Puts A Synth In A Joystick

[youtube=http://www.youtube.com/watch?v=ngXrTd-8jf4&w=470]

The Atari Punk Console, a tiny synthesizer based on the ubiquitous 555 timer chip, is the first build de rigueur for any budding electronic wizard wanting to build musical devices. With just a handful of caps, resistors, and a pair of pots, the APC is a fabulously fun and easy build made even cooler by [Pat]’s addition of a joystick.

The circuit of the Atari Punk Console consists of a 556 chip – basically two 555s put into the same package – and a pair of potentiometers to control the frequency and output of this very basic synth. Since most joysticks are just two pots arranged on an X-Y mount, [Pat] thought it would be cool to control his APC without twiddling knobs, and instead sweeping a joystick around.

After acquiring an old Microsoft joystick from his local Goodwill, [Pat] wired up his Atari Punk Console to the joystick, using the ‘fire’ button to turn the output on and off. The result is everything between a low machine gun-like tone to a nasal square wave that will hopefully keep pace with your chip-based audiophile friends.

Continue reading “Atari Punk Stick Puts A Synth In A Joystick”

ATmega1284 As An 8-voice 32 KHz Synthesizer

A couple of things strike us about this 8-voice 32 kHz synthesizer. First is the cleanliness of the prototype. As you can see, each part has plenty of room on its own board and all are interconnected by 10-pin IDC ribbon connectors. But you’ll have to see the video after the break to enjoy the impressive sound that this puts out. You’ll hear it play the Super Mario Bros. theme; it does it with passion!

To get audio from the digital microcontroller [Mike] built his own R2R digital to analog converter. The resistor ladder is built from sixteen resistors, which feed a rail-to-rail amplifier. The sound is mono but the playback is polyphonic thanks to the work done by the ATmega1284. It is reading MIDI commands coming in from an external controller (we assume it’s the computer on which the hardware is sitting). The chip’s 128 KB of Flash memory leave plenty of room to store samples, which are selected from a lookup table based on the MIDI data. If more than one sample is to be played the chip averages the data and sets the 8-bit output port accordingly.

Continue reading “ATmega1284 As An 8-voice 32 KHz Synthesizer”

Nebulophone Microcontroller Synthesizer Project Sounds Great

Judging from the video (found after the break) the Nebulophone is one of the best sounding DIY synthesizers we’ve seen. Especially when you consider the simplicity of the hardware design. It uses an AVR chip and an OpAmp. The rest of the parts are just a few handfuls of inexpensive components.

The device was developed by Bleep Labs, and they sell the synthesizer kit seen on the left. But since it’s an open source project you can follow their design to fabricate your own, which is what [BlinkyBlinky] did with his offering seen to the right.

An ATmega328 drives the device, which is the chip often used in the Arduino Duemilanove. The keyboard is a set of traces hooked to the microcontroller. These are tinned pads on the kit PCB, but the DIY version simply uses some adhesive copper foil with a jumper wire soldered to it. The keys are played with a probe that makes the electrical connection, a common practice on these stylophone type designs. Chances are you have everything on hand to make this happen so keep it in mind for that next cold winter weekend that’s making everyone a bit stir crazy.

Continue reading “Nebulophone Microcontroller Synthesizer Project Sounds Great”

Artemis Synthesizer Kit

The Artemis Synthesizer was created as a kit for Boston University’s Artemis Project. This project aims to teach female rising high school freshmen about computer science with hands-on activities. [Chris] based the kit on a ATMEGA328P microcontroller and a MCP4921 digital to analog converter. It can be used in a keyboard mode, where the buttons toggle various notes of the scale, or in a sequencer mode, where the buttons are used to toggle pre-programmed sequences.

[Chris] wanted the kit to be usable by the students after the workshop, so he used an optical link dubbed the “Optoloader” to program new sequences and waveforms into the device. A web based application allows for waveforms and sequences to be built in the browser, then programmed by holding a phototransistor up to a blinking square. The square flashes black and white corresponding to a Biphase Mark Code encoded message. This is decoded by the microcontroller on the synthesizer and stored in memory. As a result, no special hardware is needed to play new waveforms and sequences.

[Chris] has a thorough write up for the project, including feedback surveys from the students. He plans to add more specific information about the Optoloader in the future.

Check out a video of the kit in action after the break.

Continue reading “Artemis Synthesizer Kit”

LED Illuminated Isomorphic Keyboard Looks As Good As It Sounds

Unlike the traditional ebony and ivory found on pianos, isomorphic keyboards arrange buttons on a grid. This makes every chord the same shape, and to transpose a piece it’s simply a matter of moving your fingers a few places to the left or right. [Brett Park] sent in an isomorphic keyboard he built loaded up with LEDs, and we’re thinking it the perfect instrument for musicians looking to move up from playing their MacBook.

The body of [Brett]’s keyboard is made out of a sheet of acrylic. After drilling 64 holes for each of the clear arcade buttons, [Brett] bent the sides of his hexagonal keyboard into a very sturdy-looking enclosure.

On the hardware side, [Brett] used a 64 button Arduino shield and a Sparkfun MIDI shield. The RGB LEDs behind each button are controlled via MIDI sysex messages generated outside the instrument, making it perfect for a little bit of visual feedback from whatever soft synth you desire.

In the videos after the break, you can check out the light patterns in action along with one of [Brett]’s improvs. Notice how all the chords are the same shape, and changing the key only requires [Brett] to move his hands slightly to the side.

Continue reading “LED Illuminated Isomorphic Keyboard Looks As Good As It Sounds”

MIDI Man-in-the-middle Hack Lets You Add Pedal To The Mix

[Sebastian] has a friend who would like to use a pedal with his MIDI setup, but his keyboard doesn’t support one. Some might interpret that as a sign you need to buy a new keyboard. But [Sebastian] has already done a lot of work with the MIDI protocol. He knew it should be possible to create a MIDI pass-through which adds support for a pedal.

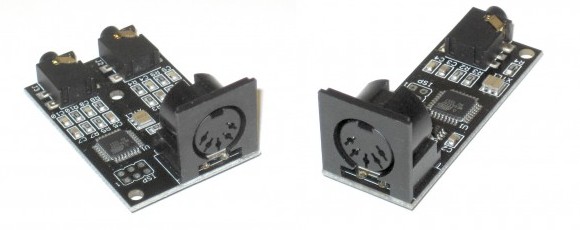
You can see the two MIDI cables connected to the box above. One is the input from the keyboard, the other is the output to the synthesizer. There is also a jack for a pedal input to the left. The chip inside intercepts each packet, rolling in values based from the pedal input and passing on the altered packets to the synthesizer. As you can hear in the video after the break, this works like a charm.

Catch more of [Sebastian’s] midi work by following his keyboard sensor replacement projects.

Continue reading “MIDI Man-in-the-middle Hack Lets You Add Pedal To The Mix”