Cassette Tape Plays MP3s

Cassette tapes were a major way of listening to (and recording) music througout the 1980s and 1990s and were in every hi-fi stereo, boom box, and passenger vehicle of the era. Their decline was largely as a result of improvements in CD technology and the rise of the MP3 player, and as a result we live in a world largely absent of this once-ubiquitous technology. There are still a few places where these devices crop up, and thanks to some modern technology their capabilities as a music playback device can be greatly enhanced.

The build starts, as one might expect, by disassembling the cassette and removing the magnetic tape from the plastic casing. With the interior of the cassette empty it’s capable of holding a small battery, USB-C battery charger, and a Bluetooth module. The head of an old tape deck can be wired to the audio output of the Bluetooth module and then put back in place in the housing in place of the old tape. With the cassette casing reassembled, there’s nothing left to do but pair it to a smartphone or other music-playing device and push play on the nearest tape deck.

As smartphones continue to lose their 3.5 mm headphone jacks, builds like this can keep lots of older stereos relevant and usable again, including for those of us still driving older vehicles that have functioning tape decks. Of course, if you’re driving a classic antique auto with a tape technology even older than the compact cassette, there are still a few Bluetooth-enabled options for you as well.

Continue reading “Cassette Tape Plays MP3s”

Building A Cassette Deck Controller To Save A Locked Out Car Stereo

Cars have had DRM-like measures for longer than you might think. Go back to the 1990s, and coded cassette decks were a common way to stop thieves being able to use stolen stereos. Sadly, they became useless if you ever lost the code. [Simon] had found a deck in great condition that was locked out, so he set about building his own controller for it. 

The build relies on the cassette transport of a car stereo and a VFD display, but everything else was laced together by Simon. It’s a play-only setup, with no record, seeing as its based on an automotive unit. [Simon]’s write up explains how he reverse engineered the transport, figuring out how the motors and position sensors worked to control the playback of a cassette.

[Simon] used an Atmega microcontroller as the brains of the operation, which reads the buttons of the original deck via an ADC pin to save I/O for other tasks. The chip also drives the VFD display for user feedback, and handles auto reverse too. The latter is thanks to the transport’s inbuilt light barriers, which detect the tape’s current status. On the audio side, [Simon] whipped up his own head amplifier to process the signal from the tape head itself.

Fundamentally, it’s a basic build, but it does work. We’ve seen other DIY tape decks before, too. There’s something about this format that simply refuses to die. The fans just won’t let Compact Cassette go down without a fight. Video after the break.

Continue reading “Building A Cassette Deck Controller To Save A Locked Out Car Stereo”

Build Your Own Tape Recorder/Player

If you want to read something from magnetic tape, you need a tape head, right? Or you could do like [Igor Brichkov] and make your own. It looks surprisingly simple. He used a washer with a small slot cut in it and a coil of wire.

The first experiment, in the first video below, is using a commercial tape head connected to a preamp. Music playing “through” the homemade head is readable by the commercial tape reader. This is a prelude to creating an entire tape deck using the head, which you can see in the second video below.

Continue reading “Build Your Own Tape Recorder/Player”

Building A Tape Echo In A Coke Can Tape Player That Doesn’t Really Work

Back in the 1990s, you could get a tape player shaped like a can of Coca Cola. [Simon the Magpie] scored one of these decks and decided to turn it into a tape echo effect instead. It didn’t work so well, but the concept is a compelling one. You can see the result in the video below.

The core of the effect is a tape loop, which [Simon] set up to loop around a pair of hacked-up cassette shells. This allows him to place one half of the loop in the Coca-Cola cassette player and the other half in a more conventional desktop tape deck. A 3D-printed bracket allows the two decks and the tape loop to be assembled into one complete unit.

The function is simple. The desktop tape deck records onto the loop, with the Coca-Cola unit then playing back that section of tape a short while later. Hey, presto — it’s a tape delay! It’s super lo-fi, though, and the tape loop is incredibly fragile.

Continue reading “Building A Tape Echo In A Coke Can Tape Player That Doesn’t Really Work”

2023 Cyberdeck Challenge: CyberTapeDeck

There seem to be two schools of thought when it comes to picking an enclosure for your cyberdeck project: you either repurpose the carcass of some commercially produced gadget, or you build a new case yourself. The former can lead to some very impressive results, especially if your donor device is suitably vintage, but the latter is far more flexible as the design will be based on your specific parameters.

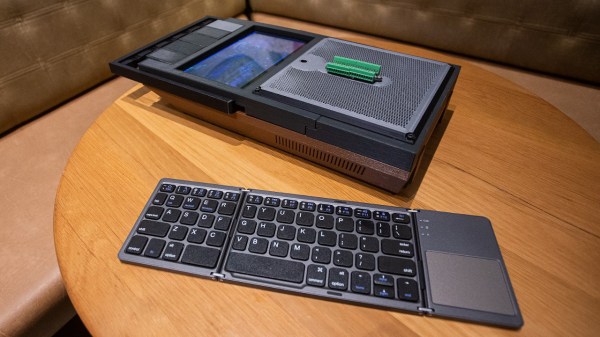
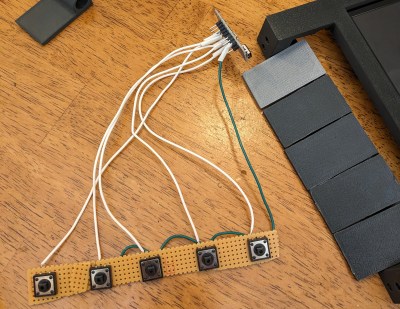
But for the CyberTapeDeck, [Matthew] decided to take a hybrid approach. The final product certainly looks like it’s built into a 1980s portable tape deck, but on closer inspection, you’ll note that the whole thing is actually 3D printed. The replica doesn’t just nail the aesthetics — it also includes the features you’d expect from the real thing, including an extendable handle and functional buttons which the internal Raspberry Pi 3 sees as a macropad thanks to an Arduino Pro Micro.

A seven inch LCD stands in for the tape door, and while it unfortunately doesn’t look like [Matthew] was able to replicate the opening mechanism to angle the display, you can at least stand the whole thing on its end to provide a more comfortable viewing experience.

[Matthew] says one of the intended purposes for this cyberdeck is to get his son excited about working with electronics and programming, so in a particularly nice touch, he’s mounted a terminal block over the “speaker” that ties into the Pi’s GPIO pins. This provides a convenient interface for experimenting on the go, without getting tangled up in exposed wiring.

We appreciate that [Matthew] has released the STL files for all of the printed parts, because even though it makes a great cyberdeck, the design is begging to house a faux-retro media player.

Simple Universal Modem Helps Save And Load Data From Tape

Back in the early days of the home computer revolution, data was commonly saved on tape. Even better, those tapes would make an almighty racket if you played them on a stereo, because the data was stored in an audio format.  The Simple Universal Modem from [Anders Nielsen] is built to work in a similar way, turning data into audio and vice versa.

The project consists of a circuit for modulating data into audio, and demodulating audio back into data. It’s “universal” because [Anders] has designed it to be as format-agnostic as possible. It doesn’t matter whether you want to store data on a digital voice recorder, a cassette deck, or an old reel-to-reel. This build should work fairly well on all of them!

On the modulation side of things, it’s designed to be as analog-friendly as possible. Rather than just spitting out rough square waves, it modulates them into nice smooth sine waves with fewer harmonics. On the demodulation side, it’s got an LM393 comparator which can read data on tape and spit out a clean square wave for easy decoding by digital circuitry.

If you find yourself trying to recover old data off tapes, or writing to them for a retrocomputing project, this build might be just what you need. [Anders] even goes as far as demonstrating its use with an old reel-to-reel deck in a helpful YouTube video.

There really were some weird ways of storing data way back when. Just ask IBM. Video after the break.

Continue reading “Simple Universal Modem Helps Save And Load Data From Tape”

Pitch Sequencer Turns Tascam Tape Deck Into Instrument

The cool thing about magnetic tape is that by varying the speed at which you play it back, you can vary the pitch of the output. [Issac] decided to take advantage of this, executing a fancy digitally-controlled pitch mod on his Tascam Porta 02 tape deck.

The build uses a Raspberry Pi Pico, which employs PWM to control the speed of the tape drive’s motor. This is achieved with the use of an NPN transistor driven by the PWM output of the Pico. This allows accurate control of motor speed, and thus pitch.

With that sorted out, the project was fleshed out with an OLED screen and a rotary encoder. These allow various patches or scripts to be run on the Pico, controlling the motor speed of the tape player in various ways. With a bit of work, [Issac] was also able to create a function that converted MIDI note values into PWM values that determine various motor speeds.

The natural thing to do next was to put in a tape with a looping sample at a set pitch, and then vary it in a sequence controlled by the Pico. The 8 steps of the sequence can be manually set with the rotary control, and in future, [Issac] even plans to add a real MIDI input, allowing the system to act as a monophonic synth.

If you prefer other routes to pitch shifting shenanigans, check out this project. Video after the break.

Continue reading “Pitch Sequencer Turns Tascam Tape Deck Into Instrument”