Turning A Waffle Iron Into A Reflow Station

There are a ton of ways to go about building your own reflow oven. Most of these builds start with, well, an oven — usually a toaster oven — with a small but significant minority choosing to modify a hotplate. But this might be the first time we’ve seen a waffle iron turned into a reflow oven.

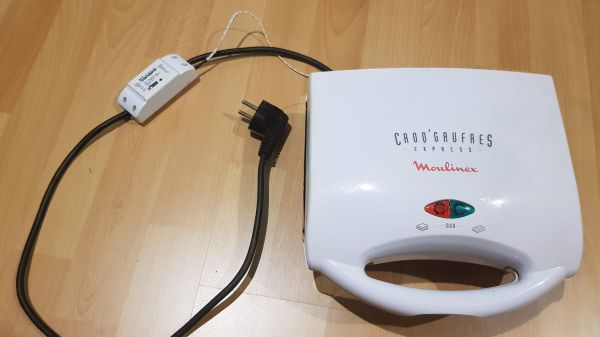
Of course, what [Vincent Deconinck] came up with is not an oven per se. But his “RefloWaffle” certainly gets the job done. It started with an old waffle maker and a few experiments to see just how much modification it would take to create the various thermal reflow profiles. As it turned out, the original cooking surfaces had too much thermal inertia, so [Vincent] replaced them with plain copper sheets. That made for quicker temperature transitions, plus created some space between the upper and lower heating elements for the SMD board.

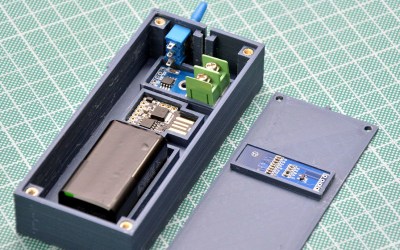
As for control, [Vincent] originally used an Arduino with a relay and a thermocouple, but he eventually built a version 2.0 that used a hacked Sonoff as both controller and switch. Adding the thermocouple driver board inside the Sonoff case took a little finagling, but he managed to get everything safely tucked inside. A web interface runs on the Sonoff and controls the reflow process.

We think this is a great build, one that will no doubt see us trolling the thrift stores for cheap waffle irons to convert. We’ve seen some amazing toaster oven reflows, of course, but something about the simplicity and portability of RefloWaffle just works for us.

Peltier Device Experiments

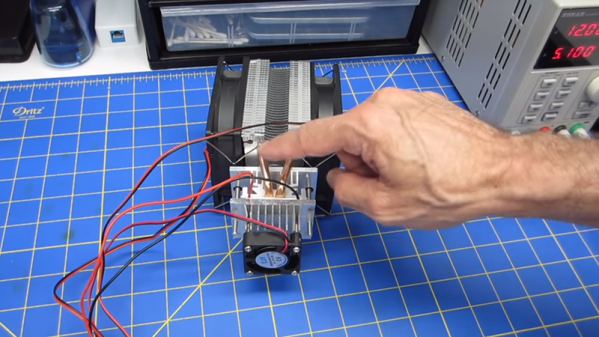
Once an exotic component, solid state heat pumps or Peltier devices are now pretty mainstream. The idea is simple: put electricity through a Peltier device and one side gets hot while the other side gets cold. [DroneBot] recently posted a video showing how these cool — really cool — devices work. You can see the video, below.

Many things in physics are reversible, and the Peltier is no exception. The device is actually a form of thermocouple, and in a thermocouple a temperature difference causes a voltage difference. This is known as the Seebeck effect as opposed to the Peltier effect in which current flowing between voltage differences causes a temperature difference. It was known for many years, but wasn’t very practical until modern semiconductor materials arrived.

Continue reading “Peltier Device Experiments”

When Engineering, Fine Art, And ASMR Collide

The success that [Julian Baumgartner] has found on YouTube is a perfect example of all that’s weird and wonderful about the platform. His videos, which show in utterly engrossing detail the painstaking work that goes into restoring and conserving pieces of fine art, have been boosted in popularity by YouTube’s Autonomous Sensory Meridian Response (ASMR) subculture thanks to his soft spoken narration. But his latest video came as something of a surprise to lovers of oil paintings and “tingles” alike, as it revealed that he’s also more than capable of scratch building his own equipment.

Anyone who’s been following his incredible restorations will be familiar with his heated suction table, which is used to treat various maladies a canvas may be suffering from. For example, by holding it at a sufficiently high temperature for days on end, moisture can be driven out as the piece is simultaneously smoothed and flattened by the force of the vacuum. But as [Julian] explains in the video after the break, the heated suction table he’s been using up to this point had been built years ago by his late father and was starting to show its age. After a recent failure had left him temporarily without this important tool, he decided to design and build his own fault-tolerant replacement.

The table itself is built with a material well known to the readers of Hackaday: aluminum extrusion. As [Julian] constructs the twelve legged behemoth, he extols the many virtues of working with 4040 extrusion compared to something like wood. He then moves on to plotting out and creating the control panel for the table with the sort of zeal and attention to detail that you’d expect from a literal artist. With the skeleton of the panel complete, he then begins wiring everything up.

Underneath the table’s 10 foot long surface of 6061 aluminum are 6 silicone heat pads, each rated for 1,500 watts. These are arranged into three separate “zones” for redundancy, each powered by a Crydom CKRD2420 solid state relay connected to a Autonics TC4M-14R temperature controller. Each zone also gets its own thermocouple, which [Julian] carefully bonds to the aluminum bed with thermally conductive epoxy. Finally, a Gast 0523-V4-G588NDX vacuum pump is modified so it can be activated with the flick of a switch on the control panel.

What we like most about this project is that it’s more than just a piece of equipment that [Julian] will use in his videos. He’s also released the wiring diagram and Bill of Materials for the table on his website, which combined with the comprehensive build video, means this table can be replicated by other conservators. Whether it’s restoring the fine details on Matchbox cars or recreating woodworking tools from the 18th century, we’re always excited to see people put their heart into something they’re truly passionate about.

Continue reading “When Engineering, Fine Art, And ASMR Collide”

Open Source Smart Smoker Brings The Heat (Slowly)

Conceptually, cooking on a grill is simple enough: just crank up the flames and leave the food on long enough for it to cook through, but not so long that it turns into an inedible ember. But when smoking, the goal is actually to prevent flames entirely; the food is cooked by the circulation of hot gasses generated by smoldering wood. If you want a well-cooked and flavorful meal, you’ll need the patience and dedication to manually keep the fuel and air balanced inside the smoker for hours on end.

Or in the case of the Smokey Mc Smokerson, you just let the electronics handle all the hard stuff while you go watch TV. Powered by the Raspberry Pi Zero and a custom control board, this open source smoker offers high-end capabilities on a DIY budget. Granted you’ll still need to add the fuel of your choice the old fashioned way, but with automatic air flow control and temperature monitoring, it greatly reduces the amount of fiddly work required to get that perfect smoke.

[HackersHub] has been working on Smokey Mc Smokerson for a few months now, and are getting very close to building the first complete prototype. The initial version of the software is complete, and the classy black PCBs have recently arrived. Some simulations have been performed to get an idea of how the smoke will circulate inside of the smoker itself, built from a 55 gallon drum, but technically the controller is a stand-alone device. If you’re willing to makes the tweaks necessary, the controller could certainly be retrofitted to  commercially available smoker instead.

Ultimately, this project boils down to tossing a bunch of temperature sensors at the problem. The software developed by [HackersHub] takes the data collected by the five MAX6675 thermocouples and uses it to determine when to inject more air into the chamber using a PWM-controlled fan at the bottom of the smoker. As an added bonus, all those temperature sensors give the user plenty of pretty data points to look at in the companion smartphone application.

We’ve actually seen a fair number of technologically-augmented grills over the years. From this automotive-inspired “turbocharged” beast to a robotic steak flipper built out of PVC pipes, we can confidently say that not all hackers are living on a diet of microwaved ramen.

Perfect Cheese Every Time With This Temperature Controller

Anyone who is from a background in which cheesemaking is a feature will tell you that it is an exact science in which small differences in parameters can make a huge difference in the resulting cheese, to the extent that entire batches can be rendered inedible. In particular the temperature at which the milk is held can be crucial to the production of individual styles of cheese. A friend of [William Dudley]’s had this problem, as a dairy farmer and artisinal cheesemaker they had to carefully control their vat with a set of profiles depending upon the recipe in use. This was achieved using an Arduino Mega 2650 and a thermocouple to control the heat source for the hot water in the outer wall of the vat.

A cheap K-type thermocouple amplifier proved unsatisfactory, so a Sparkfun item was substituted. A relay, Ethernet adaptor, and LCD display provided power control, access to a web interface, and user feedback respectively. Four buttons to select programs were added, and the whole was neatly boxed up to survive the dairy and put to work. In tests with a saucepan it was configured as a PID controller, but the real vat proved to have a much greater thermal inertia so a simpler bang-bang home thermostat style approach was used. Temperatures are logged in an eeprom for later retrieval via the web interface.

We don’t see the cheeses produced, but we’re sure they must be worth the effort. Blessed may be the cheesemakers, but doubly blessed are they who have a little help from an Arduino.

DIY Tube Oven Brings The Heat To Homebrew Semiconductor Fab

Specialized processes require specialized tools and instruments, and processes don’t get much more specialized than the making of semiconductors. There’s a huge industry devoted to making the equipment needed for semiconductor fabrication plants, but most of it is fabulously expensive and out of reach to the home gamer. Besides, where’s the fun in buying when you can build your own fab lab stuff, like this DIY tube oven?

A tube oven isn’t much more complicated than it sounds — it’s just a tube that gets hot. Really, really hot — [Nixie] is shooting for 1,200 °C. Not just any materials will do for such an oven, of course, and this one is built out of blocks of fused alumina ceramic. The cavity for the tube was machined with a hole saw and a homebrew jig that keeps everything aligned; at first we wondered why he didn’t use his lathe, but then we realized that chucking a brittle block of ceramic would probably not end well. A smaller hole saw was used to make trenches for the Kanthal heating element and the whole thing was put in a custom stainless enclosure. A second post covers the control electronics and test runs up to 1,000°C, which ends up looking a little like the Eye of Sauron.

We’ve been following [Nixie]’s home semiconductor fab buildout for a while now, starting with a sputtering rig for thin-film deposition. It’s been interesting to watch the progress, and we’re eager to see where this all leads.

Homebrew Not A Hakko

We don’t know if [Marius Taciuc] was thinking about how all Jedi make their own lightsabers as a rite of passage, but he decided that it was time to build his own soldering iron. He used a Hakko T12 tip which has a built-in thermocouple. However, he found that the information on the Internet about the tips was either incomplete or incorrect. Naturally, he figured it out and you can see the completed iron in the video, below.

The problem stems from the thermocouple type. Some sites he found identified it as a type K device. Others said it wasn’t, but didn’t say what kind it was. He took a container of oil and heated it to various temperatures and then measured it with both a commercial soldering iron and the T12 tip. By plotting the data against known thermocouple curves, he concluded the device was actually type C.

Continue reading “Homebrew Not A Hakko”