Baffle The Normies With This Binary Thermometer

We think it’s OK to admit that when someone puts a binary display on a project, it’s just a thinly veiled excuse to get more blinkenlights into the world. That and it’s a way to flex a little on the normies; you’ve gone pretty far down the tech rabbit hole to quickly decipher something like this binary-display thermometer, after all.

Don’t get us wrong, we think those are both perfectly valid reasons for going binary. And all things considered, a binary display for a thermometer like [Clovis Fritzen]’s is much simpler to decode than, say, a clock. Plus, it seems a bit that this build was undertaken at least partially as an exercise in Charlieplexing, which [Clovis] uses to drive the six-bit LED display using only three lines of GPIO from the Digispark ATtiny85 board running the show.

The temperature sensor is a DHT11, whose output is read by the microcontroller before being converted to binary and sent to the six-bit display. The 64-degree range is perfect for displaying the full range of temperatures most of us would consider normal, although we’d find 63°C a touch torrid so maybe there’s a little too much resolution on the upper end of the scale. Then again, switching to Fahrenheit would shift it toward the hypothermia end of the scale, which isn’t helpful. And you can just forget about Kelvin.

Barilla’s Open Source Tool For Perfect Pasta

Cooking pasta is perhaps one of the easiest things you can do in the kitchen, second only to watching a pot of water boil. But as pasta maker Barilla points out on their website, you can reduce your meal’s CO₂ emissions by up to 80% if you simply let the pasta sit in the hot water rather than actively boil it the whole time — a technique known as passive cooking.

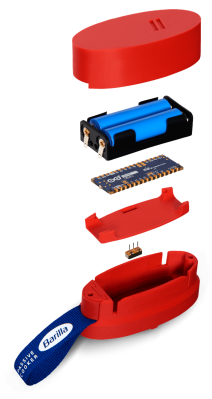
The trick is getting the timing right, so in a fairly surprising move, Barilla has released the design for an open source device that will help you master this energy-saving technique. Granted it’s not a terribly complex piece of hardware, consisting of little more than an Arduino Nano 33 BLE, an NTC probe, and a handful of passive components wrapped up in a 3D-printed case. But the documentation is great, and we’ve got to give Barilla credit for going way outside of their comfort zone with this one.

Magnets in the 3D printed case let it stick to the lid of your pot, and when it detects the water is boiling, the gadget alerts your phone (at least for this version of the device, an Android or iOS application is required) that it’s time to put in the pasta. A few minutes later it will tell you when you can turn off the burner, after which it’s just a matter of waiting for the notification that your passively-cooked pasta is ready to get pulled out.

Like the prop making video Sony put out after the release of Ghostbusters: Afterlife, we recognize that on some level this is an advertisement for Barilla pasta. But if developing useful open source gadgets that can be built by the public is what a company wants to spend their advertising dollars on, you won’t catch us complaining. Hell, we might even spring for a box of Barilla next time we’re in the store.

Continue reading “Barilla’s Open Source Tool For Perfect Pasta”

Build Your Own High-Temp Oven Thermometer

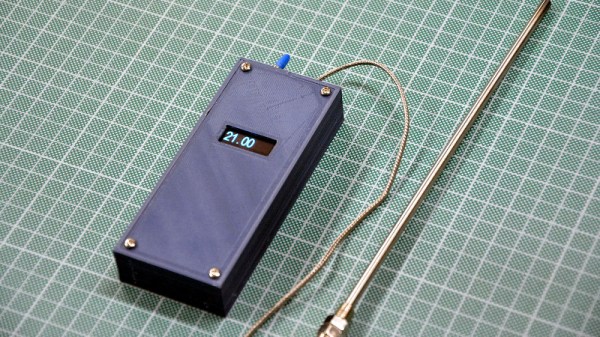
Looking to keep an eye on the temperature inside his wood-fired pizza oven, [Giovanni Bernardo] decided to skip the commercial offerings and build his own high-temperature thermometer using a type-K thermocouple. The end result is a no-nonsense handheld unit with a surprisingly low part count that, at least in theory, can read temperatures as high as 1023.75°C. Though we hope he’ll be pulling the pizza out long before that.

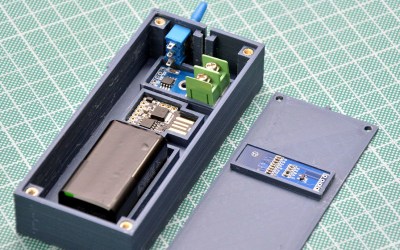
Inside the 3D printed case we find just a handful of components. The 0.91″ OLED display mounted in the front panel is wired to a Digispark ATtiny85 development board, which in turn is connected to a MAX6675 breakout board. This takes the input from the thermocouple probe and converts it into a digital signal that can be read over SPI with an Arduino library from Adafruit. Rather than going through the added complication of adding a rechargeable pack, [Giovanni] is running this thermometer from a standard 9 V battery thanks to the 5 V regulator built into the Digispark.

We especially appreciate the attention to detail [Giovanni] put into his case design. Each component is nestled into a perfectly formed pocket in the bottom of the box, and he’s even gone through the trouble of using heat-set inserts for the front panel screw holes. It would have been quicker and easier to just model up a basic box and hot glue his components in place, but he took the long way around and we respect that.

This project is another example of an interesting principle we’ve observed over the years. Put simply, if somebody is going through this much trouble to check an object’s temperature, there’s a higher than average chance they intend on eating it at some point.

Custom Firmware For Cheap Bluetooth Thermometers

The Xiaomi LYWSD03MMC temperature and humidity sensor is ridiculously cheap. If you’re buying a few at a time, you can expect to pay as little as $5 USD a pop for these handy Bluetooth Low Energy environmental sensors. Unfortunately, that low price tag comes with a bit of a catch: you can only read the data with the official Xiaomi smartphone application or by linking it to one of the company’s smart home hubs. Or at least, that used to be the case.

Over the past year, [Aaron Christophel] has been working on a replacement firmware for these Xiomi sensors that unlocks the data so you can use it however you see fit. In addition, it allows the user to tweak various features and settings that were previously unavailable. For example, you can disable the little ASCII-art smiley face that usually shows on the LCD to indicate the relative comfort level of the room.

The new firmware publishes the temperature, humidity, and battery level every minute through a BLE advertisement broadcast. In other words, that means client devices can read data from the sensor without having to be paired. Scraping this data is quite simple, and the GitHub page includes a breakdown of what each byte in the broadcast message means. Avoiding direct connections not only makes it easier to quickly read the values from multiple thermometers, but should keep the device’s CR2032 battery going for longer.

But perhaps the most impressive part of this project is how you get the custom firmware installed. You don’t need to crack the case or solder up a programmer. Just load the flasher page on a computer and browser combo that supports Web Bluetooth (a smartphone is probably the best bet), point it to the MAC address of the thermometer you want to flash, and hit the button. [Aaron] is no stranger to developing user-friendly OTA installers for his firmware projects, but even for him, it’s quite impressive.

Continue reading “Custom Firmware For Cheap Bluetooth Thermometers”

A VFD Wall Thermometer

Want to build something using VFD tubes, but don’t need yet another clock project? In that case, this wall mounted temperature and humidity display created by [commanderkull] might be exactly what you’re looking for. With six IV-11 tubes, this display is a practical way to add some of that gorgeous blue-green glow to your home or office.

The USB powered display uses a XL6009 and an XL7015 to provide the 24 V and 1.8 V needed by the IV-11 tubes, respectively. Both of which can be disconnected with jumpers to shut down the tubes without powering off the entire device, a useful feature when programming and debugging the display’s ATmega328P microcontroller. Each tube is connected to the ATmega with an 74HC595 shift register and a UDN2981 driver. Temperature and humidity data is provided, perhaps unsurprisingly, by the exceptionally common DHT22 sensor.

If you are looking to build another clock with these style tubes, there’s certainly enough prior art out there to get you started. We’ve also seen faux VFDs that you could use for either project, just in case you aren’t looking to deal with the voltage requirements and relative rarity of the real thing.

Speaking The Same Language As A Wireless Thermometer

Temperature is a delicate thing. Our bodies have acclimated to a tight comfort band, so it is no wonder that we want to measure and control it accurately. Plus, heating and cooling are expensive. Measuring a single point in a dwelling may not be enough, especially if there are multiple controlled environments like a terrarium, pet enclosure, food storage, or just the garage in case the car needs to warm up. [Tim Leland] wanted to monitor commercially available sensors in several rooms of his house to track and send alerts.

The sensors of choice in this project are weather resistant and linked in his project page. Instead of connecting them to a black box, they are linked to a Raspberry Pi so your elaborate home automation schemes can commence. [Tim] learned how to speak the thermometer’s language from [Ray] who posted about it a few years ago.

The system worked well, but range from the receiver was only 10 feet. Thanks to some suggestions from his comments section, [Tim] switched the original 433MHz receiver for a superheterodyne version. Now the sensors can be a hundred feet from the hub. The upgraded receiver is also linked on his page.

We’ve delved into thermocouple reading recently, and we’ve featured [Tim Leland] and his 433MHz radios before.

Radiosondes: Getting Data From Upstairs

Ever since I first learned about radiosondes as a kid, I’ve been fascinated by them. To my young mind, the idea that weather bureaus around the world would routinely loft instrument-laden packages high into the atmosphere to measure temperature, pressure, and winds aloft seemed extravagant. And the idea that this telemetry package, having traveled halfway or more to space, could crash land in a field near my house so that I could recover it and take it apart, was an intoxicating thought.

I’ve spent a lot of time in the woods over the intervening years, but I’ve never seen a radiosonde in the wild. The closest I ever came was finding a balloon with a note saying it had been released by a bunch of schoolkids in Indiana. I was in Connecticut at the time, so that was pretty cool, but those shortsighted kids hadn’t put any electronics on their balloon, and they kind of left me hanging. So here’s a look at what radiosondes are, how they work, and what you can do to increase your chances of finding one.

Continue reading “Radiosondes: Getting Data From Upstairs”