Retrotechtacular: Soldering The Tek Way

For a lot of us, soldering just seems to come naturally. But if we’re being honest, none of us was born with a soldering iron in our hand — ouch! — and if we’re good at soldering now, it’s only thanks to good habits and long practice. But what if you’re a company that lives and dies by the quality of the solder joints your employees produce? How do you get them to embrace the dark art of soldering?

If you’re Tektronix in the late 1970s and early 1980s, the answer is simple: make in-depth training videos that teach people to solder the Tek way. The first video below, from 1977, is aimed at workers on the assembly line and as such concentrates mainly on the practical aspects of making solid solder joints on PCBs and mainly with through-hole components. The video does have a bit of theory on soldering chemistry and the difference between eutectic alloys and other tin-lead mixes, as well as a little about the proper use of silver-bearing solders. But most of the time is spent discussing the primary tool of the trade: the iron. Even though the film is dated and looks like a multi-generation dupe from VHS, it still has a lot of valuable tips; we’ve been soldering for decades and somehow never realized that cleaning a tip on a wet sponge is so effective because the sudden temperature change helps release oxides and burned flux. The more you know.

The second video below is aimed more at the Tek repair and rework technicians. It reiterates a lot of the material from the first video, but then veers off into repair-specific topics, like effective desoldering. Pro tip: Don’t use the “Heat and Shake” method of desoldering, and wear those safety glasses. There’s also a lot of detail on how to avoid damaging the PCB during repairs, and how to fix them if you do manage to lift a trace. They put a fair amount of emphasis on the importance of making repairs look good, especially with bodge wires, which should be placed on the back of the board so they’re not so obvious. It makes sense; Tek boards from the era are works of art, and you don’t want to mess with that.

Continue reading “Retrotechtacular: Soldering The Tek Way”

Soldering, Up Close And Personal

A word of warning before watching this very cool video on soldering: it may make you greatly desire what appears to be a very, very expensive microscope. You’ve been warned.

Granted, most people don’t really need to get this up close and personal with their soldering, but as [Robert Feranec] points out, a close look at what’s going on when the solder melts and the flux flows can be a real eye-opener. The video starts with what might be the most esoteric soldering situation — a ball-grid array (BGA) chip. It also happens to be one of the hardest techniques to assess visually, both during reflow and afterward to check the quality of your work. While the microscope [Robert] uses, a Keyence VHX-7000 series digital scope, allows the objective to swivel around and over the subject in multiple axes and keep track of where it is while doing it, it falls short of being the X-ray vision you’d need to see much beyond the outermost rows of balls. But, being able to look in at an angle is a huge benefit, one that allows us a glimpse of the reflow process.

More after the break

Continue reading “Soldering, Up Close And Personal”

Off-Grid Radio Also Repairable Off-Grid

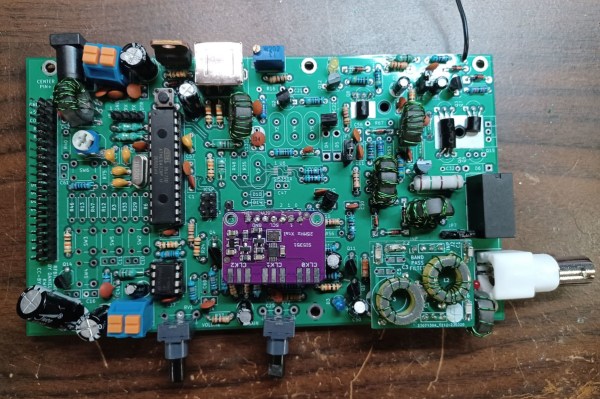
Low-power radios, often referred to in the amateur radio community as QRP radios, have experienced a resurgence in popularity lately. Blame it on certain parts of the hobby become more popular, like Parks on the Air (POTA) or Summits on the Air (SOTA). These are events where a radio operator operates off-grid at remote parks or mountaintops. These QRP rigs are a practical and portable way to make contacts. You would think that a five- or ten-watt rig running on batteries would be simple. Surprisingly, they can be enormously complex and expensive. That’s why [Dr. Daniel Marks] built the RFBitBanger, a QRP radio designed to not only be usable off-grid but to be built and maintained off-grid as well.

The radio accomplishes this goal by being built out of as many standard off-the-shelf components as possible. It eschews modern surface-mount components in favor of the much more accessible through-hole parts, including the ATMEGA328P at the center of the build. A PCB design is also available, but it can be built on perf board nearly as easily. The radio supports any mode a QRP operator might use, including CW, SSB, RTTY, and a new mode designed explicitly for this radio called SCAMP which is a low bandwidth, low SNR digital mode built into the Arduino-based firmware. It’s a single-band radio, but any band between 20 and 80 meters can be selected with pluggable filters.

As far as bomb-proof radios go, we can’t imagine a better way to live out an apocalypse than with a radio like this. As long as there’s a well-stocked parts drawer around, this radio could theoretically reach around the world without worrying about warranty claims, expensive parts, or even a company going out of business or not stocking parts for old radios anymore. There’s also more information about this build at the Open Research Institute for those interested. And, if you’re wondering how useful any radio could be using only five watts of transmitter power, take a look at this in-depth look at QRP radio operation.

Thanks to [Stephen Walters] for the tip.

When Only A TO92 Will Do

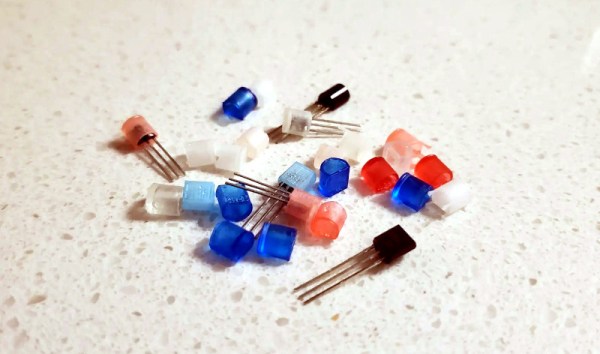
As through-hole components are supplanted by their surface-mount equivalents, we’re beginning to see the departure of once-common component form factors. Many such as the metal can transistors became rare years ago, while others still hang on albeit in fewer and fewer places. One of these is the once-ubiquitous TO92 moulded plastic transistor, which we don’t see very much of at all in 2022. [Sam Ettinger] is a fan of the D-shaped plastic blobs, and has gone as far as to recreate them for a new generation to enjoy.

Though a TO92 was a relatively miniature package in its day, it’s still large enough to easily fit a SOT23 or similar SMD packaged device on a small PCB. So the tiny board with just enough space for the part and the three wires was fabricated, ready for encapsulating. Epoxy moulding a TO92 gave very poor results, so instead an SLA print of a T092 shell was made. It fits neatly over the PCB, producing a perfect TO92 package. We’re sure a translucent pink package would have raised a few eyebrows back in the 1960s though.

There will come a time when restorers of old electronics will use and refine this technique to replace dead components. We’ve seen the technique before, after all.

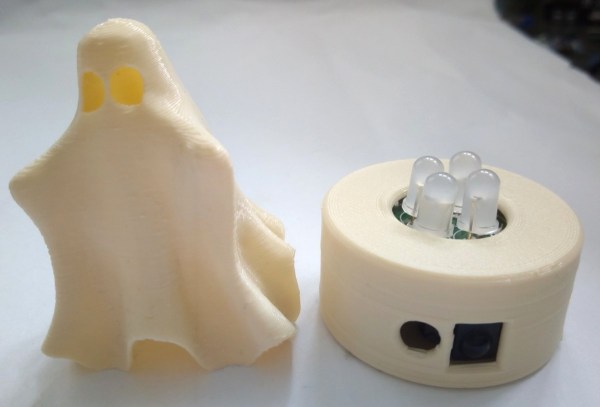
A 3d printed ghost next to the base of an LED tea light that has 4 LEDs poking out and the IR receiver port and micro-USB connector showing.

A Cold Light To Warm Your Heart

Halloween is coming fast and what better way to add to your Halloween ornamentation than [Wagiminator]’s cute NeoCandle tea light simulator.

[Wagiminator] has modified a 3D printed ghost along with extending [Mark Sherman]’s light simulation code to create a cute light that’s perfect for the holiday season. The NeoCandle uses an ATtiny85 chip to power four WS2812 NeoPixel jelly bean LEDs. The device has an infrared (IR) receiver to be able to control it from a remote that speaks the NEC protocol. There is a light sensor that allows the unit to dim when it detects ambient light and the whole unit is powered off of a micro-USB connection.

The ATtiny85 have limited program flash and [Wagiminator] packs in a lot of functionality in such a small package, squeezing in a bit-banging NeoPixel driver in only 18 bytes of flash that can push out a transfer rate 762 kpbs to update the LEDs. The pseudo-random number uses a Galois linear feedback shift register and comes in at 86 bytes of flash, with the IR receiver implementation code being the largest using 234 bytes of flash. The ATtiny85 itself has 8 KB of flash memory so maybe it’s possible to push [Waginminator]’s code to even more restrictive Atmel devices in the ATtiny family.

With microcontrollers and LEDs becoming so cheap and ubiquitous, making realistic flames with them is becoming accessible, as we’ve seen with previous projects on electronic candles.

Continue reading “A Cold Light To Warm Your Heart”

Hackaday Links Column Banner

Hackaday Links: February 20, 2022

Sounds like somebody had a really bad day at work, as Western Digital reports that “factory contamination” caused a batch of flash memory chips to be spoiled. How much, you ask? Oh, only about 7 billion gigabytes! For those of you fond of SI prefixes, that’s 7 exabytes of storage; to put that into perspective, it’s seven times what Google used for Gmail storage in 2012, and enough to store approximately 1.69 trillion copies of Project Gutenberg’s ASCII King James Version Bible. Very few details were available other than the unspecified contamination of two factories, but this stands poised to cause problems with everything from flash drives to phones to SSDs, and will probably only worsen the ongoing chip shortage. And while we hate to be cynical, it’ll probably be prudent to watch out for any “too good to be true” deals on memory that pop up on eBay and Ali in the coming months.

Continue reading “Hackaday Links: February 20, 2022”

Solder Bridges Aid Desoldering

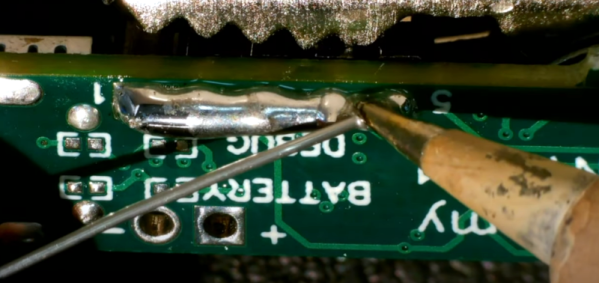
As our own Elliot Williams laid out, many people think that soldering is a key skill for electronics, but we don’t as often think about desoldering. Even if you are perfect in your technique, there’s always the chance you’ll put in a bad part or have a part fail later and it will need replacement. [Robert] has a short video showing his method for removing through-hole components and you can see it below.

This isn’t the first time we’ve seen it, of course. In fact, it is very much like using hot air, although it doesn’t require hot air, just extra solder and a regular iron. Of course, if we knew that connector was bad, we’d have been tempted to cut each pin apart and remove them one at a time. Heating a joint and then slamming your hand on the bench can work wonders.

We always think desoldering pumps are a good idea, but the electric ones tend to be anemic. The ones with the springs are usually better, but still have limitations. In the end, we’ll stick with using hot air, but if all you have is an iron, this method is worth checking out. You might also be interested in the needle method.

Continue reading “Solder Bridges Aid Desoldering”