Copper tubes formed by 3D printed press dies

Can 3D Printed Press Tools Produce Repeatable Parts?

When we think of using a press to form metal we think of large stamps with custom made metal dies under unimaginable hydraulic pressure. It’s unlikely we’d e think of anything 3D printed. And in a commercial environment we’d be right. But your average garage hacker is far more likely to have access to a bench vise and a 3D printer. It’s in this context that [The Shipping Container Garage] has spent considerable time, effort, and money perfecting a process for pressing copper parts with 3D printed dies, which you can watch below the break.

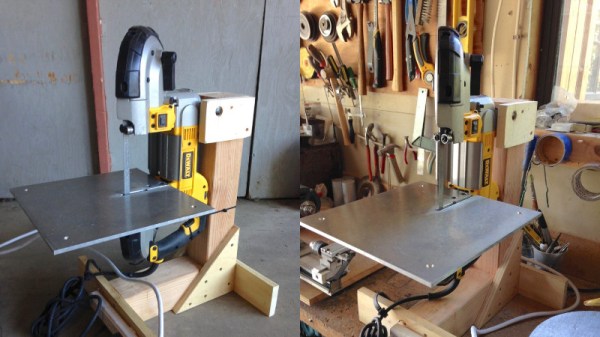
In the quest to make a custom intake manifold for his project car, [The Shipping Container Garage] first made 3D printed jigs for cutting out a manifold flange that bolts to the cylinder head. It’s a process he calls Analog CNC, as all the cutting is done by hand.

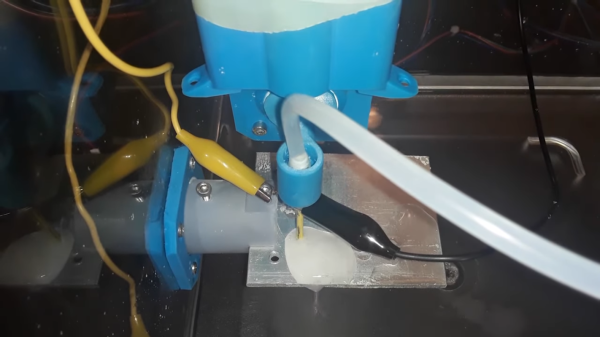
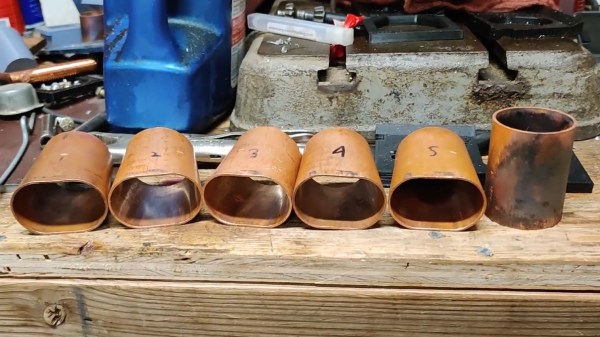
Buoyed by his success, he proceeded with the next step: making manifold runners. His metal of choice was copper. While softer than many metals such as steel, he found it too hard. In the video, he describes his method for annealing the copper. Once cooled, two 3D printed dies are pressed into the copper tubes to progressively shape them. Watch the video to find out one of the neatest details of the die itself: how he gets it out!

Of course no matter how clever this all is, it’s useless if it produces poor results. And that’s where the most astounding part of the build is: The parts are all the same within 0.006 inches (0.15mm) of each other, and the parts fit the manifold flange they were made for. Additionally, the die can be used for the duration of the project at hand. For low volume production, this appears to be a viable method. It’ll be interesting to see what others do to iterate these processes to even more advanced stages.

You may also like to see 3D printing used in leather working and in jigs for beautiful circuit sculptures. A big thanks to [JapanFan] for the tip! If you have your own pressing hacks to share, let us know via the Tip Line!

Continue reading “Can 3D Printed Press Tools Produce Repeatable Parts?”

3D Printer Cuts Metal

Every now and then we’ll see a 3D printer that can print an entire house out of concrete or print an entire rocket out of metal. But usually, for our budget-friendly hobbyist needs, most of our 3D printers will be printing small plastic parts. If you have patience and a little bit of salt water, though, take a look at this 3D printer which has been modified to cut parts out of any type of metal, built by [Morlock] who has turned a printer into a 5-axis CNC machine.

Of course, this modification isn’t 3D printing metal. It convers a 3D printer’s CNC capabilities to turn it into a machining tool that uses electrochemical machining (ECM). This process removes metal from a work piece by passing an electrode over the metal in the presence of salt water to corrode the metal away rapidly. This is a remarkably precise way to cut metal without needing expensive or heavy machining tools which uses parts that can easily be 3D printed or are otherwise easy to obtain. By using the 3D printer axes and modifying the print bed to be saltwater-resistant, metal parts of up to 3 mm can be cut, regardless of the type of metal used. [Morlock] also added two extra axes to the cutting tool, allowing it to make cuts in the metal at odd angles.

Using a 3D printer to perform CNC machining like this is an excellent way to get the performance of a machine tool without needing to incur the expense of one. Of course, it takes some significant modification of a 3D printer but it doesn’t need the strength and ridigity that you would otherwise need for a standard CNC machine in order to get parts out of it with acceptable tolerances. If you’re interested in bootstraping one like that using more traditional means, though, we recently featured a CNC machine that can be made from common materials and put together for a minimum of cost.

Continue reading “3D Printer Cuts Metal”

Vise Tripod Lets You Put The Tool Where You Need It

Vises are useful things for holding whatever you’re working on, but too often they’re stuck to a bench. [seamster] has experienced the glory of having a more portable solution, however, and has shared his design for a heavy duty vise tripod that provides just that.

The trick is that to be useful, the design must be heavy and stout enough to hold the vise without tipping over. For this build, [seamster] selected a fat steel pipe with 1/4″ thick walls, some solid bars and some 3/8″ thick plate. Legs and arms where then fabbed up from the bar material and welded up to form the tripod. A stout plate for the vise was then welded on top of the pipe, and the vise mounted pride of place on top.

It’s not a particularly difficult build, but it’s a smart idea that gets you a vise you can easily drag to where it’s needed. If you don’t have the vise itself, consider this hydraulic build. Meanwhile, if you’ve been whipping up your own useful workshop hacks, let us know!

parser drill

Machining Wood Inlays, No CNC Required

It’s almost hard to remember a time when the obvious answer to most questions about manufacturing wasn’t “Throw it on the CNC.” CNC machines have become so entrenched that the acronym has become a verb; few people would misunderstand a statement like “Let’s just CNC that.”

But before CNC machines became so ubiquitous, there were plenty of clever tricks for cutting material in a controlled fashion, as [Pask] shows us with this tool to machine wood for inlays. The tool is called a parser (or passer) drill, and is designed for use in conjunction with a steel template. [Pask]’s version seems pretty easy to make; a pair of mild steel bars are forged flat into spade shapes before having a cutting surface ground into them. The two halves of the drill are welded together and ground down to fit in the chuck of a hand drill, a modern nod to the fact that few people will want to use the traditional bow and breastplate that drove the original parser drills.

In use, a steel template that determines the shape of the inlay is affixed to the workpiece. The cutting edges of the bits are plunged into the template cutout to machine out the wood; the overhangs of the bits act as depth stop and guide. It only takes a few seconds to make a neat, CNC-free inlay. The video below shows the tool being made and in action.

It’s nice to see what can be accomplished without the need for fancy CNC machines. Not that we have anything against them, of course, but when the same results can be had with some scraps of steel and a little ingenuity, it’s pretty impressive. Looking for something between manual tools and CNC for woodworking? The pantorouter might be just your speed.

Continue reading “Machining Wood Inlays, No CNC Required”

IBM Cheese Cutter Restoration

For a while now, Mac Pro towers have had the nickname “cheese grater” because of their superficial resemblance to this kitchen appliance. Apple has only been a company since the 70s, though, and is much newer than one of its historic rivals, IBM. In fact, IBM is old enough to have made actual cheese-related computers as far back as the 1910s, and [Hand Tool Rescue] recently obtained one of these antique machines for a complete restoration.

The tool arrived to the restoration workshop in a state so poor that it was difficult to tell what many of the parts on the machine did except for the large cleaver at the top. The build starts with a teardown to its individual parts, cleaning and restoring them to their original luster, machining new ones where needed, and then putting it all back together. The real mystery of this build was what the levers on the underside of the machine were supposed to do, but after the refurbishment it was discovered that these are the way that portions the cheese wheel would be accurately sized and priced before a cut was made.

By placing a section of a wheel of cheese on the machine and inputting its original weight with one of the levers, the second lever is adjusted to the weight of cheese that the customer requested, which rotates the wheel of cheese to the correct position before a cut is made. To us who are spoiled with a world full of electronic devices, a mechanical computer like this seems almost magical, especially with how accurate it is, but if your business in the 1910s involved cheese, this would have been quite normal. In fact, it would be 50 more years before IBM created the machines that they’re more commonly known for.

Thanks to [Jasper Jans] for the tip!

Continue reading “IBM Cheese Cutter Restoration”

Handheld Bandsaw Gets Standup Conversion With Scrap Lumber

Handheld band saws exist, and can be highly useful tools. However, they lack some of the finesse and precision of the more traditional upright units, particularly for with smaller workpieces. [Honus] set about rectifying this, building a stand for their DeWalt handheld bandsaw out of scrap lumber.

The stand consists of some hefty wooden beams sawn to length and screwed together to make a support for the bandsaw. A nice 1/4″ thick aluminium plate is installed as a baseplate for cutting.

Then, the handheld bandsaw itself is attached to the rig, held in place with a bolt and a large zip tie. The zip tie is fastened around the trigger, holding it down all the time. Then, a switched powerboard is used to turn the saw on and off as needed. Importantly, simply cutting a ziptie and removing a bolt is enough to restore the handheld saw to its original purpose.

It’s a tidy build and one that makes an existing tool more useful for minimal extra cost. We’ve actually seen bandsaws built from scratch, too. If you’re cooking up your own great hacks in the home shop, be sure to let us know!

Building Your Own Filing Machine From A Kit

Files are a very useful important tool if you’re machining your own parts. They can do plenty of shaping themselves on smaller parts in particular. Powering such a tool just makes sense, and a die filer or filing machine is essentially just that, reciprocating a file up and down for you. They’re highly prized amongst clockmakers and model builders, and [jeanluc83] decided to build one at home.

The design chosen was the MLA-18 filing machine, for which castings and parts can be purchased from a company called Metal Lathe Accessories. However, it’s far from a simple screw-together kit. [jeanluc83] goes through the full process of painting, machining, and assembling the kit, which takes quite a bit of work to do properly.

Notably, the design is quite old fashioned in that it does not include its own power source. Instead, the MLA-18 filing machine is fitted with a pulley, such that it can be driven from a motor on a bench. A 1/4 horsepower motor running at roughly 1725 RPM is recommended for best results.

Filing machines aren’t exactly something you’ll find at every hardware store or Harbor Freight, so you might find building your own is the right way to go. Hackaday is, after all, full of examples of hackers building their own tools!