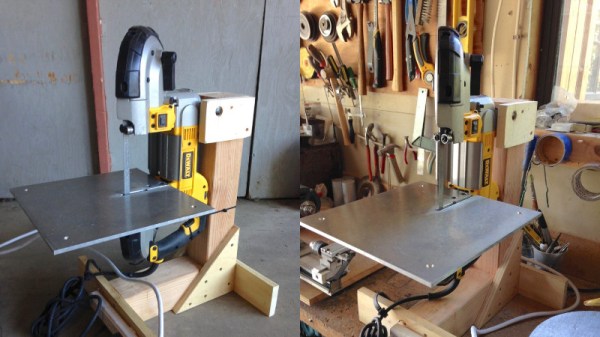
CNC Scroll Saw Add-On Cuts Beautiful Wooden Spirals

If there’s one thing that woodworkers have always been good at, it’s coming up with clever jigs and work-holding solutions. Most jigs, however, are considerably simpler and more static than this CNC-controlled scroll saw add-on that makes cool wooden spirals a snap.

As interesting as the products of this setup are, what we like about this is the obvious care and craftsmanship [rschoenm] put into making what amounts to a hybrid between a scroll saw and a lathe. Scroll saws are normally used to make narrow-kerf cuts in thin, delicate materials, often with complicated designs using very tight radius turns. In this case, though, stock is held between centers on the lathe-like carriage. The jig uses a linear slide driven by a stepper and a lead screw to translate the workpiece perpendicular to the scroll saw blade while a geared headstock rotates it. Starting with the blade inserted into a through-hole, the saw slowly cuts a beautiful nested spiral down the length of the workpiece. An Uno, a GRBL shield, and some stepper drivers let a little G-code control the two axes of the jig.

The video below shows it in action; things do get a bit wobbly as the cut progresses, but in general the jig works wonderfully and results in some lovely pieces. At first we thought these would purely be objets d’art, but then we thought about this compression screw grinder for DIY injection molding machines and realized these wooden screws look pretty similar.

Continue reading “CNC Scroll Saw Add-On Cuts Beautiful Wooden Spirals”

Making PCBs The Easy Way

Building a PCB at home can be fraught. If you’re etching, there are chemicals and the nuances of toner transfer. If you’re milling, getting the surface height just right, and not breaking those pointy little v-cutters is always a challenge. [Robin] has tips for both of these cases, and solves a lot of the common hassles by using a milling machine.

Whether he’s scraping away etch resist or entire copper isolation lines, [Robin] uses a non-spinning scratching tool instead of a v-bit: they’re more robust and cut every bit as well. He’s got tips for using FlatCam and KiCAD to make scratched-out traces. His registration system allows him to get double-sided boards with a minimum of hassle. And as a bonus, he’s doing some experimentation with embedding SMT parts inside the boards as well. Be sure that you check out his whole guide, or just watch the video embedded below.

We’re pretty sure you’ll pick up a trick or two, and maybe you’ll be convinced to bite the bullet and invest in a nice mill. If you’d like a more traditional take on PCB milling, try out our own [Adil Malik]’s guide.

Continue reading “Making PCBs The Easy Way”

A Nifty Tool For Separating Magnets

Neodymium magnets are fun to play with, largely thanks to their incredibly strong magnetic field. This also gives them plenty of applications where other magnets won’t cut the mustard. This very strength is also a drawback, making them difficult to work with and posing a danger to squishy human bodies. To help ease the task, [RandomCitizen4] developed a handy magnet separator tool.

The tool is similar in design to a pair of scissors, with two blades that are slid together when the handles are squeezed. The design is subtly different, however, with plastic blades that slide in between the gaps of a pair of magnets stuck together, pushing them apart. With just three parts to be 3D printed, a handful of fasteners and a rubber band, the tool is easy to build, too.

As someone who has spent significant time sliding magnets apart on the edge of a desk, wearing away the skin on my hands in the process, this tool would certainly come in handy. It might also be useful if you find yourself experimenting with magswitches or similar. Video after the break.

Continue reading “A Nifty Tool For Separating Magnets”

Slice Through Your Problems With A Shukran

We’d wager most hackers are familiar with FTDI as the manufacturer of the gold standard USB-UART interfaces. Before parts like the ultra cheap CH340 and CP2102 became common, if you needed to turn a USB cable into a TTL UART device, “an FTDI” (probably an FT232RL) was the way to make that happen. But some of the parts in the FT232* family are capable of much more. Wanting to get at more than a UART, [linker3000] designed the Shukran to unlock the full potential of the FT232H.

The FT232H is interesting because it’s an exceptionally general purpose interface device. Depending on configuration it can turn USB into UART, JTAG, SPI, I2C, and GPIO. Want to prototype the driver for a new sensor? Why bother flashing your Teensy when you can drive it directly from the development machine with an FT232H and the appropriate libraries?

The Shukran is actually a breakout for the “CJMCU FT232H” module available from many fine internet retailers. This board is a breakout that exposes a USB-A connecter on one side and standard 0.1″ headers on the other, with a QFN FT232H and all the passives in the middle. But bare 0.1″ headers (in a square!) require either further breadboarding or a nest of jumper wires to be useful. Enter the Shukran. In this arrangement, the CJMCU board is cheap and handles the SMT components, and the Shukran is easy to assemble and makes it simple to use.

The Shukran gives you LEDs, buttons and switches, and a bunch of pull up resistors (for instance, for I2C) on nicely grouped and labeled headers. But most importantly it provides a fused power supply. Ever killed the USB controller in your computer because you forgot to inline a sacrificial USB hub? This fuse should take care of that risk. If you’re interested in building one of these handy tools, sources and detailed BOM as well as usage instructions are available in the GitHub repo linked at the top.

Unlocking Hidden Potential In IvyBridge ThinkPads

Upgrading the BIOS in older computers is a great way to get a few more years of life out of old hardware or improve its performance. ThinkPads are a popular choice around these parts, but often flashing new firmware involves directly programming the chips themselves. Luckily, there’s a new flashing tool for some older Thinkpads that is much simpler.

The ThinkPads involved are the xx30 models with IvyBridge processors built around 2012, and a tool called 1vyrain now allows unlocking the bios without disassembling your computer. This means that there’s support for custom BIOS images such as coreboot, and in certain computers this also allows for overclocking, replacing WLAN hardware, and a number of other customizations. It will also allow you to disable the Intel management engine, which is not something we tire of talking about.

If you have one of these older computers floating around, some new RAM, an SSD, and this update will get you well on your way to a computer that feels brand new at virtually no cost, and the upgrades to the BIOS that you can easily make now only add to that. ThinkPads are a popular choice, especially for their hardware, but you do need to make sure that the software on them is trustworthy too.

Header image: Ashley Pomeroy [CC BY-SA 4.0].

Stacks Of Spring Washers Power The Drawbar On This CNC Mill Conversion

With Tormach and Haas capturing a lot of the entry-level professional market for CNC machines, we don’t see too many CNC conversions of manual mills anymore. And so this power drawbar conversion for a Precision Matthews mill really caught our eye.

What’s that, you say? Didn’t [Physics Anonymous] already build a power drawbar for a mill? They did, and it was quite successful. But that was based on a pneumatic impact wrench, and while it worked fine on a manual mill, the same approach would be a bit slow and cumbersome on a CNC mill. For this build, they chose a completely different approach to providing the necessary upward force to draw the collet into the collet holder and clamp down on the tool: springs. Specifically, Belleville spring washers, which are shaped like shallow cups and can exert tremendous axial force over a very short distance.

[PA] calculated that they’d need to exert 2,700 pounds (12,000 Newtons) of force over a length of a couple of inches, which seems outside the Belleville washer’s specs. Luckily, the springs can be stacked, either nested together in “series” to increase the load force, or alternating in “parallel” to apply the rated force over a greater distance. To compress their stack, they used a nifty multi-stage pneumatic cylinder to squash down the springs and release the collet. They also had to come up with a mechanism to engage to machine’s spindle only when a tool change is called for. The video below details the design and shows the build; skip to 11:32 to see the drawbar in action.

We’re looking forward to the rest of [Physics Anonymous]’ conversion. They’re no strangers to modifying off-the-shelf machines to do their bidding, after all – witness their improvements to an SLA printer.

Continue reading “Stacks Of Spring Washers Power The Drawbar On This CNC Mill Conversion”

If You Need A Measurement Tool Just Build A Measurement Tool

[Darlan Johnson] was working on a wearable project and needed a way to measure the change in voltage and current over time. 

Most measurement tools are designed to take snapshots of a system’s state in a very small window of time, but there are few common ones designed to observe and log longer periods. It’s an interesting point, for example, many power supply related failures such as resets occur sporadically. Longer timescale measuring devices could pick these up.

[Darlan] had a ton of Feathers and shields lying around, and combined them into the needed instrument. An INA219 current sensor records the measurements. They are then displayed on a TFT and logged to an SD card. Everything is bundled into a neat 3D printed case along with a battery for wireless operation. A set of barrel connectors provide the breakout to split the wires for the current measurement.

It’s a neatly done hack and we can see it as a nice addition to any hacker’s measurement drawer.