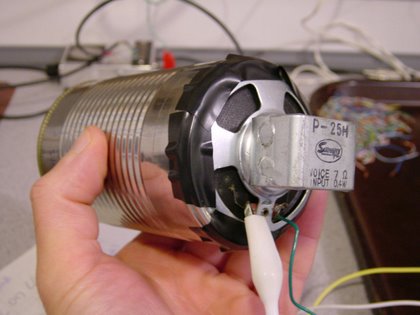
Teensy Board Used As An AM Radio Transmitter

[Angus McInnes] has been working on AM radio transmission techniques. He tried out a method of using a VGA port for the task but found the vertical blanking was audible. His latest experiments use a Teensy microcontroller board as an AM transmitter.

This is not a standalone solution, but rather a hardware extension for his laptop. This is because the microprocessor doesn’t have enough cycles to do much more than read bytes over USB and push their bits out one of the I/O pins.

To get a steady stream of data he’s using isochronous mode to push a steady data stream via the USB connection. Bulk transfer is another option but [Angus] found that it caused some jitter in the audio. Each byte is fed to the AVR SPI hardware once every eight clock cycles. His transmission can be picked up from across the room, but that’s the limit since the AVR doesn’t put out that strong of a signal. But it should be a rather trivial exercise to build a simple amplifier.

A Laser Audio Transmitter

Here’s a way of transmitting audio that makes it virtually impossible for someone else to listen in. Instead of sending radio waves bouncing all over creation, this uses the focused light of a laser to transmit audio. In the image above you can see the silver cylinder which houses the laser diode. It is focusing the beam on a light dependent resistor to the right which looks almost like a red LED due to the intensity of the light.

The simplicity of this circuit is fascinating. On the receiving end there is no more than the LDR, a 1.5V power source, and a headphone jack. The transmitter is not much more complicated than that. It includes an audio output transformer which boosts the resistance of the audio signal. This increase in resistance ensures that the laser diode modulates enough to affect the LDR on the receiving end. The transmitter uses a 3.3V supply. Check out the video after the break to hear the high quality of audio coming through the setup.

Once you’re done playing around with the transmitter you might try turning the laser into a remote control for your stereo.

Continue reading “A Laser Audio Transmitter”

Need A Quadcopter Transmitter? Use A PS2 Controller!

After [Pyrofer] built a quadcopter, he purchased a cheap 6-channel transmitter made in China. Unfortunately, that transmitter was terrible so he took an old PS2 controller and built his own.

For his build, [Pyrofer] broke out the analog sticks and wired them to an AVR housed in the handle of the controller. The AVR sent commands to a 2.4 GHz radio transmitter powered by a small LiPo battery. With the addition of a few tact switches behind the shoulder buttons of the controller, [Pyrofer] has four axes of control with a few buttons for changing modes on his quadcopter.

This build really doesn’t hold a candle to some of the awesome DIY RC transmitters we’ve seen, but we’ve got to give [Pyrofer] credit for coming up with a very simple and easy build. Just about everyone has a PS2 or XBox controller lying around, and with a few extra hardware bits it’s easy to bodge up a decent remote control.

[Pyrofer] used a project called Funkenschlag to generate PPM signals, so if you feel the need to replicate this project send it in when you’re done.

The RC Transmitter That Does Everything

[Demetris] sent in a project he’s been working on over the last year. It’s called the Open Source Radio Control, and promises to be a modular platform for every imaginable remote control transmitter need. If you’d like to control a bipedal android or a 3D aerobatic model plane, the OSRC can do it while transmitting video from the cockpit down to your hands.

Last summer, we caught wind of the OSRC project to build an extensible and open source remote control radio that would do anything; from displaying video from the cockpit to serving as the brain of a UAV rig, the OSRC promised to do everything.

A fully decked out OSRC can be had for about $1400, putting it in the upper echelon of remote control radios. For that price, though, you get a fully customizable radio with your choice of shoulder buttons and a 4.8 inch LCD that receives a video feed from the cockpit of your favorite model. The base unit starts out around $700; still very expensive for a remote control radio, but reasonable when you consider all the possible upgrades.

[Demetris] and the rest of the team put together an outrageously long yet surprisingly beautiful video showing off a few features of the OSRC. You can check that out after the break.

Continue reading “The RC Transmitter That Does Everything”

The Folly Of Adding An Auxiliary Audio Input To A Hyundai Sonata

Why auxiliary audio inputs haven’t been standard on automotive head units for decades is beyond us. But you can bet that if you’re looking at a low-priced sedan you’ll need to buy an entire upgrade package just to get an audio jack on the dash. [Jon W’s] Hyundai Sonata didn’t have that bells-and-whistles upgrade so he decided to pop his stereo out and add his own aux port.

A big portion of this hack is just getting the head unit out of the dash. This is made difficult on purpose as an anti-theft feature, but [Jon’s] judicious use of a butter knife seemed to do the trick. He lost some small bits along the way which were recovered with a Shish Kebab skewer with double-stick tape on the end.

With the head unit out, he opened the case and plied his professional Electrical Engineering skills to adding the input. Well, he meant to, but it turns out there’s no magic bullet here. The setup inside the unit offered no easy way to solder up an input that would work. Having done all of the disassembly he wasn’t going to let it go to waste. [Jon] grabbed a nice FM transmitter setup. He wired it up inside the dash and mounted the interface parts in the glove box as seen here.

It’s nice to know we’re not the only ones who sometimes fail at achieving our seemingly simple hacking goals. At least [Jon] was able to rally and end up with the functionality he was looking for.

Building A Simple FM Transmitter Bug

simple_fim_transmitter_hack_a_week

[Dino] got his hands on an FM transmitter “bug” kit via a friend, and thought it would make for an easy and fun Hack a Week project. The kit is simple two transistor half-wave FM transmitter, which the manufacturer suggests could be used to bug a room, hence the name. After poking a bit of fun at the instructions, [Dino] gets to work building the transmitter, wrapping things up in a little less than an hour.

Once he finished soldering everything together, he takes a few moments to test out the bug and to explain how various parts of the board work together in order to transmit the FM signal. He mentions that adding a dipole antenna would make it easy to extend the range of the transmitter, and briefly teases next week’s episode, where he plans on constructing a similar dual-stage transmitter.

This sort of FM circuit is one of the first few simple projects you would see in a beginner’s electronics class, so if you know anyone that is just starting to get their feet wet, be sure to pass this Hack a Week episode along.

Continue reading to see [Dino] explain the ins and outs of his FM bug transmitter.

Continue reading “Building A Simple FM Transmitter Bug”

RF Robot Controlled From A Terminal Window

This robot can be controlled from the terminal window of your computer. You can see a manilla-colored board mounted between the wheels. This is the RF receiver which has quite a long antenna that we’ve cropped out to get a better look at the bot itself. [Ashish] picked up an RF transmitter/receiver pair for about $4 and after the break you can watch him walk us through the method he’s using for control.

First off, he had to find a way to interface the transmitter with his computer. He decided to use an Arduino because sending data to it from the computer is as simple as writing to /dev/ttyUSB0. The Arduino sketch just listens for incoming characters on the serial connection and pushes them over the RF transmitter.

We like his development methods. In the video he shows the command syntax used to drive and stop the robot. Once he figured that out he wrote a shell script to send the bot on a preprogrammed square path. From there a bit more coding would give him real-time control which could be extended to something like a web-based interface for smartphone control.

Oh, and if you’re wondering about the bot itself it’s a kit robot which normally uses IR control. [Ashish] upgraded to RF since it doesn’t require line-of-sight to work.

Continue reading “RF Robot Controlled From A Terminal Window”