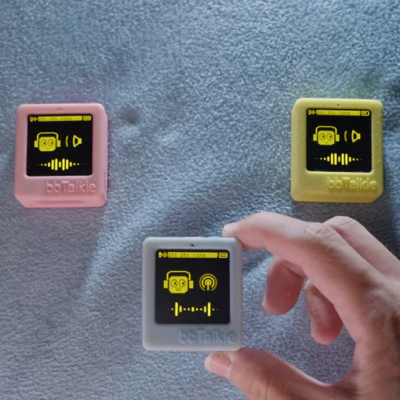
Creators demonstrating their Jedi Watch

Walkie Talkies, Jedi Style: Building A Communicator

Playing Star Wars Outlaws sparked an idea with [3DSage]: why not recreate the game’s wrist communicator as a functioning gadget? Inspired by the relatively simplistic design, he and his friend Ben set out to build their own device to take to Galaxy’s Edge in Disneyland. Armed with an arsenal of tools—3D printers, CNC machines, and soldering irons—he aimed to turn imagination into reality.

After ordering multiple walkie-talkies, they meticulously tested each one for audio quality, circuit board size, and compatibility with custom components. The ‘world’s tiniest walkie-talkie’ had potential but demanded creative modifications, including disassembling and resoldering components. They crafted their own circuit board and designed a 3D printed housing to fit both electronics and style. For the finishing touch, they weathered the device with paints and even glow-in-the-dark accents, making it authentic to the Star Wars universe. Even Chewbacca himself gave one a thumbs-up!

Weathering goes a long way towards creating a convincing prop — it can turn a bundle of pipes and some foam blocks into a movie-ready WWII machine gun.

Continue reading “Walkie Talkies, Jedi Style: Building A Communicator”

DIY Walkie-Talkie With ESP32 And ESP-NOW

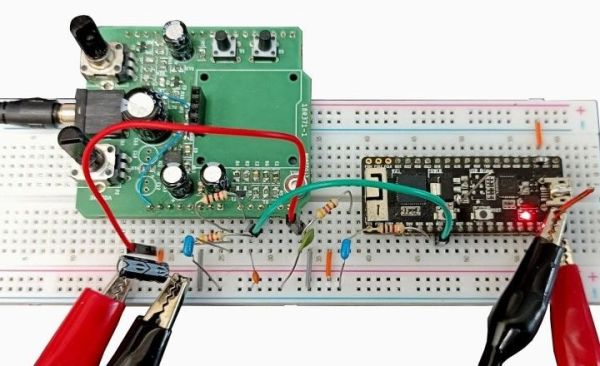
In a recent article in Elektor magazine, [Clemens Valens] describes the construction and software for an ESP32 walkie-talkie system that uses ESP-NOW for the wireless connection between units, along with a low-cost condenser microphone with a transistor-based preamplifier and an LM386 op-amp for the speaker circuit. In the ESP32 module the built-in DAC and ADC are used for audio in and output, which provide just about enough resolution for voice communication.

So why use ESP-NOW rather than WiFi or Bluetooth? Mostly because of range, power usage and convenience with no SSIDs and passwords to bother with.

The DIY Walkie-Talkie circuit diagram. (Credit: Clemens Valens, Elektor magazine)

ESP-NOW is Espressif’s own network protocol that uses the same underlying hardware as 2.4 GHz WiFi and Bluetooth, but focuses on more basic direct and mesh-style communication. It can be considered to be somewhat like low-level UDP with MAC address instead of IP address, which makes it useful for fire-and-forget traffic such as from IoT devices.

In the past, we’ve seen ESP-NOW control everything from fake security cameras to CNC machines. In fact, we’ve even seen it used in another walkie-talkie a couple years back.

ESPboy Turned Into Functional Walkie-Talkie

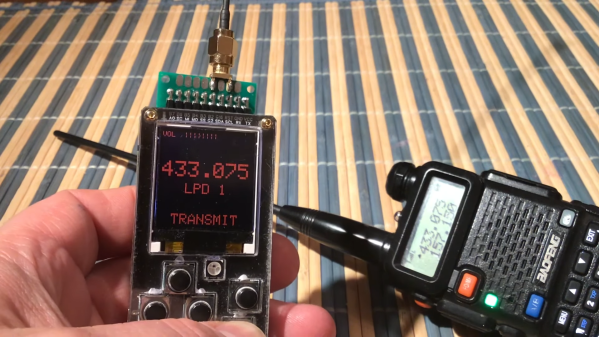
The ESPBoy was first built as a hackable open-source game engine and handheld console for educational purposes. However, it’s also a platform that can readily support all kinds of other uses. You can even turn the humble handheld device into a working walkie talkie.

The build relies on adding a SA868 transceiver module to the ESPBoy, along with a microphone, speaker, audio amplifier and antenna as supporting hardware. It then relies on the ESPBoy’s existing screen and buttons as a user interface for the radio. Assembled appropriately, it can then be used as a very basic and barebones walkie talkie for voice communication.

You won’t get coded squelch or other useful features, but it’s enough to let you talk over the air with other handheld radio users. The SA868 module can transmit on a variety of frequency bands, but the video shows it operating in the UHF band around 433 MHz. With a power on the order of 1.8W, it should get you a few kilometers of transmission range in an open field.

Check out our earlier coverage of the ESPBoy and its many different configurations. Video after the break.

Continue reading “ESPboy Turned Into Functional Walkie-Talkie”

AN ESP32 Walkie-Talkie, For Those Spy Radio Moments

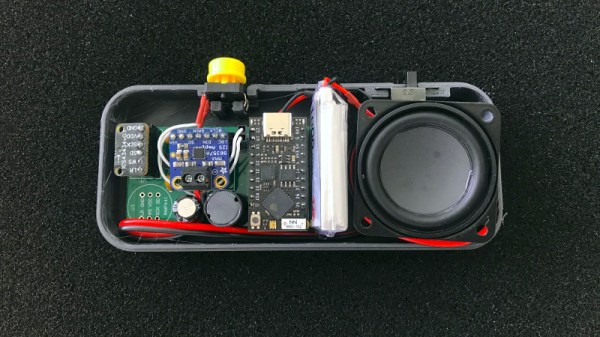
One of the most thrilling childhood toys for the adventurous 1970s or 1980s kid was probably the toy walkie-talkie. It didn’t matter that they were a very simple AM low-end-VHF radio with a range of about 500m and a Morse key of debatable utility, you could talk clandestinely with your friends, and be a more convincing spy, or commando, or whatever was the game of the moment. It’s a memory conjured up for grown-ups by [Chris G] with his ESP32 walkie-talkie, which replaces a shaky 49MHz connection with one a bit more robust through the magic of WiFi.

The hardware is a collection of modules on a custom PCB, aside from the ESP32 there’s an I2S microphone and I2S audio amplifier, which along with battery and speaker are housed in a neat 3D printed case. I2S is used for simplicity, but there is no reason why analogue components couldn’t be used with a few code changes. Connection is made via UDP over a WiFi network, or should there be no network via ESP-NOW. We’re not sure the range will be brilliant with those little on-board chip antennas, but with the wide range of 2.4GHz antennas to be had it’s likely a better result could easily be achieved if the stock item disappoints.

We like this project, and it’s one that’s especially pleasing to see given that we saw the potential a few years ago in a less successful walkie-talkie using the ESP8266.

Dog-Harnessing The Power Of Walkie Talkies

[javier.borquez] likes to take his dog to the hang out at the dog park around dusk. But once the sun goes down and [Rusio]’s off the leash, running amok with the other dogs, it’s almost impossible to keep track of him.

Sure, there are probably glow-in-the-dark or lighted collars out there, but if you go commercial, chances are good that someone else’s dog will be wearing the same thing. Besides, what’s the fun in buying something that you can do a better job making yourself? With this dog distance indicator harness, you don’t even have to program anything. Instead, it uses a cheap pair of modified walkie talkies to show green LEDs on the harness while the dog is in range, and red when it isn’t.

Although [javier]’s pupper is the best pupper yes he is, [Rusio] can’t be expected to hold down the button and bark his location. His walkie talkie uses a 555-based frequency generator and a glued-down button to speak at 1 kHz.

Over in [javier]’s walkie, there’s a resistor in place of the speaker to keep the talkie parts working. There’s also a half-wave bridge rectifier that charges a capacitor when [Rusio] is within range, and a resistor that drains it when he’s outside the 6-8 meter range. The rectifier’s output goes to a second 555 set up as a Schmitt trigger, which tells a transistor to turn the red LEDs on instead.

If you got stuck on the idea of hearing your dog talk to you over distances, here’s a Bluetooth Babelfish collar.

Fail Of The Week: The Arduino Walkie That Won’t Talkie

There’s something seriously wrong with the Arduino walkie-talkie that [GreatScott!] built.

The idea is simple: build a wireless intercom so a group of motor scooter riders can talk in real-time. Yes, such products exist commercially, but that’s no fun at all. With a little ingenuity and a well-stocked parts bin, such a device should be easy to build on the cheap, right?

Apparently not. [GreatScott!] went with an Arduino-based design, partly due to familiarity with the microcontroller but also because it made the RF part of the project seemingly easier due to cheap and easily available nRF24 2.4 GHz audio streaming modules. Everything seems straightforward enough on the breadboard – an op-amp to boost the signal from the condenser mic, a somewhat low but presumably usable 16 kHz sampling rate for the ADC. The radio modules linked up, but the audio quality was heavily distorted.

[GreatScott!] assumed that the rat’s nest of jumpers on the breadboard was to blame, so he jumped right to a PCB build. It’s a logical step, but it seems like it might be where he went wrong, because the PCB version was even worse. We’d perhaps have isolated the issue with the breadboard circuit first; did the distortion come from the audio stage? Or perhaps did the digitization inject some distortion? Or could the distortion be coming from the RF stage? We’d want to answer a few questions like that before jumping to a final design.

We love that [GreatScott!] has no issue with posting his failures – we’ve covered his suboptimal CPU handwarmer, and his 3D-printed BLDC motor stator was a flop too. It’s always nice to post mortem these things to avoid a similar fate.

Continue reading “Fail Of The Week: The Arduino Walkie That Won’t Talkie”

Fail Of The Week: ESP Walkie, Not-So-Talkie

The ESP8266 has become such a staple of projects in our community since it burst onto the scene a few years ago. The combination of a super-fast processor and wireless networking all on the same chip and sold in retail quantities for relative pennies has been irresistible. So when [Petteri Aimonen] needed to make a wireless intercom system for cycling trips it seemed an obvious choice. Push its internal ADC to sample at a high enogh rate for audio, and stream the result over an ad-hoc wi-fi network.

The result was far from satisfactory, as while early results with a signal generator seemed good, in practice it was unusable. Significant amounts of noise were entering the pathway such that the resulting audio was unintelligible. It seems that running a wireless network causes abrupt and very short spikes of power supply current that play havoc with audio ADCs.

He’s submitted it to us as a Fail Of The Week and he’s right, it is a fail. But in a way that’s an unfair description, because we can see there is the germ of a seriously good idea in there. Perhaps with an external ADC, or maybe with some as-yet-to-be-determined filtering scheme, an ESP8266 walkie-talkie is one of those ideas that should be taken to its conclusion. We hope he perseveres.