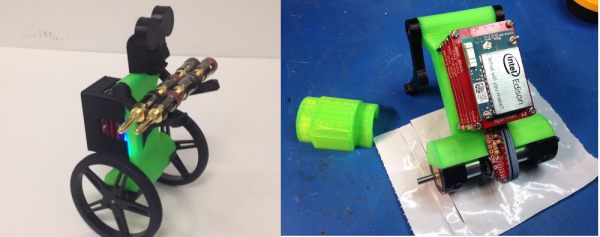
IP camera hack

How To Backup And Restore Your IP Camera Firmware

[Filipe] has been playing around with custom firmware for inexpensive IP cameras. Specifically, he has been using cameras based on a common HI3815 chip. When you are playing around with firmware like this, a major concern is that you may end up bricking the device and rendering it useless. [Filipe] has documented a relatively simple way to backup and restore the firmware on these cameras so you can hack to your heart’s content.

The first part of this hack is hardware oriented. [Filipe] cracked open the camera to reveal the PCB. The board has labeled serial TX and RX pads. After soldering a couple of wires to these pads, [Filipe] used a USB to serial dongle to hook his computer up to the camera’s serial port.

Any terminal program should now be able to connect to the camera at 115200 baud while the camera is booting up. The trick is to press “enter” during the boot phase. This allows you to log in as root with no password. Next you can reset the root password and reboot the camera. From now on you can simply connect to the phone via telnet and log in as root.

From here, [Filipe] copies all of the camera’s partitions over to an NFS share using the dd command. He mentions that you can also use FTP for this if you prefer. At this point, the firmware backup is completed.

Knowing how to restore the backup is just as important as knowing how to create it. [Filipe] built a simple TFTP server and copied the firmware image to it in two chunks, each less than 5MB. The final step is to tell the camera how to find the image. First you need to use the serial port to get the camera back to the U-Boot prompt. Then you configure the camera’s IP address and the TFTP server’s IP address. Finally, you copy each partition into RAM via TFTP and then copy that into flash memory. Once all five partitions are copied, your backup is safely restored and your camera can live to be hacked another day.

Recording Time Lapse Of Endangered Reptiles Hatching

The tuatara is a reptile native to New Zealand, and thanks to the descendants of stowaway rats on 17th century ships, these little lizards are critically endangered. [Warren] was asked if he could film one of these hatchlings being born and pulled out a Raspberry Pi to make it happen.

[Warren] constructed a small lasercut box to house the incubating egg, but he hit a few snags figuring out how to properly focus the Raspi camera board. The original idea was to use a Nikkor macro lens, without any kind of adapter between it and the camera board. A bit of googling lead [Warren] to this tutorial for modifying the focus on the Raspi camera, giving him a good picture.

The incubator had no windows and thus no light, making an IR LED array the obvious solution to the lighting problem. Time was of the essence, so an off-the-shelf security camera provided the IR illumination. After dumping the video to his computer, [Warren] had a video of a baby tuatara hatching. You can check that out below.

Continue reading “Recording Time Lapse Of Endangered Reptiles Hatching”

A Full IP Webcam With A Raspberry Pi

A Dropcam will run you about $150. Price out a Raspberry Pi, camera sensor, and a CCTV camera housing found on eBay, and it starts to look like there may be a cheaper replacement for a Dropcam sitting around on workbenches, if only someone can figure out the software. [Antoine] did just that, giving any Raspberry Pi the ability to stream H.264 video over a network.

[Antoine]’s software is based on the raspivid tool distributed from the foundation, but that only takes care of capturing and encoding H.264 video from the camera sensor. To add IP camera support, the Live555 RTSP library was mixed in and combined to stream video over the Raspi’s network connection.

With a camera dome enclosure from the usual outlets, [Antoine]’s project really starts to look professional. The specs are respectable, too: it can output a 1080 stream, and with a small modification to an Ethernet cord, this webcam has PoE. Future updates include the ability to record videos based on a trigger and possibly a webserver on the Pi for configuration. [Antoine] says he really isn’t up to speed with Javascript, so any help would be appreciated.

Hackerspace Monitor

HackerSpace Monitor Monitors Hackerspace Environment

What’s going on at the Hackerspace? If you can’t answer that, maybe your ‘space needs a HackerSpace Monitor. [Tayken] over at the Tokyo Hackerspace has come up with a way to remotely monitor all the stuff you’d want to know about the ‘space.

His project is based on a Raspberry Pi with a webcam connected to the Pi’s USB port by way of a hub. The webcam is set up to stream 2 frames per second, which is plenty to be able to judge the activity at the ‘space. A WiFi dongle is also plugged into the USB hub in order to gain internet access, send out the video and allow the ability to SSH into the Pi.

What if you’re on the fence about heading over to work on your favorite project but the current weather leaves you wondering what the temperature is going to be like at the hackerspace? Well, this project has that covered too. An off the shelf temperature and humidity sensor plugs directly into the Pi’s GPIO pins. [Tayken] used the Python-based package, RPi.GPIO, to manage the temperature and humidity sensor readings as well as a toggle switch that monitors if the main door is open or closed.

To get everything all the above information to be displayed on a webpage, [Tayken] had to do some fancy programming. Luckily for us, he has made all his code available for download. Not only is this a great convenience for members, but it can also show non-members when it is or isn’t a good time to show up to check the ‘space out.

Raspberry Pi Spies On Your Front Door

doorbell pictures

One of [Sander]’s first projects with a Raspberry Pi was to get it to send messages to his iPhone. From there he decided to take it a step further and wire the tiny computer up to his doorbell, creating a system that can send push messages to his phone whenever someone is at the front door.

[Sander]’s doorbell is wireless, and he decided to keep all of its original functionality. All it took to signal the Pi was a simple circuit tied to the doorbell’s status LED which turns off whenever the doorbell is pushed.

The Raspberry Pi runs a python program that handles the GPIO pin which is wired to the doorbell. When the doorbell is pushed, the program processes and sends the push notification while taking pictures of the visitor with an attached webcam. The pictures are included in the message so [Sander] can see who is at the front door. The code for the project is included on his project page.

This project rang a bell for us since we’ve seen projects using a Raspberry Pi and push notifications. None of them so far have included a webcam or utilized an existing wireless doorbell though, and this is a great step forward!

DIY USB Spectrometer Actually Works

image of diy spectrometer

When we hear spectrometer, we usually think of some piece of high-end test equipment sitting in a CSI lab. Sure, a hacker could make one if he or she put their mind to it. But make one out of a webcam, some cheap diffraction grating purchased off ebay and some scrap? Surely not.

[Renaud] pulls off this MacGyver like build with a detailed knowledge of how spectrometers work. A diffraction grating is used to split the incoming light into its component wavelengths. Much like a prism would. The wavelengths then make their way through a slit, which [Renaud] made from two pieces of highly polished brass, so the webcam sensor can see a specific wavelength. While the spectrometer-from-webcam concept isn’t new,  the build is still impressive.

Once the build was complete, [Renaud] put together some software to make sense of the data. Though a bit short on details, we hope this build will inspire you to make your own spectrometer, and document it on hackaday.io of course.

A 3D(ollar) Scanner

Once you have a 3D printer, making copies of objects like a futuristic Xerox machine is the name of the game. There are, of course, 3D scanners available for hundreds of dollars, but [Joshua] wanted something a bit cheaper. He built his own 3D scanner for exactly $2.73 in parts, salvaging the rest from the parts bin at his local hackerspace.

[Josh]’s scanner is pretty much just a lazy suzan (that’s where he spent the money), with a stepper motor drive. A beam of laser light shines on whatever object is placed on the lazy suzan, and a USB webcam feeds the data to a computer. The build is heavily influenced from this Instructables build, but [Josh] has a few tricks up his sleeve: this is the only laser/camera 3D scanner that can solve a point cloud with the camera in any vertical position. This potentially means algorithmic calibration, and having the copied and printed object come out the same size as the original. You can check out that code on the git.

Future improvements to [Josh]’s 3D scanner include the ability to output point clouds and STLs, meaning anyone can go straight from scanning an object to slicing it for a 3D printer. That’s a lot of interesting software features for something that was basically pulled out of the trash.