Before there was pressure-treated wood, before modern paints, there was pine tar. Everything from tool handles to wagons to ships were made of wood preserved with pine tar, once upon a time, and [woodbrew] wants to show you how to make it, how to use it, and why you might put it on your skin.
It starts with, you guessed it, pine! In the first part of the video, [woodbrew] creates a skin salve with pine resin and food-safe oil. The pine resin–which is the sticky goop that dries around wounds on evergreen trees–is highly antiseptic and has been used in wound salves since the stone age. The process is easy: melt it in a double boiler, then mix with equal parts oil. [woodbrew] also adds a touch of beeswax to firm it up, an a little eucalyptus extract for extra germ-killing power, and a nice smell to boot.
That’ll preserve your hands, but what about preserving wood? That starts at about 9 minutes in, and for that you’re going to need a lot more resin, so picking it off wounded trees like he does at the start of the video won’t work. [woodbrew] suggests starting with dead-or-dying pines, and harvesting the crooks of their branches for “fatwood” — wood with the highest resin content. He also suggests the center of stumps, again of trees that died or were severely injured before being cut down. Then it’s a matter of cooking those fine organic molecules out. This is where we burn the wood to save the wood. Well, to save other wood. Wood we didn’t burn, obviously.
The distillation process [woodbrew] uses it fairly traditional, and consists of a couple of buckets. One bucket is buried and collects the pine tar; the other, with holes in the bottom to allow the tar to drip out, is filled with fatwood and covered tightly before being surrounded by firewood which is set alight. You could use an alternate source of heat here, but if you just cut down a pine tree for its fatwood, well, you’d have the rest of the tree to work with. Inside the fatwood bucket, the heat of the fire cooks off the volatile compounds that make pine tar, while the lack of oxygen from being closed up keeps it from burning. Burying the collection bucket keeps it from getting so hot the volatiles all boil off.
If this sounds like the process for making charcoal or woodgas, that’s because it is! He’s letting the gas fraction flare off here, but you could probably capture it– though a true gasifier brakes the tar down into gaseous compounds as well. The charcoal of course stays in the bucket as a bonus.
To make it usable as a wood finish, [woodbrew] mixes his homemade pine tar 50:50 with linseed oil, thining it to a spreadable consistency that helps it penetrate deep into the wood. By filling the voids in the wood, this mixture will help keep moisture out, and the antiseptic properties of the organic soup that is pine tar will help keep fungi at bay for potentially decades to come.
Thanks to [Keith Olson] for the tip!
Continue reading “Burning Wood To Brew Wood To Preserve Wood : Pine Tar” →

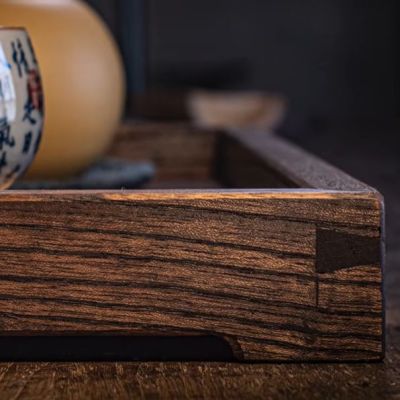 Pallets are a wonderful way to package goods and move them around, but especially the wooden ones have a very finite lifespan. This means that many of them are discarded every day, even though there is still good wood on them. Even if it’s not the highest quality wood, you can still use it for some nice wooden items, like the tea tray that [GR Woodworking] recently put together.