Addressable LED Strings In Your USB

WS2812Bs, or NeoPixels, or whatever else you call them brought full-color LEDs to maker projects a meter at a time in recent years. Hooked up to a microcontroller, they make creating vibrant, full-color glowables a cinch. They won’t work on their own though, and a some point you want to ditch the dev board and let the blinking stand on its own two feet. Enter the USB LED Otter.

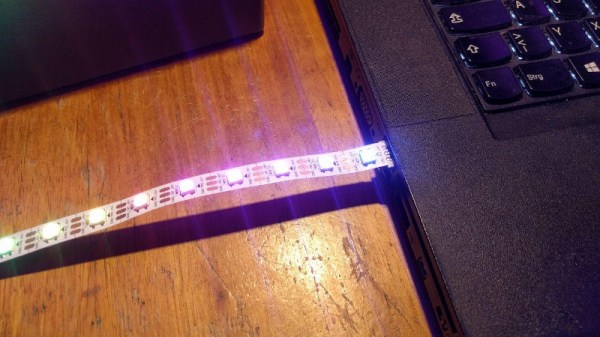
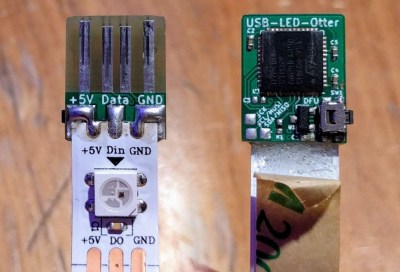
This small square of PCB lets you plug an LED strip directly into a USB port. The PCB itself has four traces on the back that mate with any USB port, and three pads for soldering the strip’s ground, 5 V line, and data. An STM32F072 microcontroller serves as the brains of the operation, packing plenty of horsepower and full compatibility with USB 2.0.

Code is flashed to the chip over USB using Device Firmware Upgrade (DFU) and once written the strip can then be driven by jamming the string into a suitably powerful USB wall charger. The woman behind the build, [Jana Marie], has mentioned that Open Pixel Control could be implemented but that may be an exercise left to the reader.

It’s a useful little tool, and one that promises to do even more with a little more development. Whipping up a few boards should be an easy task for anyone with a reflow oven and a free weekend. Oh, and if you’re tired of the WS2812? There’s other addressable LEDs out there, too!

Gaze Deeply Into These Infinity Mirror Coasters

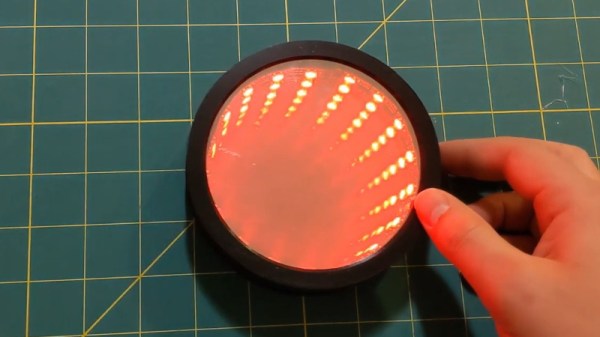
Infinity mirrors have been gaining in popularity recently, thanks in no small part to the availability of low-cost RGB LED strips to line them with. Generally such pieces are limited to wall art, or the occasional table build, which is what makes these infinity mirror drink coasters from [MnMakerMan] so unique.

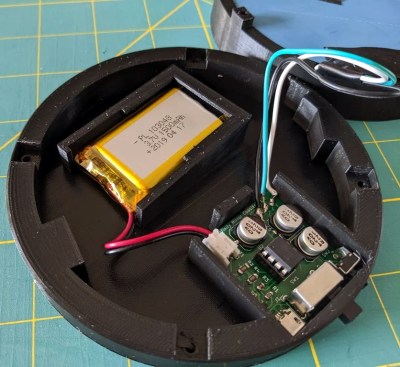
Built from an ATtiny85 and a WS2812B LED strip nestled into a 3D printed enclosure, these coasters are relatively cheap and easy to assemble should you want to run a few off before the holiday party season. [MnMakerMan] mentions the LEDs can consume a decent amount of energy, so he’s included a module to allow recharging of the internal 3.7 V 1500 mAh battery over USB.

Of course, a couple of PLA pieces and a custom PCB doesn’t make an infinity mirror. To achieve the desired effect, he’s created a stack consisting of a 4″ glass mirror, a 1/8″ thick plexiglass disc, and one-way mirror tint film. The WS2812B strip mounted along the circumference lights up the void between the two surfaces, and produces a respectable sense of depth that can be seen in the video after the break.

This isn’t the first high-tech piece of surface protection we’ve seen around these parts, as some very nice wirelessly charged supercapacitor coasters were entered into the 2019 Hackaday Prize. Of course, if you’re of the opinion that coasters should remain as cheap as possible, we’ve seen a number of automated attempts to add some flair to the classic paperboard discs.

Continue reading “Gaze Deeply Into These Infinity Mirror Coasters”

How To Get Started With Fadecandy And LEDs

The internet is awash with millions of stunning LED projects, and for that, we are all very thankful. For those outside the hacker/maker matrix, it can be difficult to know how to approach such a build. Never fear, for [Amy Goodchild] has put together a beginner’s guide to building pretty glowables, using Fadecandy and Processing.

Fadecandy is a platform specifically designed to drive WS2812B LEDs for artistic purposes. This allows users to focus on the visual side of things without getting bogged down with the hassle of selecting the right microcontroller and choosing the applicable libraries. It works great in combination with Processing, a piece of software designed for coders experimenting with visual arts. Through a USB link, any graphics drawn by processing can be mapped to the LEDs attached to the Fadecandy controller.

[Amy] does a great job of explaining how to do everything required, from purchasing the right equipment, through wiring everything up, and then getting it all humming along with the correct software. If you’ve ever wanted to build a big flashy project with a ton of LEDs, this would be a great place to start.

We’ve seen Fadecandy put to good use before, too. Video after the break.

Continue reading “How To Get Started With Fadecandy And LEDs”

Super Nice LED Lamp Is Super Simple

If you’re looking for a fancy LED lamp, the Internet can provide in spades. There are all manner of flashy-this and glowing-that, often with wild and impressive designs made with high-end tools. However, when it came time to decorate the apartment, [thebigpotatoe] wanted to build something simple that anyone could attempt. From this, the Super Simple RGB WiFi Lamp was created.

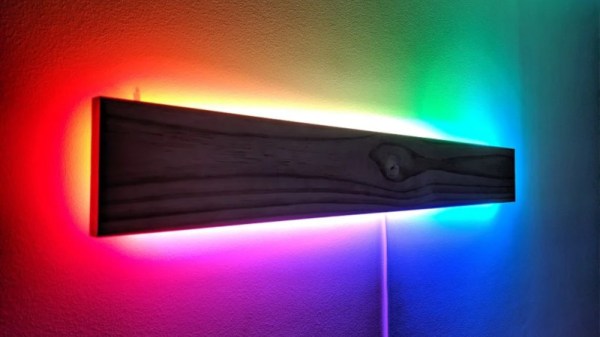
The body of the lamp consists of a plank of wood. It may not sound like much, but thanks to a nifty design, it actually comes out looking remarkably stylish. The plank is fitted with aluminium angle on the back, and a strip of WS2812B LEDs are wrapped around the perimeter of the board. An ESP8266 NodeMCU is fitted to run the show, and powered from a mains supply to allow it to run all day.

The trick here is that the LEDs are mounted on the back of the board, where they are out of direct sight. The light from the LEDs is projected onto the wall the lamp is mounted on, giving a nice smooth effect without requiring any dedicated diffusers. There’s a series of animations coded in, which look great, particularly when the animations wrap around the end of the lamp.

It’s a great addition to the apartment’s feature wall, and goes to show that you don’t need world-beating crafting skills to make a great piece for your home. You can even go all out, and light your whole room this way. Video after the break.

Continue reading “Super Nice LED Lamp Is Super Simple”

Interactive LED Dome Glows With The Best Of Them

With the price and availability of components these days, it’s easier than ever to throw a whole pile of LEDs at a build and get them flashing away. The hard part is doing it well. [Amy Goodchild] is an artist, and has a knack for producing rather beautiful LED projects. The When in Dome installation is no exception.

The build is based around a large geodesic dome, fitted with LED panels that glow and react to the occupants inside. Using the Microsoft Kinect as a sensor enables the dome to map out what’s happening in 3D space, and use this data to guide its animations. WS2812B LED strips were used, in combination with a Fadecandy controller along with Processing. This is a powerful combination which makes designing attractive LED effects easier, without forcing users to go to the effort of writing their own libraries or optimizing their microcontroller code.

For those more interested in the dome itself, you’ll be happy to know that [Amy] doesn’t skimp on the details there either. The build actually started as a commercially available kit, though there’s still plenty of manual cutting, screwing, and painting required. She does an excellent job documenting the dome build through a series of videos, and walks the reader through some of the design decisions she made (and would remake, if given the chance).

People love geodesic domes at the best of times; adding an interactive LED installation just takes things to the next level. We’ve seen them used as greenhouses too, and they make a great hackerspace project as well. Video after the break.

Continue reading “Interactive LED Dome Glows With The Best Of Them”

LED Music Visualizer Bespeckles Your Bedroom

When it comes to wall-mounted ornamentation, get ready to throw out your throw-rugs and swap them for something that will pop so vividly, you’ll want to get your eyes checked. To get our eyes warmed up and popping, [James Best] has concocted a gargantuan 900-RGB-LED music visualizer to ensure that our bedrooms are bright and blinky on demand.

Like any other graduate from that small liberal-arts school in southern California, [James] started prototyping with some good old-fashioned blue tape. Once he had had his grid-spacing established, he set to work on 2-meter-by-0.5-meter wall mounted display from some plywood and lumber. Following some minor adhesive mishaps, James had his grid tacked down with Gaffers tape, and ready for visuals.

Under the hood, a Teensy is leveraging its DMA capabilities to conduct out a bitstream to 900 LEDs. By using the DMA feature and opting for a Teensy over the go-to Arduino, [James] is  using the spare CPU cycles to cook out some Fourier-Transformed music samples and display their frequency content.

We’ve covered folks proving the concept of driving oodles of WS2812B LEDs over DMA; it’s great seeing these ideas mature into a fully-featured project that lands on the walll. For more on chatting with WS2812B LEDs over DMA, have a look back into our archive.

Continue reading “LED Music Visualizer Bespeckles Your Bedroom”

Building An ESP8266 Game System With MicroPython

After a seemingly endless stream of projects that see the ESP8266 open doors or report the current temperature, it can be easy to forget just how powerful the little WiFi-enabled microcontroller really is. In fact, you could argue that most hackers aren’t even scratching the surface of what the hardware is actually capable of. But that’s not the case for [Brian Wagner] and his students from the Kentucky Country Day School.

Their project, the GamerGorl, is a completely custom handheld game system running on a Wemos D1 Mini development board. The team’s PCB, which was developed over several iterations, is essentially a breakout board which allows them to easily connect up peripheral devices. Given the low total component cost of the GamerGorl and relative simplicity of its construction, it looks like a phenomenal project for older STEM students.

Beyond the ESP8266 board, the GamerGorl features a SSD1106 1.3″ OLED display, a buzzer for sound effects, two tactile buttons, and an analog joystick originally intended for an Xbox controller. Around the backside there’s a WS2812B RGB LED strip that’s at least partially for decoration, but it’s also actively used in some of the games such as the team’s take on Simon.

Even if you aren’t in the market for a portable game system, the GameGorl does provide an interesting case study for MicoPython applications on the Wemos D1 Mini. Browsing through the team’s source code as well as the helpful hints that [Brian] gives about getting the software environment up and running could be useful if you’re looking to expand your ESP8266 programming repertoire. We’d also love to see this device running the “ESP Little Game Engine” we covered recently.

Continue reading “Building An ESP8266 Game System With MicroPython”