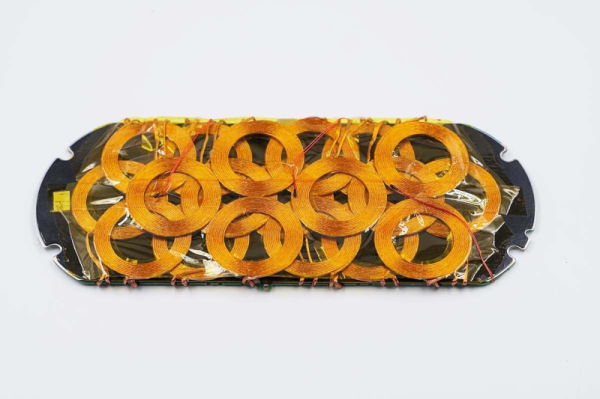
Custom Firmware For Cheap Bluetooth Thermometers

The Xiaomi LYWSD03MMC temperature and humidity sensor is ridiculously cheap. If you’re buying a few at a time, you can expect to pay as little as $5 USD a pop for these handy Bluetooth Low Energy environmental sensors. Unfortunately, that low price tag comes with a bit of a catch: you can only read the data with the official Xiaomi smartphone application or by linking it to one of the company’s smart home hubs. Or at least, that used to be the case.

Over the past year, [Aaron Christophel] has been working on a replacement firmware for these Xiomi sensors that unlocks the data so you can use it however you see fit. In addition, it allows the user to tweak various features and settings that were previously unavailable. For example, you can disable the little ASCII-art smiley face that usually shows on the LCD to indicate the relative comfort level of the room.

The new firmware publishes the temperature, humidity, and battery level every minute through a BLE advertisement broadcast. In other words, that means client devices can read data from the sensor without having to be paired. Scraping this data is quite simple, and the GitHub page includes a breakdown of what each byte in the broadcast message means. Avoiding direct connections not only makes it easier to quickly read the values from multiple thermometers, but should keep the device’s CR2032 battery going for longer.

But perhaps the most impressive part of this project is how you get the custom firmware installed. You don’t need to crack the case or solder up a programmer. Just load the flasher page on a computer and browser combo that supports Web Bluetooth (a smartphone is probably the best bet), point it to the MAC address of the thermometer you want to flash, and hit the button. [Aaron] is no stranger to developing user-friendly OTA installers for his firmware projects, but even for him, it’s quite impressive.

Continue reading “Custom Firmware For Cheap Bluetooth Thermometers”

Does Your Phone Need A RAM Drive?

Phones used to be phones. Then we got cordless phones which were part phone and part radio. Then we got cell phones. But with smartphones, we have a phone that is both a radio and a computer. Tiny battery operated computers are typically a bit anemic, but as technology marches forward, those tiny computers grew to the point that they outpace desktop machines from a few years ago. That means more and more phones are incorporating technology we used to reserve for desktop computers and servers. Case in point: Xiaomi now has a smartphone that sports a RAM drive. Is this really necessary?

While people like to say you can never be too rich or too thin, memory can never be too big or too fast. Unfortunately, that’s always been a zero-sum game. Fast memory tends to be lower-density while large capacity memory tends to be slower. The fastest common memory is static RAM, but that requires a lot of area on a chip per bit and also consumes a lot of power. That’s why most computers and devices use dynamic RAM for main storage. Since each bit is little more than a capacitor, the density is good and power requirements are reasonable. The downside? Internally, the memory needs a rewrite when read or periodically before the tiny capacitors discharge.

Although dynamic RAM density is high, flash memory still serves as the “disk drive” for most phones. It is dense, cheap, and — unlike RAM — holds data with no power. The downside is the interface to it is cumbersome and relatively slow despite new standards to improve throughput. There’s virtually no way the type of flash memory used in a typical phone will ever match the access speeds you can get with RAM.

So, are our phones held back by the speed of the flash? Are they calling out for a new paradigm that taps the speed of RAM whenever possible? Let’s unpack this issue.

Continue reading “Does Your Phone Need A RAM Drive?”

Reverse-Engineering Xiaomi IoT Firmware

IoT devices rarely ever just do what they’re advertised. They’ll almost always take up more space than they need to – on top of that, their processor and memory alone should be enough to run a multitude of other tasks while not necessarily compromising the task they were built to do.

That’s partially the motivation for rooting any device, but for Xiaomi devices, it’s a bit more fun – that is to say, it’s a little bit harder when you’re reverse engineering its firmware from scratch.

Similar to his other DEF CON 26 talk on modifying ARM Cortex-M firmware, [Dennis Giese] returns with a walkthrough of how to reverse-engineer Xiaomi IoT devices. He starts off talking about the Xiaomi ecosystem and the drawbacks of reusing firmware across all the different devices connected to the same cloud network before jumping into the walkthrough for accessing the devices.

Continue reading “Reverse-Engineering Xiaomi IoT Firmware”

Customizing Xiaomi ARM Cortex-M Firmware

This hack was revealed a while ago at DEFCON26, but it’s still a fascinating look into vulnerabilities that affect some of the most widely used IoT devices.

[Dennis Giese] figured out a way to modify ARM Cortex-M based firmware for use in customizing the functionality of devices or removing access to the vendor. Obviously, there are more malicious activities that can be done with this type of hack, as with any exploits of firmware, but they are (also) obviously not condoned.

The talk goes into the structure of Xiaomi ecosystem and products before going into a step-by-step approach to binary patching the firmware. The first step was to acquire the firmware, either by dumping SPI flash memory (using JTAG, SWD, or desoldered Flash pins) or intercepting traffic during a firmware update and downloading the firmware. There’s also a possibility of downloading the firmware using a URL, although this can be more difficult to find.

The firmware can then be parsed, which first requires the format to be converted from a proprietary format to and ELF file. This conversion makes it easier to load into IDA pro, and gives information on the segments of the firmware and its entry point. Python tools luckily exist for converting binary files to ELF, which simplifies the task.

After loading the ELF file into the disassembler, you’ll want to find the key memory area, denoted by “TAG_MAC”, “TAG_DID”, and “TAG_KEY” in the example firmware (for storing the MAC address, device ID, and key). In order to prepare the firmware for Nexmon – a software that supported C-based firmware binary patching for ARM Cortex-A and ARM Cortex-M binaries – you’ll need to partition some space in the memory for patches and know the function names and signatures for the firmware.

The latter is done by doing a difference comparison in the disassembler between an unknown executable and the example executable.

With the necessary information gathered, you can now use Nexmon to make your modifications. The fact that this can be done for smart devices at home means that smart devices you acquire – especially those partitioned by others – may contain malicious code, so take care when handling used devices.

Continue reading “Customizing Xiaomi ARM Cortex-M Firmware”

Fried Desk Lamp Reborn: How To Use ESP8266 To Build Connected Devices

Some hacks are born of genius or necessity, and others from our sheer ham-fisted incompetence. This is not a story about the first kind. But it did give me an excuse to show how easy it is to design WiFi-connected devices that work the way you want them to, rather than the way the manufacturer had in mind.

It started out as a sensible idea – consumer electronics in Vietnam have many different electric plug types for mains AC power: A, C, G, F, and I are fairly present, with A and C being most common. For a quick review of what all those look like, this website sums it up nicely. There are universal power adapters available of course, but they tend to fit my most common type (C) poorly, resulting in intermittent power loss whenever you sneeze. So I figured I should replace all the plugs on my devices to be A-type (common to those of you in North America), as it holds well in all the power bar types I have, mainly leftover server PDUs.

This was very straightforward until I got to my desk lamp. Being a fancy Xiaomi smart lamp, they had opted to hide a transformer in the plug with such small dimensions that I failed to notice it. So instead of receiving a balmy 12 volts DC, it received 220 volts AC. With a bright flash and bang, it illuminated my desk one final time.

Continue reading “Fried Desk Lamp Reborn: How To Use ESP8266 To Build Connected Devices”

Hackaday Podcast 036: Camera Rig Makes CNC Jealous, Become Your Own Time Transmitter, Pi HiFi With 80s Vibe, DJ Xiaomi

Hackaday Editors Elliot Williams and Mike Szczys work their way through a fantastic week of hacks. From a rideable tank tread to spoofing radio time servers and from tune-playing vacuum cleaners to an epic camera motion control system, there’s a lot to get caught up on. Plus, Elliot describes frequency counting while Mike’s head spins, and we geek out on satellite optics, transistor-based Pong, and Jonathan Bennett’s weekly security articles.

Take a look at the links below if you want to follow along, and as always tell us what you think about this episode in the comments!

Take a look at the links below if you want to follow along, and as always, tell us what you think about this episode in the comments!

Direct download (60 MB or so.)

Continue reading “Hackaday Podcast 036: Camera Rig Makes CNC Jealous, Become Your Own Time Transmitter, Pi HiFi With 80s Vibe, DJ Xiaomi”

DJ Xiaomi Spins Beats And Brushes At The Same Time

Direct from the “Just Because I Can” department, this blog post by [Eddie Zhang] shows us how easy it is to get the Xiaomi robotic vacuum cleaner working as what might be the world’s most unnecessary Spotify Connect speaker. Will your home be the next to play host to an impromptu performance by DJ Xiaomi? Judging by the audio quality demonstrated in the video after the break, we doubt it. But this trick does give us a fascinating look at the current state of vacuum hacking.

For the first phase of this hack, [Eddie] makes use of Dustcloud, an ongoing project to document and reverse engineer various Xiaomi smart home gadgets. Using the information provided there you can get root-level SSH access to your vacuum cleaner and install your own software. There’s a sentence you never thought you’d read, right?

With the vacuum rooted, [Eddie] then installs a Spotify Connect client intended for the Raspberry Pi. As they’re both ARM devices, the software will run on the Xiaomi bot well enough, but the Linux environment needs a little tweaking. Namely, you need to manually create an Upstart .conf file for the service, as the vacuum doesn’t have systemd installed. There goes another one of those unexpected sentences.

We’re certainly no stranger to robotic vacuum hacking, though historically the iRobot Roomba has been the target platform for such mischief. Other players entering the field can only mean good things for those of us who get a kick out of seeing home appliances pushed outside of their comfort zones.

Continue reading “DJ Xiaomi Spins Beats And Brushes At The Same Time”