Rock-A-Bye Baby, On The Mechatronic Crib Shaker

While an engineering mindset is a valuable tool most of the time, there are some situations where it just seems to be a bad fit. Solving problems within the family unit would seem to be one such area, but then again, this self-rocking mechatronic crib seems to be just the cure for sleepytime woes.

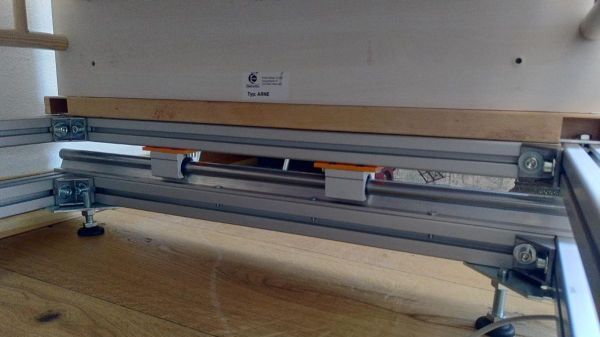
From the look of [Peter]’s creation, this has less of a rocking motion and more of a gentle back-and-forth swaying. Its purpose is plainly evident to anyone who has ever had to rock a child to sleep: putting a little gentle motion into the mix can help settle down a restless infant pretty quickly. Keeping the right rhythm can be a problem, though, as can endurance when a particularly truculent toddler is fighting the urge to sleep. [Peter]’s solution is a frame of aluminum extrusion with some nice linear bearings oriented across the short axis of the crib, which sits atop the whole thing.

A recirculating ball lead screw — nothing but the best for [Junior] — and a stepper drive the crib back and forth. [Peter] took care to mechanically isolate the drivetrain from the bed, and with the selection of the drive electronics and power supply, to make sure that noise would be minimal. Although thinking about it, we’ve been lulled to sleep by the whining steppers of our 3D printer more than once. Or perhaps it was the fumes.

Hats off to [Peter] for a setup that’s sure to win back a little of the new parent’s most precious and elusive commodity: sleep.

Arduino Nano Memory Upgrade With No Soldering

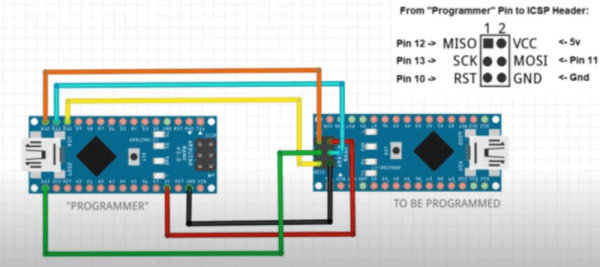
Ok, we’ll come clean. [Design Build Destroy] didn’t really add any memory to his Arduino Nano. But he did get about 1.5K more program space when compared to the stock setup. The trick? On some Nano boards and clones, the bootloader is set to use a large block of reserved memory, but Optiboot only requires a fraction of that reserved memory. By reprogramming the bootloader and changing the configuration fuses, you can reclaim that unused memory.

Of course, you can’t easily overwrite the bootloader and fuses over the serial port to prevent you from bricking your device. The video below shows how to connect another Arduino to do the programming. You could also use any dedicated AVR programmer you happen to have. Oddly, the Uno already uses Optiboot with the same processors, and is set correctly and the video shows the differences in the configuration between the two in their default state.

Of course, depending on where you get your Nano devices and their age, you may already have this set up at which point you won’t gain anything, but you should be able to easily tell if you need to go through the steps or not. The same trick will probably work with any older Arduino boards you have laying around if Optiboot supports them. What can you do with the extra memory? Maybe speech recognition?

Continue reading “Arduino Nano Memory Upgrade With No Soldering”

Hackaday Links Column Banner

Hackaday Links: June 20, 2021

The hits just keep coming for Elon Musk, as this week Starlink users reported their new satellite dishes apparently can’t take the heat. Granted, the places these reports are coming from are really, really hot, like Topock, Arizona, where one Starlink beta tester is located and where the air temperature is expected to hit 123°F (50°C) on Saturday. One user contacted Starlink customer service and was told that Dishy McFlatface is programmed to shut down if the surface temperature exceeds 50°C, which even in non-Arizona locations would be easily exceeded on a rooftop or in an urban heat island. Users experiencing thermal shutdown are taking extreme measures to get back online in the heat of the day, like by setting up sprinklers to water-cool their dishes. Others are building solar shades, and one die-hard is even considering putting the dish on an antenna tower, to get it up into the relatively cooler air above the ground. But these are just workarounds, and according to the engineer who did the Starlink teardown we featured a while back, the permanent fix may just be to redesign the thermal management. In other words, this isn’t likely to be another one of those problems that gets fixed with an OTA software push. Which is probably to be expected for something that’s still in the “Better than Nothing Beta” release.

We’ve all heard that AI and robots are going to replace pretty much every job at some point, but if one customer’s experience with an AI drive-through window is any gauge, it might take quite a while to get there. In a video posted on TikTok (we know, we know), a customer at a Chicago-area McDonald’s showed that the fast-food giant put exactly zero effort into making the experience anything but engaging. The synthesized voice is creepy, and evokes all the wrong kinds of feelings, like the ones you get when you’re forced to use a voice-response system to get through “voice mail jail”. At least in those cases, the voice at least sounds semi-apologetic when it can’t understand what you’ve said. After listening to it once, we’d much rather have a real human, even if it is a surly teen. This seems like a missed opportunity by McDonald’s, which probably has the resources to put a little humanity into their AI.

A while back, we dropped a link about satellites made largely of wood. At the time it seemed interesting if a bit self-serving, since the effort was largely backed by a large Finnish plywood company. And while that aspect of the project hasn’t changed, we’ve now got a better idea of how the WISA Woodsat is put together, and what it will do once it flies later this year. To be clear, the 1U CubeSat is not 100% wood, which of course would make including any electronics problematic. Instead, the side and top panels of the satellite are made from plywood, which are attached to aluminum rails that integrate with the launcher on the mothership. There’s also a metal pantograph-style selfie-stick, because pics or it didn’t happen. The interesting bit is the pre-treatment of the birch plywood, which is dried in a thermal vacuum chamber to prevent outgassing in space. Additionally, the exterior surface of the wood panels was covered with a thin layer of aluminum oxide, to give the surface a chance against highly reactive atomic oxygen. There will be sensors inside the satellite to see if any outgassing occurs, so we could actually get some valuable data about using wood in satellites out of what otherwise could have been just a publicity stunt.

As our long global nightmare appears to be playing out its endgame, and as the world begins to reopen itself to normal pursuits, it’s nice to see that some cons and meetups are actually returning to meatspace. One such event will be BornHack 2021, that week-long campout in a Danish forest with hundreds of like-minded hackers, tinkerers, and artists. The Call for Participation deadline has been extended to July 1, which gives you just a little more time to consider giving a presentation. We’ve heard Jenny List speak glowingly of BornHack, and it actually looks like a lot of fun.

And finally, it’s said that one can never include too many comments when writing code. Not everyone feels that way, of course; I once had a co-worker complain that I commented my code too much, which of course meant that I redoubled my efforts to make sure I had as many comments as possible. That meant I often ran out of ideas for pithy, pertinent, and gratuitous comments to sprinkle into my code. It’s a shame What The Commit didn’t exist back then. Just click the link and you’ll get a fresh, auto-generated comment ready to copy into your commits or embed in your code. Have fun!

Raspberry Pi Hat Adds SDR With High Speed Memory Access

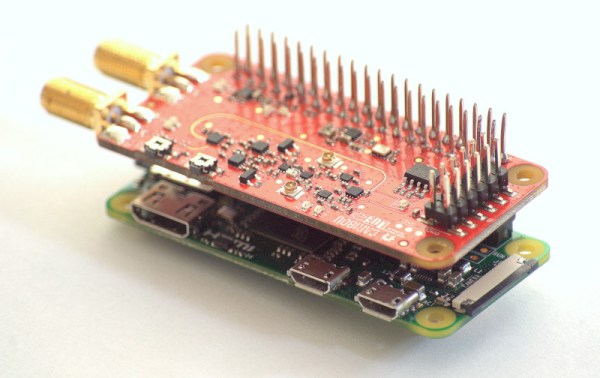
An SDR add-on for the Raspberry Pi isn’t a new idea, but the open source cariboulite project looks like a great entry into the field. Even if you aren’t interested in radio, you might find the project’s use of a special high-bandwidth memory interface to the Pi interesting.

The interface in question is the poorly-documented SMI or Secondary Memory Interface. [Caribou Labs] helpfully provides links to others that did the work to figure out the interface along with code and a white paper. The result? Depending on the Pi, the SDR can exchange data at up to 500 Mbps with the processor. The SDR actually uses less than that, at about 128 Mbps. Still, it would be hard to ship that much data across using conventional means.

On the radio side, the SDR covers 389.5 to 510 MHz and 779 to 1,020 MHz. There’s also a wide tuning channel from 30 MHz to 6 GHz, with some exclusions. The board can transmit at about 14 dBm, depending on frequency and the receive noise figure is under 4.5 dB for the lower bands and less than 8 dB above 3,500 MHz. Of course, some Pis already have a radio, but not with this kind of capability. We’ve also seen SMI used to drive many LEDs.

Tiny Tesla Valves Etched In Glass

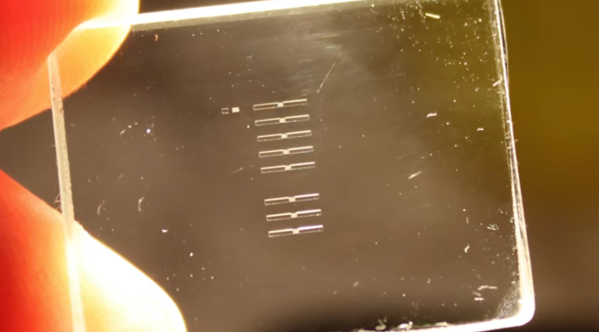
While it’s in vogue right now to name fancy new technology after Tesla, the actual inventor had plenty of his own creations that would come to bear his namesake, including Tesla coils, Tesla oscillators, Tesla turbines and even the infamous Tesla tower. One of the lesser known inventions of his is the Tesla valve, a check valve that allows flow in one direction without any moving parts, and [Huygens Optics] shows us a method of etching tiny versions of these valves into glass.

The build starts out with a fairly lengthy warning, which is standard practice when working with hydroflouric acid. The acid is needed to actually perform the etching, but it’s much more complicated than a typical etch due to the small size of the Tesla valves. He starts by mixing a buffered oxide etch, a mix of the hydroflouric acid, ammonia, and hydrochloric acid, which gives a much more even etching than any single acid alone. Similar to etching PCBs, a protective mask is needed to ensure that the etch only occurs where it’s needed. For that there are several options, each with their own benefits and downsides, but in the end [Huygens Optics] ends up with one of the smallest Tesla valves ever produced.

In fact, the valves are so small that they can only be seen with the aid of a microscope. While viewing them under the microscope he was able to test with a small drop of water to confirm that they do work as intended. And, while the valves that he is creating in this build are designed to work on liquids, [Huygens Optics] notes that the reason for making them this small was to make tiny optical components which they are known for.

Continue reading “Tiny Tesla Valves Etched In Glass”

19 Coils Make Charging Wireless

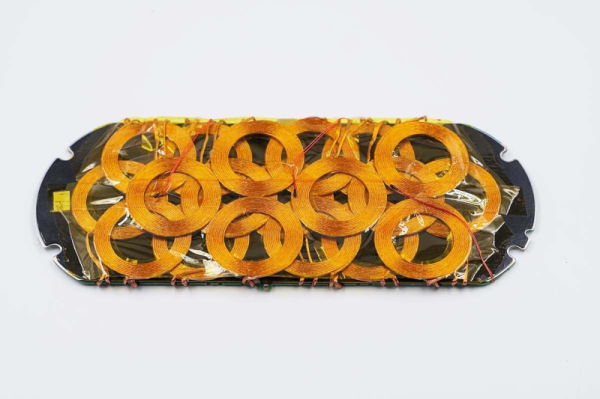
Wireless charging is conceptually simple. Two coils form an ad hoc transformer with the primary in the charger and the secondary in the charging device. However, if you’ve ever had a wireless charging device, you know that reality can be a bit more challenging since the device must be positioned just so on the charger. Xiaomi has a multi-coil charger that can charge multiple devices and is tolerant of their positioning on the charger. How does it work? [Charger Lab] tears one apart and finds 19 coils and a lot of heat management crammed into the device.

The first part of the post is a terse consumer review of the device, looking at its dimensions and features. But the second part is when the cover comes off. The graphite heat shield looks decidedly like an accidental spill of something, but we’re sure that’s just how it appears. The coils are packed in tight in three layers. We have to wonder about their mutual interactions, and we assume that only some of them are active at any given time. The teardown shows a lot of the components and even pulls datasheets on many components, but doesn’t really go into the theory of operation.

Still, this is an unusual device to see from the inside. It is impressive to see so much power and thermal management in such a tiny package. We wonder that we don’t see more wireless charging in do-it-yourself projects. We do see some, of course. Not to mention grafting a charging receiver to an existing cell phone.

Compact M&M Sorter Goes Anywhere

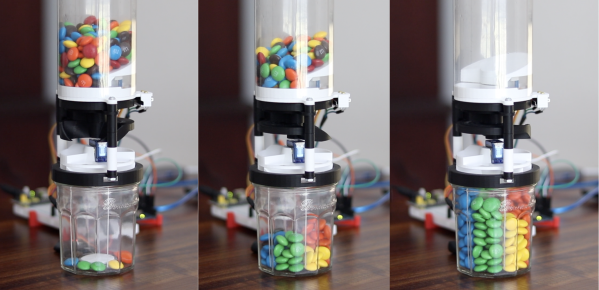
Let’s face it — eating different colored candy like M&Ms or Skittles is just a little more fun if you sort your pile by color first. The not-fun part is having to do it by hand. [Jackofalltrades_] decided to tackle this time-worn problem for engineering class because it’s awesome and it satisfies the project’s requirement for sensing, actuation, and autonomous sequencing. We’d venture to guess that it satisfies [Jackofalltrades_]’ need for chocolate, too.

Here’s how it works: one by one, M&Ms are selected, pulled into a dark chamber for color inspection, and then dispensed into the proper cubby based on the result. [Jackofalltrades_] lived up to their handle and built a color-detecting setup out of an RGB LED and light-dependent resistor. The RGB LED shines red, then, green, then blue at full brightness, and takes a voltage reading from the photocell to figure out the candy’s color. At the beginning, the machine needs one of each color to read in and store as references. Then it can sort the whole bag, comparing each M&M to the reference values and updating them with each new M&M to create a sort of rolling average.

We love the beautiful and compact design of this machine, which was built to maximize the 3D printer as one of the few available tools. The mechanical design is particularly elegant. It cleverly uses stepper-driven rotation and only needs one part to do most of the entire process of isolating each one, passing it into the darkness chamber for color inspection, and then dispensing it into the right section of the jar below. Be sure to check out the demo after the break.

Need a next-level sorter? Here’s one that locates and separates the holy grail of candy-coated chocolate — peanut M&Ms that didn’t get a peanut.

Continue reading “Compact M&M Sorter Goes Anywhere”