Using A Spring As A Capacitive Touch Button

When [Daniel Eichhorn] designed the Pendrive S3 project, he wanted to use an off-the-shelf USB enclosure but also add a button for the user to start certain actions. Drilling a hole into the enclosure would be an option, but decided a touch sensor on the top of the enclosure would be much more elegant — not to mention better at keeping dirt and moisture out. To bridge the 6.3 mm spacing between the PCB and the top of the enclosure [Daniel] used a small, 7 mm PCB-mounted spring.

The spring used to create a capacitive touch sensor. (Source: JLCPCB parts)

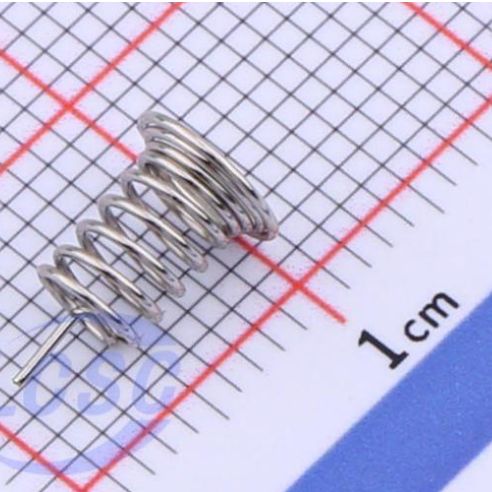
Although capacitive sensing works with just about  anything that’s electrically conductive, it’s important to get the conductive element as close to the user’s digits as possible. Using a spring here has the advantage that when the enclosure is closed up, the lid will push down onto the spring, which will not only compress slightly, but also provide the best capacitive sensing experience when e.g. the enclosure flexes or warps over time on account of always being pressed against the inside of the lid.

While hardly world-changing, this is another neat design tip when you’re looking to turn more surfaces into touch controls. Just keep in mind that capacitive sensing is notoriously fussy and any trace and spring are also excellent antennae for stray EMI. Nobody likes random capacitive button inputs, after all.

Hands On: AD409-Max Microscope

It used to be that only the most well-equipped home electronics lab had a microscope. However, with SMD parts getting smaller and smaller, some kind of microscope is almost a necessity.

Luckily, you can get USB microscopes for a song now. If you’re willing to spend a little more, you can get even get microscopes that have little LCD screens. However, there are some problems with the cheaper end of these microscopes.

Many of them have small and wobbly stands that aren’t very practical. Some don’t leave you much room to get a soldering iron in between the lens and the part. Worse still, many cheap microscopes have trouble staying still when you have to push buttons or otherwise make adjustments to the device.

It seems like every time a new generation of microscopes aimed at the electronics market arrives on the scene, many of the earlier flaws get taken care of. That’s certainly the case with the Andonstar AD409-Max.

Continue reading “Hands On: AD409-Max Microscope”

90s PowerBook Runs MacOS Monterey

Even though Apple isn’t known for making the most pro-consumer devices ever (at least not since the Apple II), the trope that Apples aren’t upgradable, customizable, or otherwise hackable doesn’t really hold much weight. It does take more work to modify them or change how Apple wants them to behave, but it’s not completely impossible. Take this example of a ’94 Apple PowerBook which runs macOS Moneterey thanks largely to new internals from a 2015 MacBook Pro.

[Billy] originally intended for a Raspberry Pi to go inside this old PowerBook, but at the time, prices for ARM single-board computer (SBC) were astronomical. For around the same price as the Pi was at the time, he was able to pick up a retina display from an iPad and the internals from a broken MacBook Pro to outfit this retro case. There’s also a Teensy installed to get the trackpad working and a driver board for the display from Adafruit, and a number of case mods were needed to get everything to fit including the screen which was slightly larger than the original 9.5″ display the laptop would have shipped with.

This project took both inspiration and some of the actual code needed to get everything working from another project we featured a while ago where a Mac Mini was installed inside of a PowerBook case from 1993. Unlike projects that use smaller SBCs for retrocomputing, these builds are notable because the hardware on the inside makes them usable as daily driver computers even today, and might even be an upgrade if you’re using the internals from a MacBook Pro that would have originally had a butterfly keyboard.

Continue reading “90s PowerBook Runs MacOS Monterey”

Filming The Eclipse From 80,000 Feet

Watching an eclipse from the ground is pretty fun. Depending on where you live, you might even get a decent view. But what if you wanted a truly unique vantage point? You could replicate the work of [Tarik Agcayazi] and [kemfic], who set about filming the recent eclipse from an altitude of 80,000 feet.

That’s what the eclipse looks like from 80,000 feet.

The duo didn’t rent a high-performance aircraft from the US military. Instead, they relied on a high-altitude balloon carrying a glider with a camera payload. The idea was for the balloon to go up, and have the camera capture the eclipse. Then, it would be released so that it could glide back home in controlled flight. However, time constraints made that too hard. Instead, they simplified to a parachute recovery method.

The project video covers the development process, the balloon launch itself, and of course, the filming of the eclipse. High altitude balloon launches are stressful enough, but having a short eclipse as a target made everything even more difficult. But that just makes things more exciting!

The project builds on earlier work from the duo that we discussed back in 2017.

Continue reading “Filming The Eclipse From 80,000 Feet”

Mechanical 7-Segment Display Looks Clean

[Jens] wanted a subscriber counter for his YouTube channel. He could have gone with a simple OLED, LCD, or LED display, but he wanted something more tactile and interesting. So he built a mechanical 7-segment display instead!

Currently, [Jens]’s channel is in the four-digit subscriber range, so he planned to build a four-digit display. He started by searching for existing projects in this space, and came across the designs of [shiura] on Thingiverse. [shiura] had a 3D printed cam-driven 7-segment digit that runs on a single servo motor. Once armed with four of the digits, he hooked them up to a Pi Pico W to drive them all with four servo outputs. The Pico W is responsible for querying the channel subscriber count online, and updating the display in turn.

It’s a neat build, and [Jens] learned some things along the way—like how Super Lube seemed to ruin filament for him. Ultimately, the build came good, and it looks great. We’ve seen some other mechanical 7-segment builds before, too!

Continue reading “Mechanical 7-Segment Display Looks Clean”

An image of an orange, translucent glowing quartz rod. Thermocouples can be seen at intervals along the rod looking in.

Industrial Solar Heat Hits 1000˚C

While electricity generation has been the star of the energy transition show, about half of the world’s energy consumption is to make heat. Many industrial processes rely on fossil fuels to reach high temps right now, but researchers at ETH Zurich have found a new way to crank up the heat with a solar thermal trap. [via SciTechDaily]

Heating water for showers or radiant floor systems in homes is old hat now, but industrial application of solar power has been few and far between. Part of the issue has been achieving high enough temperatures. Opaque absorbers can only ever get as hot as the incident surface where the sun hits them, but some translucent materials, like quartz can form thermal traps.

In a thermal trap, “it is possible to achieve temperatures that are higher in the bulk of the material than at the surface exposed to solar radiation.” In the study, the researchers were able to get a 450˚C surface to produce 1,050˚C interior temperature in the 300 mm long quartz rod. The system does rely on concentrated solar power, 135 suns-worth for this study, but mirror and lens systems for solar concentration already exist due to the aforementioned electrical power generation.

This isn’t the only time we’ve seen someone smelting on sunlight alone, and you can always do it less directly by using a hydrogen intermediary. If you’re wanting a more domestic-level of heat, why not try the wind if the sun doesn’t shine much in your neighborhood?

Ribbon Cable Repair Saves Touch ID

Some might consider a broken ribbon cable to be unsalvagable. They’re delicate and fragile as can be, and sometimes just fussing with them further is enough to cause additional damage. However, with the right set of skills, it’s sometimes possible to achieve the unthinkable. As [Master Liu] demonstrates, you can indeed repair a broken ribbon cable, even a tiny one.

The video concerns a ribbon cable linked to a Touch ID fingerprint sensor from an Apple device. It’s common to break these ribbon cables when repairing a phone, and doing so causes major problems. The Touch ID device is paired with the host phone, and cannot easily be replaced. Thus, repair is justified if at all possible.

The repair involves scraping back the outer coating on the two sections of ribbon cable to reveal the copper pads underneath. The copper is then coated with flux and solder to prepare them to be rejoined. Ultra-fine strands of wire are used to join the individual traces. Then, the repaired section is coated in some kind of sealant or epoxy to hold the joint together and protect it from failing again. The theory is easy, it’s just the execution that’s hard.

Ribbon cable repair is becoming one of our favorite topics of late. Sometimes you just need a steady hand and the guts to have a go. Video after the break.

Continue reading “Ribbon Cable Repair Saves Touch ID”