CD-ROM POV Clock

clock

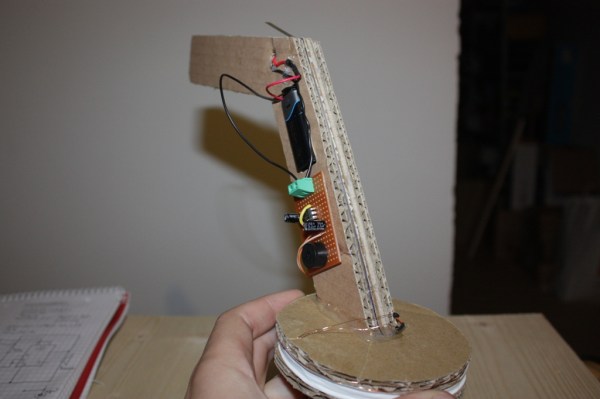
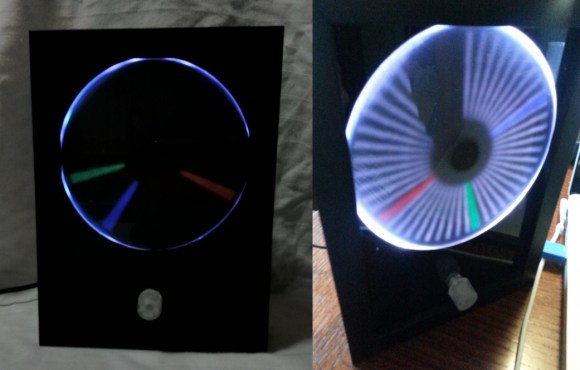
[Kyle] wanted to try something new. A Persistence of Vision Clock using a CD-ROM drive.

We have covered lots of POV Clocks that make use of hard drives, but we think this is the first time we have seen a CD-ROM drive used instead. [Kyle] points out that CD-ROM drives are typically much quieter than hard drives, which is the main reason he chose the CD-ROM route.

At the heart of this project is a good old ATMEGA168 and an RGB LED strip for the lights. To measure and maintain the rotational speed of the clock [Kyle] used an IR photodiode that detects a reference mark on the disc. An elegant build of a classic POV Clock, with a new twist!

The cool thing about this project is he did not actually use the CD-ROM drive like you think he would — he chucked the spindle motor and instead is spinning the disk using the tray ejection motor! He did this so he could control the motor by PWM straight off the microcontroller, whereas the spindle motor would require an IC and a varying control signal with specific voltage amplitudes.

He also experimented with different backgrounds and background lighting, which you can see in the video after the break!

Continue reading “CD-ROM POV Clock”

DIY Metal Detector

Looking for a light project to teach young hackers some very basic electronics? Here’s a quick and easy weekend project, a simple metal detector!

We all know 555 timers are very useful and pop up in a wide range of projects, but did you know a metal detector is one of them? [vonPongrac] stumbled upon this handy guide, a free eBook on 50 555 Circuits, which contains many cool project ideas, including a simple metal detector circuit. It’s a very basic concept that uses a coil of copper wire as a home-made choke — when metal or a magnet comes near the coil, it varies the output frequency, and the 555 timer in turn, varies the output sound, alerting you of the presence of something metal nearby.

After the break there’s a video of it during its testing phases. If you don’t have a 555 on hand (tisk tisk) but still want to have some treasure hunting fun you can also build one based on an Arduino.

Continue reading “DIY Metal Detector”

Making QR Codes In Google Docs

screen-shot-2013-09-18-at-1-48-20-am

[Jordi] sent us this great tip on how to generate QR codes inside Google Docs. This can be super handy if you ever need to make a lot of them at one time, plus they update on the fly!

In his example he set up the code to create vCards so he could transfer contacts to his phone quickly and easily. The code pulls in a Google API QR generator and provides you with a QR code as an image! The following is his code, which can be easily modified to suit your needs:

=image("https://chart.googleapis.com/chart?chs=200x200&cht=qr&chl=BEGIN:VCARD%0AN:" & A2 & "%20" & B2 & "%0ATEL;CELL:" & C2 & "%0AEMAIL:" & D2 & "%0AEND:VCARD")

Or if you just want the bare bones:

=image("https://chart.googleapis.com/chart?chs=200x200&cht=qr&chl=<strong>YOUR CELL</strong>")

And if you need a full walkthrough, there is a video after the break. Those wanting to tinker around with more QR code hijinks will enjoy forming images from QR codes and milling QR codes into your copper layers.

Continue reading “Making QR Codes In Google Docs”

Mechanical Typewriter Types Your Tweets!

ScreenShot027

While we weren’t able to visit the Toronto Maker Faire this past weekend, a friend let us know about this great hack. A mechanized typewriter that types out tweets directed at the maker, @mschwanzer!

[Michael Schwanzer] has a few blog posts outlining the build, but the first part of this news article and accompanying video explain it quite nicely. The printer-typewriter features an array of solenoids that are controlled by an Arduino using shift registers. A Raspberry Pi collects the information from Twitter and then parses the data to the Arduino for typing. A simple concept, but a complex and relatively expensive build.

During the fair, people could have their own tweets printed and streamed on this site. You can still see it in action though, just check out the video after the break! Continue reading “Mechanical Typewriter Types Your Tweets!”

An Oscilloscope On Your Wrist

osc-watch2

Calculator watches were the Geek cred of the 80’s. Today everyone is getting smart watches. How can the hip Geek stay ahead? [Gabriel Anzziani] to the rescue with his Oscilloscope Watch! [Gabriel] has made a cottage industry with his micro test tools. We’ve featured his Xprotolab and Xminilab on here on Hack a Day more than once. The Oscilloscope Watch basically takes all the features of the Xprotolab and squeezes them down into a wrist watch.

The Oscilloscope Watch includes an oscilloscope, a logic analyzer, an arbitrary waveform generator, and of course it tells time.  The Oscilloscope Watch’s processor is the AVR XMega128.  [Gabriel] has even included a link to the schematics (PDF) on his Kickstarter page. We really like that 3D printed case, and hope [Gabriel] opens up his CAD designs for us to work with.

Like its predecessors, the Oscilloscope watch won’t be replacing your Tektronix scope, or even your Rigol. Much like a Swiss army knife or Leatherman tool, the Oscilloscope Watch packs a bunch of tools into a small package. None of them are as good as a full-sized tool, but in a pinch they will get the job done. If you are wondering where the probes connect. [Gabriel] states on the Kickstarter page that he will design a custom 9 pin .100 connector to BNC adapter to allow the use of standard probes.

The screen is the same series of Sharp Memory LCD’s used in the Pebble watch. [Gabriel] chose to go with the FPC version of the Sharp LCD rather than the zebra connector.  We’ve learned the hard way that those flex circuits snap at the LCD glass after only a few flexes. Hopefully this won’t impact the hackability of the watch.

A Simple Nixie Clock With Logic Gates

Here is a very nice project that [Znaxque] finished a few months ago: a simple nixie clock made with logic gates only. In this build, the mains 50Hz is used as a time base instead of a 32KHz crystal that most readers here may use. In the very long term, this clock may actually be more precise than a crystal-based one as power companies in Europe adjust the mains frequency. However, at a given moment the difference between this clock and a reference may be as big as 60 seconds.

The design was sketched on a simple piece of paper and later made using salvaged ICs. [Znaxque] only bought the six IN-14 nixies for $45 and the veroboard shown in the picture above. The BCD to Decimal decoders are 74141s and three buttons are present on the board to set minutes, hours, as well as resetting all the counters.

Learn To Translate IR Codes And Retransmit Using Arduino

[Dave Jones] from EEVBlog.com takes “Arduino fan boys” off the garden path getting down and dirty with different methods to capture, evaluate and retransmit IR remote control codes. Capturing and reproducing IR remote control codes is nothing new, however, [Dave] carves his own roads and steers us around some “traps for young players” along the way.

[Dave] needed a countdown timer that could remotely start and stop recording on his Cannon video camera, which he did with simplicity in a previous EEVBlog post using a commercial learning remote control unit. The fans demanded better so he delivered with this excellent tutorial capturing IR codes on his oscilloscope from an IR decoder (yellow trace) as well as using an IR photo transistor (blue trace) which showed the code inclusive of 38 KHz carrier frequency. Either capture method could easily be used to examine the transmitted code. The second lesson learned from the captured waveforms was the type of code modulation being used. [Dave’s] remote transmitted NEC (Japanese) pulse length encoding — which can be assertaind by referencing the Infrared Remote Control Techniques (PDF). Knowing the encoding methodology it was trivial to manually translate the bits for later use in an Arduino transmitter sketch. We find it amazing how simple [Dave] makes the process seem, even choosing to write his own sketch to reproduce and transmit the IR codes and carrier instead of taking the easy road looking for existing libraries.

A real gem of knowledge in the video was when it didn’t work! We get to follow along as [Dave] stumbles before using a Saleae Logic analyzer to see that his transmitter was off frequency even though the math in his sketch seemed correct. Realizing the digital write routine was causing a slowdown he fudged his math to make the needed frequency correction. Sure, he could have removed the performance glitch by writing some custom port control but logic dictates using the fastest and simplest solution when hacking a one-off solution.

[Dave’s] video and links to source code after the break.

Continue reading “Learn To Translate IR Codes And Retransmit Using Arduino”