An Actual Working Hoverboard

What with 2015 being the apparent “year of the hoverboard”, we have a final contender before the year ends. It’s called the ArcaBoard from ArcaSpace, A private space company. And it doesn’t use magnets, or superconductors, or any smoke and mirrors — just a whole lot of ducted fans.

Thirty-six of them to be precise. The ArcaBoard uses 36 electric motors with an apparent 7.55HP each, powered by a massive bank of lithium ion batteries. Together, they produce 430 pounds of thrust, which allows most riders to float around quite easily. Even with that huge power drain, it apparently lasts for a whole 20 minutes, which is pretty impressive considering its size.

Continue reading “An Actual Working Hoverboard”

Pewter Casting With PLA

Over on Hackaday.io, [bms.had] is showing his technique for 3D printing molds that he uses to cast (lead-free) pewter objects. The process looks simple enough, and if you have a 3D printer, you only need some lead-free pewter, a cheap toaster oven, and PLA filament. He’s made two videos (below) that do an excellent job of showing the steps required.

Even though the pewter is hot enough to melt the PLA, it doesn’t appear to be a major problem if you quench the piece fast enough. According to [bms.had], a slower quench will melt some PLA although that creates a smoother surface. You can see the 0.31 mm layer lines in the cast, though, although you can use any layer height you like to control that. Creating the mold is simple (the videos use Tinkercad, although anything suitable for creating 3D models would work). You essentially attach a funnel to your part and make the entire part a hole inside an enveloping shape.

Continue reading “Pewter Casting With PLA”

Hackaday Links: December 27th, 2015

PCBs can be art – we’ve known this for a while, but we’re still constantly impressed with what people can do with layers of copper, fiberglass, soldermask, and silkscreen. [Sandy Noble] is taking this idea one step further. He took C64, Spectrum, and Sinclair PCBs and turned them into art. The results are incredible. These PCBs were reverse engineered, traced, and eventually turned into massive screen prints. They look awesome, and they’re available on Etsy.

$100k to bring down drones. That’s the tagline of the MITRE Challenge, although it’s really being sold as, “safe interdiction of small UAS that pose a safety or security threat in urban areas”. You can buy a slingshot for $20…

[styropyro] mas made a name for himself on Youtube for playing with very dangerous lasers and not burning his parent’s house down. Star Wars is out, and that means it’s time to build a handheld 7W laser. It’s powered by two 18650 cells, and is responsible for more than a few scorch marks on the walls of [styropyro]’s garage.

Everybody is trying to figure out how to put Ethernet and a USB hub on the Pi Zero. This means a lot of people will be launching crowdfunding campaigns for Pi Zero add-on boards that add Ethernet and USB. The first one we’ve seen is the Cube Infinity. Here’s the thing, though: they’re using through-hole parts for their board, which means this won’t connect directly to the D+ and D- USB signals on the Pi Zero. They do have a power/battery board that may be a little more useful, but I can’t figure out how they’re doing the USB.

[Keith O] found a fascinating video on YouTube and sent it into the tips line. It’s a machine that uses a water jet on pastries. These cakes start out frozen, and come out with puzzle piece and hexagon-shaped slices. Even the solution for moving cakes around is ingenious; it uses a circular platform that rotates and translates by two toothed belts. Who would have thought the latest advancements in cutting cakes and pies would be so fascinating?

It’s time to start a tradition. In the last links post of last year, we took a look at the number of views from North Korea in 2014. Fifty-four views, and we deeply appreciate all our readers in Best Korea. This year? For 2015, we’ve logged a total of thirty-six views from the Democratic People’s Republic of Korea. That’s a precipitous drop that deserves an investigation. Pyongyang meetup anyone?

Turning The Pi Zero Into A USB Gadget

The Raspberry Pi Zero is limited, or so everyone says, and everyone is trying to cram a USB hub and WiFi adapter on this tiny, tiny board. One thing a lot of people haven’t realized is that the Raspberry Pi Zero comes with a USB OTG port, meaning it can function as a USB device rather than a USB host. This means the Raspi can become a serial device with just a USB cable, an Ethernet device, MIDI device, camera, or just about anything else you can plug into a USB port. Adafruit has your back with a tutorial for using the USB OTG port as a serial and Ethernet interface, and the possible applications are extremely interesting.

The only requirement for using the USB OTG port for device applications is an update to the kernel. This is easily installed by dumping a few files on an SD card and a employing bit of command line wizardry. The simplest example is setting up the Pi Zero as a USB serial device, allowing anyone to log into a serial console on the Pi with just a USB cable.

A slightly more interesting application is setting up the Pi as an Ethernet gadget. This effectively tunnels all the networking on the Pi Zero through a USB cable and a separate computer. The instructions are extremely OS-specific, but the end result is the same: you can apt-get on a Pi Zero to your heart’s desire with a new kernel loaded onto the SD card and a USB cable.

This experimentation is just scratching the surface of what is possible with the OTG port on the Pi Zero. MIDI devices are easy, and with a ton of GPIOs, the Pi Zero itself could become a very interesting musical instrument. Want the Pi Zero to be a storage device? That’s easy too. The USB Gadget will end up being one of the most exciting uses for the Pi Zero, and we can’t wait to see what everyone will come up with next.

IoT Power Strip Lets You Control All Your Holiday Lights

As IoT devices become more prevalent in the consumer world, how long will it be before it’s cheaper to buy one, than to make one? Definitely not yet, which means if you want your very own IoT power strip — you’ll have to make your own. Good thing it’s not that hard!

[Dev-Lab] came up with this project which allows him to control several outlets with his phone. What we really like about it is that he designed a 3D printed housing that fits on the end of the power-strip. This keeps all messy wires out of sight, and it looks like it was designed to be there!

The beauty with an IoT device like this is that it doesn’t require any infrastructure besides a WiFi enabled device with an HTTP browser — the ESP8266 module means no server is necessary. An Arduino was used in the project just because it was quick an easy to do. But it really boils down to being a glorified pin expander. This could very easily be fixed by upgrading from an ESP01 to and ESP03 module to get more IO broken out on the carrier board. If you do this, let us know!

Continue reading “IoT Power Strip Lets You Control All Your Holiday Lights”

A Better Expanding Table

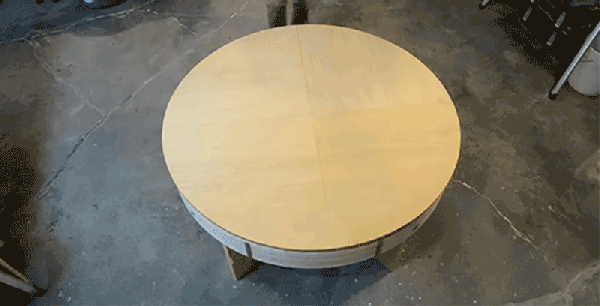
About a year ago, [Scott] completed what is probably one of the finest builds ever shown on a YouTube channel. It was an expanding wooden table, a build inspired by a fantastically expensive expanding table that was itself inspired by a creation by a mad woodworker in the early 1800s. Although [Scott]’s table is a very well-engineered build, there were a few things he wasn’t happy with. Over the past few months he’s been refining the design and has come up with the final iteration – and plans – for a wooden mechanical expanding table.

Late last year, [Scott] had about 450 hours of design and build time in his table, and by the time he got to the proof of concept stage, he simply ran out of steam. Another year brings renewed enthusiasm, and over the past month or so he’s been working on much-needed improvements to his expanding table that included a skirt for the side of the table, and improvements to the mechanics.

The expanding table is rather thick with three layers of tabletop stacked on top of each other, and those exposed mechanical linkages should be hidden. This means a skirt, and that requires a huge wooden ring. [Scott] built a ring 5 1/2″ deep, about an inch and a half thick, and has the same diameter of the table itself. This means cutting up a lot of plywood, and stacking, gluing, sanding, and routing the entire thing into a perfectly round shape.

The other upgrades were really about the fit and finish of the internal mechanics of the table. Screws were changed out, additional brackets were crafted, and the mounts for the internal ‘star’ was upgraded.

After all that work, is the table done? No, not quite; the skirt could use a veneer, proper legs need to be built, and the entire thing could use a finish. Still, this is the most complete homebuilt expanding table ever conceived, and [Scott] has the plans for his table available for anyone who would want to replicate his work.

Continue reading “A Better Expanding Table”

Eagle To KiCad Made Easy

One barrier for those wanting to switch over from Eagle to KiCad has been the lack of a way to convert existing projects from one to the other. An Eagle to KiCad ULP exists, but it only converts the schematic, albeit with errors and hence not too helpful. And for quite some time, KiCad has been able to open Eagle .brd layout files. But without a netlist to read and check for errors, that’s not too useful either.

[Lachlan] has written a comprehensive set of Eagle to KiCad ULP scripts to convert schematics, symbols and footprints. Board conversion is still done using KiCad’s built in converter, since it works quite well, and we were able to successfully convert two projects from Eagle. The entire process took only about 10 to 15 minutes of clean up after running the scripts.

The five scripts and one include file run sequentially once the first one is run. [Lachlan]’s scripts will convert Eagle multi sheet .sch to KiCad multi sheets, place global and local net labels for multi sheets, convert multi part symbols, build KiCad footprint modules and symbol libraries from Eagle libraries, create a project directory to store all the converted files, and perform basic error checking. The Eagle 6.xx PCB files can be directly imported to KiCad. The scripts also convert Via’s to Pads, which helps with KiCad’s flood fill, when Via’s have no connections — this part requires some manual intervention and post processing.