DIY Rotary Tool

DIY Rotary Tool

[Shashank] has a modest tool collection but is missing a rotary tool. He needed one for a project he was working on but didn’t think that it would get much use after the current project was completed. So instead of buying a rotary tool, he decided to make one to get the job done.

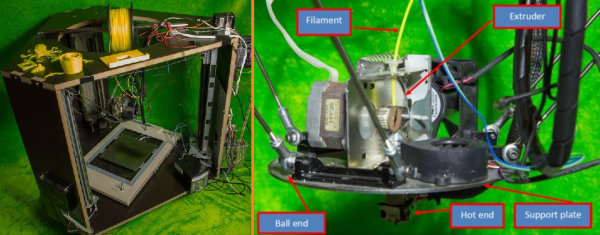
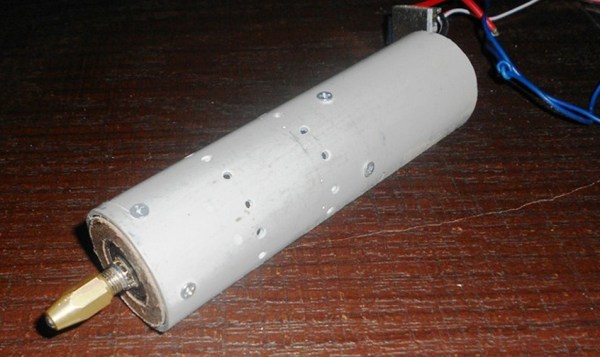
The project started out with a 40mm PVC pipe that would serve a the main body of the tool. Two MDF disks were cut to fit inside the pipe. One was used for mounting an RC vehicle brushless motor and the other was bored out to accept a pair of bearings. The bearings supported a modified pin vise that acts as the chuck for securing rotary tool bits. A 20-amp ESC and a servo tester control the motor’s speed and can get the motor up to 18,000 rpm.

Although this worked for a while, [Shashank] admits it did fall apart after about 20 hours of use. The MDF bearing mounts crumbled, thought to be a result of vibration due to mis-assignment between the motor and pin vise. He suggests using aluminum for the bearing mounts and a flexible coupling to connect the motor to the pin vise. If you’re interested in making your own rotary tool but don’t have any spare motors kicking around,  this 3D printed vacuum-powered rotary tool may be for you.

Plywood Camera Dolly

DIY Plywood Camera Dolly Looks Professional

While [Ted] was poking around the ‘net, he came across a neat little product called a camera dolly. These are used to add an artistic flair to filming. They are similar to a camera slider but can roll around on the floor or a table and do not need to follow a track. [Ted] wanted a camera dolly but the cost of a professional product seemed too expensive for what he’d actually be getting, so he set off to make his own.

[Ted] first designed the dolly in a CAD software and printed out templates for the parts. Those templates were then transferred to plywood and cut out with a jig saw. Three inline skate wheels support the frame and allow the unit to roll around. Mounted in the center of the frame is a pan and tilt camera mount.

The extraordinary part of the build is that the angle of each wheel can be adjusted independently.  This allows the dolly to do anything from rolling in a straight line to gradually traveling around a curve or even just spinning the camera in place. Each wheel mount has degree indications so that they can be adjusted very precisely as well as be returned to a previously recorded position.

DIY Drill Powered Band Saw

Hand Drill To Band Saw Conversion

Need a band saw but only have a drill kicking around? That may not be a common problem but if you ever run into it, [Izzy] has got you covered. He’s on a mission to make a drill-powered workshop and in his YouTube video, he shows a small bench top band saw he made that is powered by a corded hand drill.

The main frame is made from doubled up 3/4″ plywood. The saw blade is strung between two wooden wheels. Those wheels have tape applied to their outer diameter to create a crowned roller. That crown keeps the saw blade tracking in the middle of the wheel. The bottom wheel is mounted to an axle that is supported by bearings in the main frame. That axle pokes out the back and is connected to the drill. The top wheel has integrated bearings and ride on a stud mounted to the frame. The blade seems to be pretty tight although there is no noticeable tensioning system.

The video shows that this DIY band saw can cut through 1.5 inch wood fairly easily. Even so, there are clearly some needed features, like guide bearings for the blade and an overall cover to prevent accidental lacerations. But we suppose, even professional saws can be dangerous if not treated with respect.

DIY BobbleHead

Making A Bobblehead Of You

Bobbleheads, you remember them, small figures with a spring-mounted comically large head. They brought joy to millions of car drivers every day as at least 97.5% of all registered cars in the 1960’s had bobbleheads mounted to the dash. Years later bobblehead popularity has waned but [Luis] is trying to bring them back, this time not as your iconic sports hero but as YOU!

[Luis] uses software called Skanect along with his Kinect to scan a persons geometry. There is a free version of Skanect but it is limited to exporting STL files no larger than 5,000 faces. That means that 3d printed bobblehead
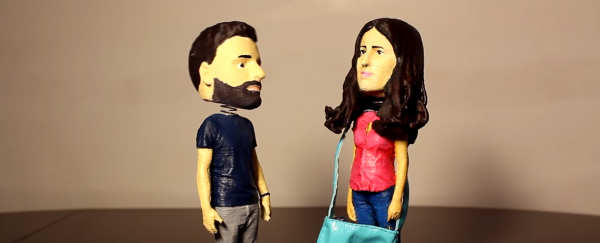
scans of large objects (including people) come out looking noticeably faceted. [Luis] came up with a work-around that results in a much finer detailed scan. Instead of scanning an entire person with one scan, he would do 4 separate scans. Since each individual scan can support 5,000 faces, the resulting merged model can be up to 20,000 faces. Check out the comparison, the difference between the two scanning methods is quite noticeable. MeshMixer is the software used to merge the STL files of the 4 separate scans.

Once the full body is assembled in MeshMixer, it is time to separate the head from the body. A cylindrical hole is then made in the bottom of the head and the top of the body. This hole is just slightly larger than the spring used to support the head. The parts are then printed, painted and assembled. We have to say that the end result looks pretty darn good.

recycled delta 3d printer

Delta 3D Printer Made From Unorthodox Parts

Over here at Hackaday, we love stuff made from other (unrelated) stuff. Maybe it’s the ingenuity behind the build or the recycling of parts… or it could be both. Either way, it’s cool and a side benefit of re-using parts from the junk drawer is that it keeps the project cost down, maybe enough that the project wouldn’t even be feasible without the re-use of parts.

That brings us to the topic of this post, a Delta-style 3D Printer made from recycled parts not typically seen in such a machine. It was built by DIYer [hesamh] and is almost unrecognizable visually. The usual extruded aluminum or precision shaft frame has been replaced with 5 pieces of MDF, finger-jointed together at the seams. Attached to the 3 vertical MDF frame pieces are rail and carriage assemblies scavenged from Epson dot matrix prints saved from the scrap yard. The best part is that these rail/carriage assemblies already had stepper motors and belts installed!

The end effector is also unique among delta-style printers. This one is made from aluminum plate and provides a mount for the extruder. There is no need for a bowden tube setup when the extruder is mounted on the end effector, although the increase in mass may reduce the printer’s top speed. That’s fine by us as we’d rather have a good-looking slow print than a fast ball of spaghetti. Another scavenged stepper motor is used for the extruder. The accompanying belt pulley acts as a direct drive feed gear.

The print bed is a re-purposed flatbed scanner. The guts were removed and a heating element was placed under the glass. The bed heater is controlled separately by way of a household thermostat. An Arduino Leonardo and 4 stepper drivers replace the normally used Mega/RAMPS/Pololu combo. Overall, this is a cool build that shows what is possible with a little thought and resourcefulness. The only part used in this build that was actually made for use in a 3D Printer is the hotend!

Arduino Controlled AC

Arduino Controlled Air Conditioner

Now that summer is coming, it’s time to break out the Air Conditioners! There are some old AC units out there that still work just fine, but nowadays we are used to everything being remotely controlled and automatic. [Phil] had an old window-mounted AC unit that still worked but was installed in a not-so-convenient place. To access the AC’s controls, one would have to climb over a large desk. This is a perfect opportunity to use the plethora of widely available hobby electronics to make an automatic AC controller retrofit.

First things first, there needs to be a way to turn the current control knob on the AC. [Phil] modeled up a 3D bracket to hold an RC car servo to the AC control panel. Attached to the servo horn is a slotted cylinder sized appropriately to fit the shape of the control knob. An Arduino measures the temperature of the room via a DS18B20 temperature sensor which then has the servo turn the control knob to the appropriate position, on or off. The Arduino sends temperature data back to a PC via MegunoLink Pro which graphs past data and also displays current temperature data. Using MegunoLink Pro, the min/max temperature points can also be set without uploading a new sketch to the Arduino.

Arduino Controlled AC

From the temp vs time graph, it looks like the room temperature stays a consistent 23 +/- 1 °C. [Phil] did us summer-swelterers a favor and made all his design files available. This is a great idea but wonder if leaving the air conditioner unit switch in the ‘on’ position and turning the unit on/off via a relay connected to the 120vac line would work just as well.

PiClock

PiClock – Time And Weather Information Overload

[Kevin] wanted a display where he could take a quick glance and get all the current environmental information he uses throughout the day. That information includes, of course, the time and date as well as weather information. We’re not just talking the current weather information but the forecast for the upcoming week as well as a map showing current weather patterns. To do this, [Kevin] came up with a unique system he’s calling the PiClock.

[Kevin] did some serious programming to get this clock project off of the ground. The weather data comes via the Weather Underground API and the map data from the Google Maps API. The main program is written in Python and will run on any OS running Python 2.7+ and PyQt4. If you’re interested in doing something similar, check out the source at github.

From the project’s name, it is no surprise that a Raspberry Pi is the brains here. A USB WiFi adapter allows access to the internet but an Ethernet connection would do just fine. Having the RaspPi hanging out with wires everywhere would be a little lazy, so [Kevin] opened up his 19″ LCD monitor and mounted the RaspPi inside the case. He tapped 5vdc off of the monitors power supply and used that to power the RaspPi, no external wall wart necessary! And if the PiClock’s background isn’t cool enough, some RGB LED strips were mounted to the back of the monitor to give an Ambilight effect.