RetroPie SNES Portable

RetroPie Portable Looks Like SNES Gameboy

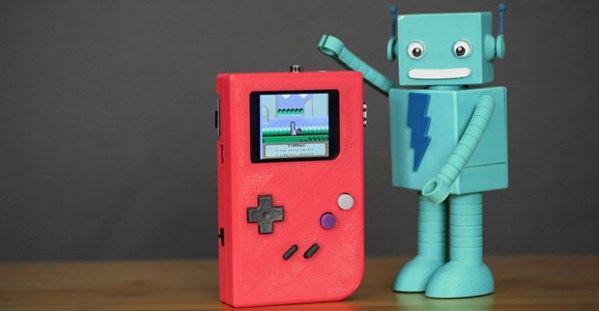
[Mat] wanted a portable RetroPie project he could take while travelling. He made one with a laser cut plastic housing and, according to him, it turned out to be a ‘hideous deformed beast’. In version 2 he took a different approach and we must say it came out looking pretty nice.

This time [Mat] went with a 3D printed case. He designed it himself in SketchUp. Unfortunately, [Mat] doesn’t have access to a 3D printer so he had to send it out to a professional printing company to the tune of £60 ($90). Although that was a large chunk of change, he was happy with the quality of the print. The final exterior dimensions of the case is 13 x 13 x 2.5 cm.

A quick look at the controls will remind anyone of an SNES controller. [Mat] took the innards of an SNES-like USB gamepad and modeled the new case around it. Not having to cut up or otherwise modify the controller PCB makes for an easy addition to the project. Conveniently, the width of the controller was just about the same as the 4.3 inch LCD used for the gamepad’s display. Both fit nicely together.

Under the hood is a Rasberry Pi running RetroPie. An internal 2600mAh Lithium Ion battery provides up to 3.5 hours of game play. Battery charging management is provided by an Adafruit Powerboost 500 which also has a micro USB port that makes connecting an external charger easy.

The Proper Use For A Gameboy Advance Carrying Case

About a decade ago, Nintendo released a Game Boy Advance carrying case in the shape of a Game Boy Advance. It was the obvious answer to the original brick Game Boy carrying case every eight year old had in 1990. This jumbo-sized Game Boy Advance case also makes a really good platform for a console mod, which is exactly what [frostefires] got when he put an N64 in one.

This isn’t the first time we’ve seen this bit of old Nintendo paraphernalia used to house an N64. A few years ago, [Hailrazer] used the same GBA carrying case as the body of an N64 build. There were a few shortcomings in that build, most importantly the removal of the D pad.  [frostedfires]’ build fixes this oversight.

Inside the GBA enclosure is a 4.3 inch screen, a replacement Gamecube joystick, an SNES D pad, and of course the entire N64 circuit board with a few modifications.

[frostedfires] entered this into a ‘Shark Tank’-ish  competition at school, and this build was so impressive he won first place. Link to the full build thread here.

Original Gameboy Gets Stuffed Full Of Cool Parts

Raspberry Pi Gameboy

One day at Good Will, [microbyter] came across an original Gameboy for $5. Who reading this post wouldn’t jump on a deal like that? [microbyter] was a little disappointed when he got home and found out that this retro portable did not work. He tried to revive it but it was a lost cause. To turn lemons into lemonade, the Gameboy was gutted and rebuilt into a pretty amazing project.

Looking at the modified and unmodified units, it is extremely obvious that there is a new LCD screen. It measures 3.5″ on the diagonal and is way larger than the 2.6″ of the original screen. Plus, it can display colors unlike the monochrome original. Flipping the unit over will show a couple of buttons have been added to the battery compartment door to act as shoulder buttons.

The brains of the project is a Raspberry Pi running Retropie video game system emulation software which will emulate a bunch of consoles, including the original Gameboy. The video is sent to the LCD screen via the composite video output. The Pi’s headphone jack is connected to a small audio amplifier that powers the original speaker that still resides in the stock location. Connecting the controller buttons got a little more complicated since the original board was removed. Luckily there is a replacement board available for just this type of project that bolts into the stock location, allows the use of the original iconic buttons and has easily accessible solder points. This board is wired up to the Pi’s GPIO pins.

Continue reading “Original Gameboy Gets Stuffed Full Of Cool Parts”

The Raspi GameBoy For The Rest Of Us

We’ve seen quite a few casemods that stuff a Raspberry Pi into a Game Boy with all the required to turn it into a very cool portable Pi and retro gaming device. Most of these builds use a modified 20-year-old Game Boy for the enclosure, and if you have an attachment to your old green screened friend, you might not want to cut it up for a Pi project. [Noe] over at Adafruit has a solution – a 3D printed Game Boy enclosure that turns a Pi and TFT screen into a barely pocketable Raspberry Pi, with all the buttons and batteries required for taking an installation of RetroPi on the road.

The PiGRRL, as this build is called, uses the Adafruit touchscreen TFT kit for the Pi, effectively turning the Pi into a very tiny tablet. This allows for normal desktop interaction with the Pi, and it’s also small enough to fit in the smallest of enclosures.

The 3D printed enclosure is the star of the show here, allowing complete access to most of the Pi’s ports, while allowing enough space in the rest of the enclosure for a largish battery, charging circuit, and buttons taken from an SNES controller.

The end result is a very usable portable Pi that just happens to be in the perfect form factor for loading up a few ROMs and playing some classic video games. Video below.

Continue reading “The Raspi GameBoy For The Rest Of Us”

The Credit Card Sized GameBoy

Think you’ve seen every possible type of Arduino based hand held video game? [Kevin] managed to coax something new out of the theme with a very clever credit card sized console that uses some very interesting construction techniques.

The inspiration for this project began when [Kevin] dropped an SMD resistor into a drill hole on a PCB. This resistor fell right through the hole, giving him the idea creating a PCB with milled cutouts made to fit SMD components. With a little experimentation, [Kevin] found he could fit a TQFP32 ATMega328p  – the same microcontroller in the Arduino – in a custom square cutout. The rest of the components including a CR2016 battery and OLED display use the same trick.

The rest of the design involved taking Adafruit and Sparkfun breakout boards, and modifying the individual circuits until something broke. Then, off to Eagle to create a PCB.

[Kevin]’s experiment in extremely unusual PCB design worked, resulting in a credit-card sized “Game Boy” that’s only 1.6 millimeters thick. The controls are capacitive touch sensors and he already has an easter egg hidden in the code; enter the Konami code and the Hackaday logo pops up to the tune of [Rick Astley]’s magnum opus.

Now [Kevin] is in a bit of a bind. He’d like to take this prototype and turn it into a crowd sourced campaign. In our opinion, this “Game Boy in a wallet” would probably do well on a site like Tindie, but any sort of large scale manufacturing is going to be a rather large pain. If you have any wishes, advice, of complaints for [Kevin] he’s got a few links at the bottom of his project page.

GameBoy Color Costume

game boy costume

Okay, okay. We know it’s November now, but when [John] sent this project in, we just had to share it. He made a fully functional Gameboy Color costume!

The costume makes use of a Raspberry Pi (located on his back), running RetroPie, which is an open source project dedicated to creating a universal console emulator.  To create the controllers he used two Teensy microcontrollers in his gloves, setup to emulate two USB keyboards on the Pi. Since he’s using Teensy 3.0, it supports capacitive touch sensing, so all he had to do was wire pieces of aluminum to the input pins to create touch-sensitive metal buttons on the gloves. He then slapped a cheap 10″ LCD from Adafruit onto his chest, stuffed a few 12V LiPo batteries in his pockets, and was ready to be the hit of any party he went to.

The costume was a great success, although a pesky pair of Mario and Luigi kept holding his hands all night… Stick around after the break to see a demonstration video!

Continue reading “GameBoy Color Costume”

Morse Code Transceiver Based On Gameboy Color Camera

Morse Code IR Transceivers

For their final project in a microcontrollers course, [Trudy] and [Josh] designed a pair of morse code transceivers. To send the message, they used an array of IR LEDs. The message is received using a Gameboy Color Camera, which takes care of basic image processing. This allows a 8-bit ATMega1284p microcontroller to handle transmitting and receiving messages.

The transmission LEDs form a square pattern with one LED in the center. The four outside LEDs are used to help the receiver locate the center LED, and the center LED is used for transmitting the message.

The Gameboy Color Camera is based on a M64282FP image sensor. This sensor uses an SPI-like protocol, which they implemented on the ATMega. It allows them to grab frames from the camera, and get the value of specific pixels. From this data they find the center LED and process the message.

The result can transmit messages of 200 letters at a time, but the speed is limited by the frame rate of the camera. If you have a Gameboy Color Camera lying around, their detailed write up might provide some inspiration and information on how to use it in a hack.