Foam And Antistatic Bag Bring Vintage Compaq Keyboard Back To Life

After winning an online auction for an 1980s vintage Compaq Portable PC, [leadacid44] discovered why it only cost him $5USD – the keyboard was shot. Not willing to accept having forked out $45USD to ship a brick, he tore into the ancient machine and came up with a found-material solution to the wonky keyboard.

[leadacid44]’s very detailed writeup of the fix for his Compaq includes a thorough examination of the guts of the machine. He got it to boot to MS-DOS 5.0 off of a 20MB ISA hard drive card and began probing the keyboard problem. It turns out the Compaq keyboard has much in common with a modern touchscreen, in that it’s a capacitive keyboard. Unfortunately the foam disks used as springs under each key cap had degraded over the last 30 years, so [leadacid44] began a quest to replace them. After much experimentation and a few false starts, he created a sandwich of transparency film, closed-cell polyethylene foam, and a Mylar antistatic bag. Many discs were punched out with a leather punch and tediously placed in the body of each key switch, and the quick brown fox was soon jumping flawlessly over the lazy dog.

We’ve seen some fixes to these lovable luggables before, like this dumpster queen that became a Hackaday Retro submission. At least [leadacid44]s machine didn’t release the Magic Blue Smoke like that one did.

DDR-ing A Simon Game With A Raspberry Pi

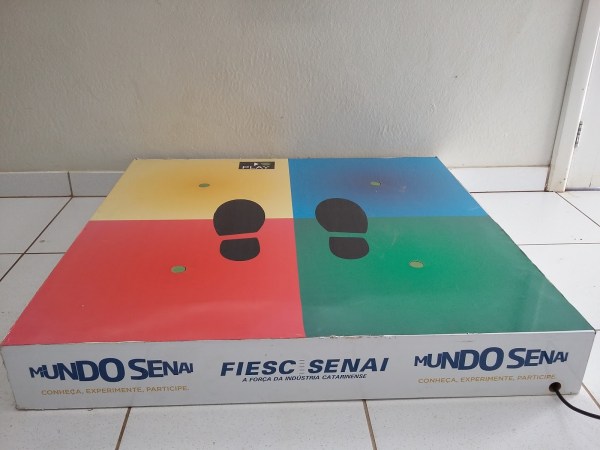
Since 1998 we’ve been privileged to partake in an arcade game known as Dance Dance Revolution, but before that, way back in the 70’s, was the Simon game. It’s essentially a memory game that asks the player to remember a series of lights and sounds. [Uberdam] decided to get the best of both worlds and mixed the two together creating this giant foot controlled Simon game. (English translation.)

The wood platform that serves as the base of the project was fitted with four capacitive sensors, each one representing a “color” on the Simon game. When a player stomps on a color, a capacitive sensor sends a signal to a relay which in turn notifies the Raspberry Pi brain of the input. The Pi also takes care of showing the player the sequence of colored squares that must be stepped on, and keeps track of a player’s progress on a projector.

This is a pretty good way of showing how a small, tiny computer like the Raspberry Pi can have applications in niche environments while also being a pretty fun game. We all remember Simon as being frustrating, and we can only imagine how jumping around on a wooden box would make it even more exciting. Now, who can build a robot that can beat this version of Simon?

Continue reading “DDR-ing A Simon Game With A Raspberry Pi”

Arduino Plays White Tiles On Your Mobile Touchscreen

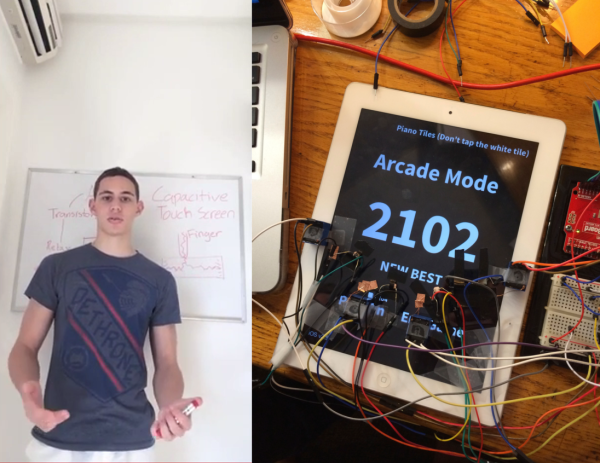
Like many mobile gamers, [Daniel] has found himself caught up by the addictive “White Tiles” game. Rather than play the game himself though,  [Daniel] decided to write his own automatic White Tiles player. While this hack has been pulled off before, it’s never been well documented. [Daniel] used knowledge he gleaned on Hackaday and Hackaday.io to achieve his hack.

The basic problem is sensing white vs black tiles and activating the iPad’s capacitive touch screen. On the sensing end, [Daniel] could have used phototransistors, but it turned out that simple CdS cells, or photoresistors, were fast enough in this application. Activating the screen proved to be a bit harder. [Daniel] initially tried copper tape tied to transistors, but found they wouldn’t reliably trigger the screen. He switched over to relays, and that worked perfectly. We’re guessing that changing the wire length causes enough of a capacitance change to cause the screen to detect a touch.

The final result is a huge success, as [Daniel’s] Arduino-based player tears through the classic game in only 3.9 seconds! Nice work [Daniel]!

Click past the break to see [Daniel’s] device at work, and to see a video of him explaining his creation.

Continue reading “Arduino Plays White Tiles On Your Mobile Touchscreen”

Desk lamp

Sleek Desk Lamp Changes Colors Based On Sun Position

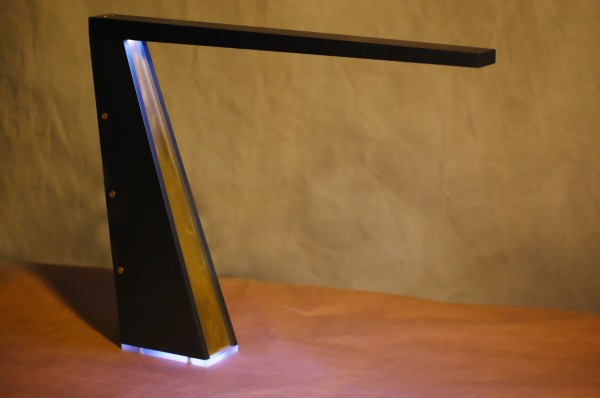
[Connor] was working on a project for his college manufacturing class when he came up with the idea for this sleek desk lamp. As a college student, he’s not fond of having his papers glowing brightly in front of him at night. This lamp takes care of the problem by adjusting the color temperature based on the position of the sun. It also contains a capacitive touch sensor to adjust the brightness without the need for buttons with moving parts.

The base is made from two sheets of aluminum and a bar of aluminum. These were cut and milled to the final shape. [Connor] found a nice DC barrel jack from Jameco that fits nicely with this design. The head of the lamp was made from another piece of aluminum bar stock. All of the aluminum pieces are held together with brass screws.

A slot was milled out of the bottom of the head-piece to make room for an LED strip and a piece of 1/8″ acrylic. This piece of acrylic acts as a light diffuser.  Another piece of acrylic was cut and added to the bottom of the base of the lamp. This makes for a nice glowing outline around the bottom that gives it an almost futuristic look.

The capacitive touch sensor is a pretty simple circuit. [Connor] used the Arduino capacitive touch sensor library to make his life a bit easier. The electronic circuit really only requires a single resistor between two Arduino pins. One of the pins is also attached to the aluminum body of the lamp. Now simply touching the lamp body allows [Connor] to adjust the brightness of the lamp.

[Connor] ended up using an Electric Imp to track the sun. The Imp uses the wunderground API to connect to the weather site and track the sun’s location. In the earlier parts of the day, the LED colors are cooler and have more blues. In the evening when the sun is setting or has already set, the lights turn more red and warm. This is easier on the eyes when you are hunched over your desk studying for your next exam. The end result is not only functional, but also looks like something you might find at that fancy gadget store in your local shopping mall.

The Nickelphone

nickelphone

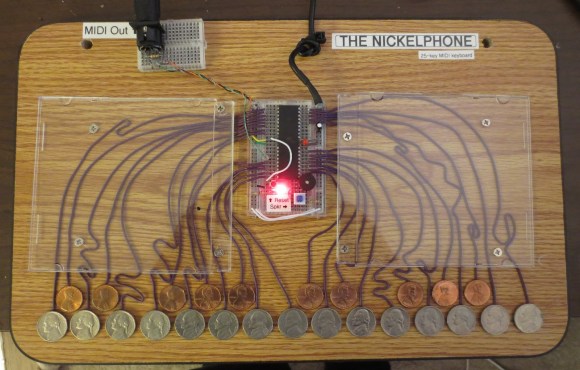
[Tyler Bletsch] sent us a tip about his new build: a keyboard that redefines “coin-operated.” The Nickelphone can emit square wave tones via a piezo buzzer, but [Tyler] made this 25-key piano as a MIDI keyboard capable of driving a full synthesizer.

He chose an ATMega644 as the brain because it’s Arduino-friendly but has more data pins—32—than the usual ATMega328 chip, which allows him to provide each key with its own pin. Each coin was soldered to its own wire and connects up to a 1MΩ resistor array. Coin-presses are recognized by the simple capacitive sensing technique outlined here, but [Tyler] needed to take advantage of a workaround to accurately detect multiple presses.

Check out [Tyler’s] detailed project guide for more information as well as the source code. Check out the video of the Nickelphone after the break, then browse through some other capacitive touch hacks, like the Capacitive Touch Business Card or the Capacitive Touch Game Controller.

Continue reading “The Nickelphone”

Asynchronous Fireflies Use Few Parts

led-firefly

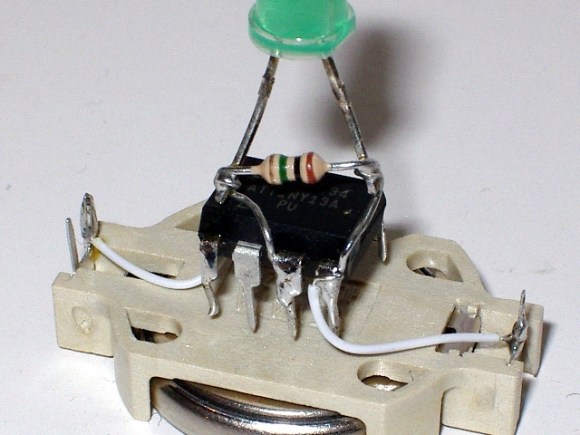
[Karl Lunt] wrote in to share his LED firefly project. His goals for the project were to develop a low-power, low parts count module that can sense when it’s dark and then mimic the blinking patterns you’d associate with its biological namesake.

We like his design which uses a coin cell battery holder as the chassis for the project. The ATtiny13 driving the hardware is held in place by the two power wires. This lets him flash new firmware by rotating the chip and plugging in a little adapter he build. The LED connection might look a bit peculiar to you. It has a resistor in parallel, which doesn’t satisfy the normal role of a current limiting resistor. That’s by design. [Karl] is driving the LED without any current limiting, which should be just fine with the 3V battery and short illumination time of the diode. The resistor comes into play when he uses the LED as a light sensor. Past firefly projects included light dependent resistors to detect light and synchronize multiple units. [Karl] is foregoing the LDR, using the LED with a resistor in parallel to combat the capacitive qualities of the diode. As we mentioned, this senses ambient light, but we’d love to see an update that also uses the LED to synchronize a set of the devices.

Fruit Piano Uses A Different Circuit Than The Makey Makey

screen

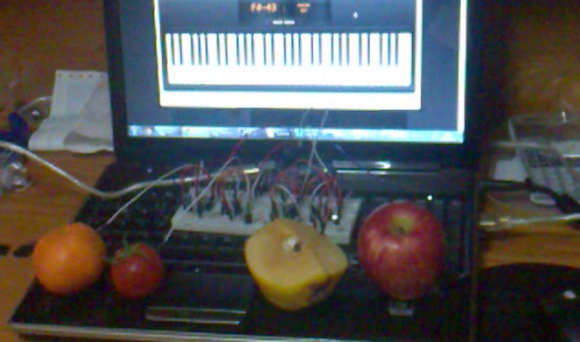
[Hasbi Sevinç] is using perishable goods in his electronics project. The orange, tomato, and two apples seen above act as keys for the virtual piano. The concept is the same as the Makey Makey which is often demonstrated as a banana piano. This implementation uses an Arduino to read the sensors and to connect to the computer running the piano program.

You can see there’s a fair amount of circuitry built on the breadboard. Each piece of fruit has its own channel to make it into a touch sensor. The signal produced when your finger contacts the food is amplified by transistors connected in a Darlington pair. That circuit drives the low side of a optoisolator transmitter. The receiving side of it is connected the I/O pin of the Arduino. You can see the schematic as well as a demo clip after the break.

This use of hardware frees up a lot of your microcontroller cycles. That’s because projects like this banana piano use the timers to measure RC decay. [Hasbi’s] setup provides a digital signal that at most only needs to be debounced.

Continue reading “Fruit Piano Uses A Different Circuit Than The Makey Makey”